For complete system requirements for the IBM UrbanCode Deploy server, agent, and related systems, see IBM UrbanCode Deploy - System Requirements.
For a list of supported web browsers for IBM UrbanCode Deploy, see the Prerequisites tab of Detailed System Requirements.
You must have a Rational® Common Licensing server with available licenses. See License management.
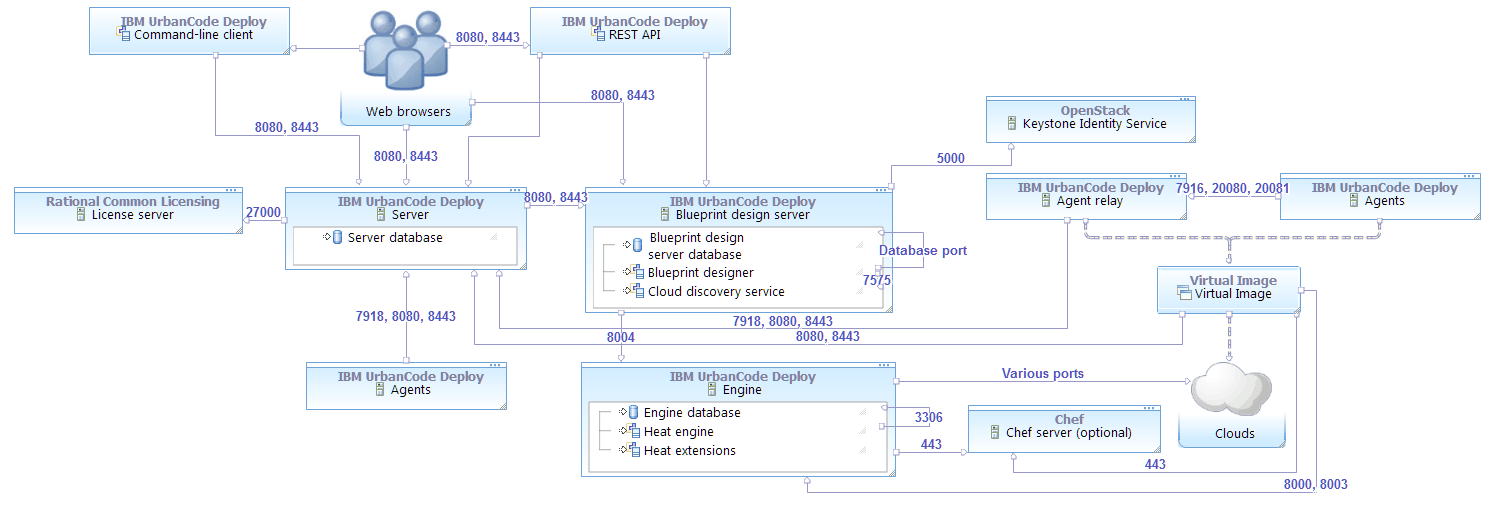
The following diagram shows the default port numbers that IBM UrbanCode Deploy uses for communication. Most of these ports can change depending on your choices at installation time. The following diagram is only a summary of the defaults.
For more topologies, see Systems overview.
- The server must be able to initiate connections to the license server. The default port for Rational Common Licensing is 27000. However, in some situations, the server uses different ports to connect to the license server. For more information, or to change the port, see http://www-01.ibm.com/support/docview.wss?uid=swg21454410.
- The server must be able to accept connections from agents and agent relays. By default, agents and relays connect on port 7918.
- Users and agents that do not use a relay must be able to initiate connections to the server through HTTP or HTTPS. The default ports are 8080 for HTTP and 8443 for HTTPS.
- Installing agents remotely on Linux or UNIX systems requires the server to initiate connections to the SSH port of the agent computer. The default port for SSH is 22.
- Remote discovery of agents requires the server to initiate connections to port 22 for Linux agents and port 135 for Windows agents.
- The server might require access to other ports if you connect to external systems, such as an SMTP server for notifications or to cloud systems that use virtual system patterns, like PureApplication System or IBM Cloud Orchestrator.
- Agents must be able to open network connections on the agent relay JMS port. The default agent relay JMS port is 7916.
- Agents must be able to open network connections on the agent relay HTTP proxy port. The default agent relay HTTP proxy port is 20080.
- Installing agents remotely on Windows systems requires the WinRS agent to initiate connections on ports 80 and 5985 on the target computer.
- If you are using artifact caching as described in Agent security and communication, agents must be able to open network connections on the agent relay artifact caching port. The agent relay artifact caching port is 20081.
- Agents run steps from automation plug-ins and source configuration plug-ins. Some of these steps require that agents create network connections to an external system.
- Agent relays must be able to open network connections on the server JMS port. The default server JMS port is 7918. It is possible to reverse the direction of the initial connection using a network relay, but doing so is deprecated.
- Agent relays must be able to open network connections on the server HTTP and HTTPs ports. The default HTTP(S) ports are 8080 and 8443. It is not possible to reverse the direction of this connection.
- Agents must be able to open network connections on the server JMS port. The default server JMS port is 7918.
- Agents must be able to open network connections on the server HTTP and HTTPS ports. The default HTTP(S) ports are 8080 and 8443.
- Agents run steps from automation plug-ins and source configuration plug-ins. Some of these steps require that agents create network connections to an external system.
- You can install the blueprint design server on Windows or Linux operating systems. Linux operating systems must have access to repositories for installing required packages. The operating system must have the most recent package updates. For more information, see Installing and Managing Software in the Red Hat Enterprise Linux customer portal. In most cases, the blueprint design server needs access to the Internet to download prerequisites, but you can also configure an internal package manager for these required packages. The cloud discovery service is automatically installed as part of the blueprint design server installation process.
- Make sure that the appropriate ports are open. See Ports, protocols, and services.Note: If you install the blueprint design server on the same computer where you installed the server, you must use different ports.
- You need an OpenStack Keystone server. See http://keystone.openstack.org.Note: If you install a heat engine, you can choose to install a Keystone server during the engine installation process.
- If you install the blueprint design server on a Windows operating system, your paths cannot contain more than 250 characters.
- Virtual images must meet the requirements in Configuring images for use with the blueprint designer.
- The blueprint design server requires a Heat orchestration engine. By default, the blueprint design server uses port 8004 to communicate with the engine.
- The IBM UrbanCode Deploy installer can install engines for the blueprint design server only on Red Hat Enterprise Linux, version 6, service level 4 or later service levels within version 6. No other operating system is supported, including Red Hat Enterprise Linux, version 7 or later. To use a different operating system, you can install an OpenStack Heat engine manually on that operating system and then extend that engine for use with the blueprint design server; see Extending Heat orchestration engines.
- The installer installs only OpenStack Juno engines. To use a different version of OpenStack, you can extend an existing Heat engine of that version; see Extending Heat orchestration engines. You can extend OpenStack Icehouse, Juno, and Kilo engines for use with the blueprint design server.
- The operating system must have the most recent package updates. For more information, see Installing and Managing Software in the Red Hat Enterprise Linux customer portal.
- You can install the engine and blueprint design server on the same computer or on different computers.
- The operating system must have access to Yum repositories for installing required packages. In most cases, the engine needs access to the Internet to download prerequisites, but you can also configure an internal package manager for these required packages.
- IBM SoftLayer®
- Amazon Elastic Compute Cloud
- VMware vCenter Server 5.5 to 6.0. To model network resources, VMware NSX is required; see Modeling new network resources.
- OpenStack and clouds that are based on OpenStack, such as IBM Cloud Orchestrator, version 2.4. The blueprint design server supports OpenStack and OpenStack-based clouds on the Icehouse, Juno, and Kilo levels. To provision environments on these clouds, an engine that has the matching OpenStack version is required.
- Because agent activity can sometimes become resource intensive, agents are usually installed on systems other than the one where the IBM UrbanCode Deploy server is located.
- When possible, install the server as a dedicated user account. However, IBM UrbanCode Deploy runs well as a root user (or local system user on Windows), and running this way is the easiest method to avoid permission errors.
- Install the agent as dedicated system account. Ideally, the account is dedicated to IBM UrbanCode Deploy. Because IBM UrbanCode Deploy agents run remote commands, it is best to create a user specifically for the agent and grant this user only the appropriate privileges.
- Installing multiple agents on the same system is not necessary because a single agent can run parallel deployments as different users. While idle agents use minimal resources, many agents on the same system might have a noticeable impact.
- For best server performance, install the server on a system that is dedicated to the server and does not run any other major software.
- For servers on Linux or UNIX, if the server is connected to many agents (400
or more), increase the process and file limit for the server. For example, for Red Hat
Enterprise Linux, version 7, use the /etc/security/limits.conf
file. For Red Hat Enterprise Linux, version 6, or AIX, use the
/etc/security/limits.d/90-nproc.conf file. Add the following
lines to the appropriate file and then restart the server
computer:
Use the name of the operating system user that is running the server for deployUser.deployUser soft nofile 60000 deployUser hard nofile 60000 deployUser soft nproc 65535 deployUser hard nproc 65535Similarly, if an agent relay connects to many agents, increase the process and file limit for the relay in the same way.