IBM Tivoli Provisioning Manager for OS Deployment, Version 7.1.1.16

Using an alternative database on Windows for Tivoli Provisioning Manager for OS Deployment

About this task

If installed straight out of the box on Windows, Tivoli® Provisioning Manager for OS Deployment sets up a Microsoft Access database that is used for storing all parameters and target inventory. You do not need MS Access to use it, the MDAC component of Windows 2003/2008 (and freely available for other versions of Windows from the Microsoft Web site) is sufficient for Tivoli Provisioning Manager for OS Deployment to work.

Although this database is sufficient for using Tivoli Provisioning Manager for OS Deployment with a few hundred targets, you must customize or convert the database for integration into a corporate environment. This is in particular the case if you set up a multiserver infrastructure requiring a database allowing concurrent access (which Microsoft Access does not). Tivoli Provisioning Manager for OS Deployment database access supports custom databases, and the databases listed in Table 2.

If you want to use your own ODBC source, ensure that it was created as a System DSN (not a User DSN), because it has to be usable by the IBM® Tivoli OS Deployment Server service.

To install the product with an alternative database on Windows, follow these steps:
Procedure

  1. Create an empty database. The OS deployment server automatically populates the database with the necessary tables.
  2. Create an ODBC system DSN from the computer on which you want to install the OS deployment server to your database. You must name the DSN AutoDeploy (case sensitive).
    Note: If you install Tivoli Provisioning Manager for OS Deployment before creating the ODBC DSN, or if you fail to name the DSN AutoDeploy, the Tivoli Provisioning Manager for OS Deployment installer will create a local database for this OS deployment server.
  3. Run the installation wizard.
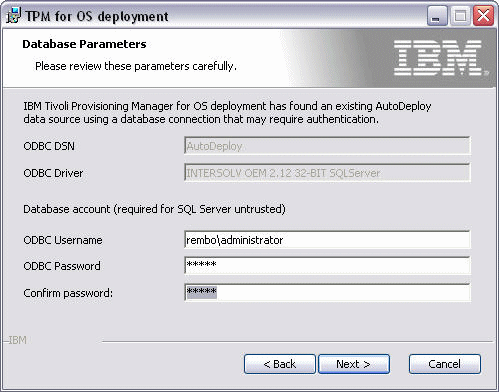
  4. At the very end of the installation process, you are prompted for an account to use the ODBC gateway (as shown in Figure 1). The account information that must be given at this stage is for access to the database. It does not need to correspond to the login for access to the OS deployment server or to the web interface.
    Figure 1. ODBC account
    Artwork for rad_replica0
  5. If your specified user account does not have the right to log on as a service, update your local security settings. To update your settings on a Windows 2003/2008 server, click Control Panel > Administrative Tools > Local Security Policy > Local Policies > User Rights Assignments > Log on as a service.


Feedback