subscribe iconSubscribe to this information
POWER6 information

Replacing the disk drive using AIX

Use this procedure to remove and replace a disk drive concurrently with the AIX® operating system.
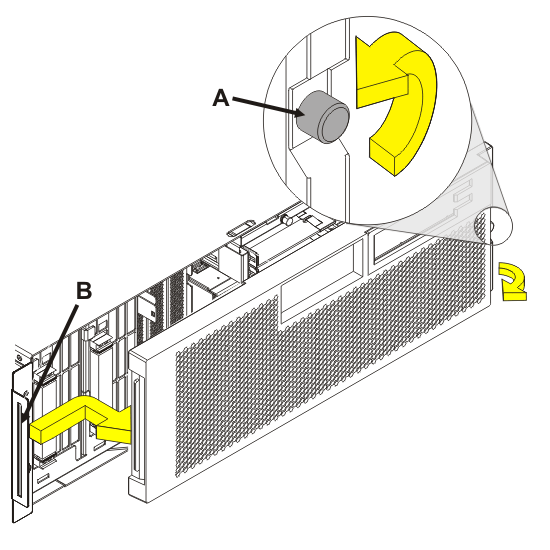
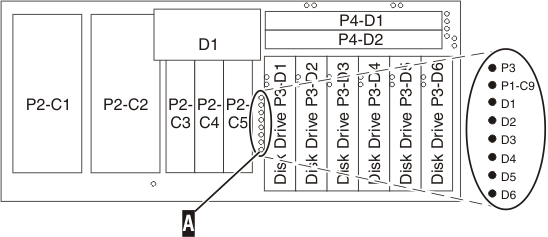
  1. Access the unit by:

    1. Open the front rack door.
    2. Loosen the thumbscrew (A) on the right side of the cover.
    3. Slide the cover to the right and remove it from the system unit slot (B).
  2. Remove the disk drive as a resource:

    1. Log in as root user or use CE Login.
    2. At the command line, type diag and press Enter.
    3. Press Enter to continue.
    4. On the Function Selection display, select Task Selection.
    5. Select Hot Plug Task.
    6. Select RAID Hot Plug Devices.
    7. Select the adapter that is connected to the array that contains the disk drive you want to replace and press Enter.
    8. Select Commit.
    9. On the Identify and Remove Resources display, select Identify.
    10. Select the disk drive you want to remove and press Enter.

      The disk drive slot enters the identify state. The concurrent maintenance light for the slot begins flashing. The following figures show the locations of the concurrent maintenance lights A. Verify that the flashing light corresponds to the location for the disk drive you want to remove, and press Enter.

      The disk drive slot exits the identify state.

    11. On the Identify and Remove Resources display, select Remove.

      A list of the disk drives that you can remove is shown. If the disk drive you want to remove does not appear on the list, ask your system administrator to put the disk drive in the failed state before continuing with this procedure. For information, see AIX System Management Guide: Operating System and Devices.

    12. Select the disk drive you want to remove and press Enter.

      The disk drive slot enters the remove state and power is removed from the slot. The concurrent maintenance light for the slot begins flashing rapidly.

    Note: If the disk drive slot is not in the Remove state, contact your next level of support.
  3. Remove the disk drive by:
    1. Unlock the disk drive handle by squeezing it and pulling it out toward you as shown.
    2. Support the bottom of the disk drive as you slide it out of the system or expansion unit. Do not hold the disk drive by the handle.

      The concurrent maintenance light for the slot turns off when you remove the disk drive.

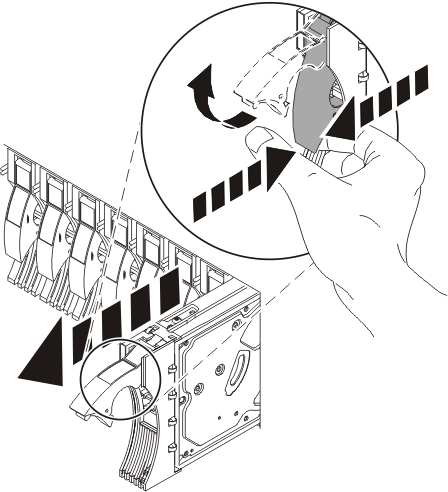
  4. Install the bezel on the new disk drive:
    1. Find the package that contains the new disk drive.
      Attention: Disk drives are fragile. Handle with care.
    2. Remove the disk drive from its static protective package.
    3. Unlock the handle of the replacement disk drive by squeezing and pulling it out toward you. If the handle is not all the way out, the disk drive will not slide into the system.
    4. Attach the disk drive bezel (A) to the replacement disk drive as shown.
    5. Press in and then tighten the thumbscrew (B) to secure the bezel to the disk drive.
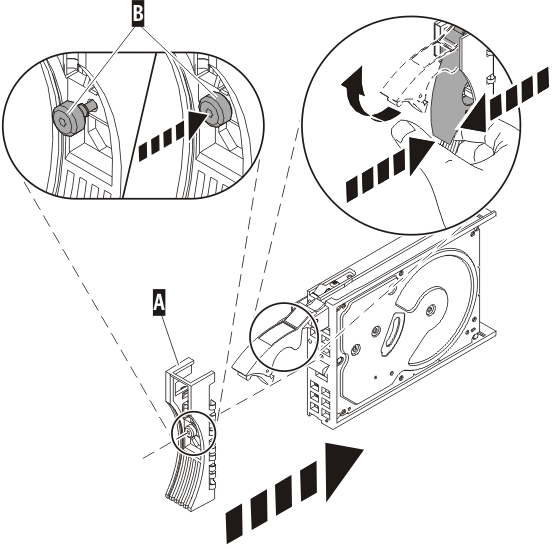
  5. Install the disk drive:
    1. Support the bottom of the disk drive as you align it with the guide rails in the system unit. Do not hold the disk drive by the handle.
    2. Slide the disk drive into the system until it stops.
    3. Push the disk drive handle in until it locks.
      Note: It is important to ensure that when installing a disk drive, that the drive is fully seated and all the way into the system.
  6. Add the new disk drive as a resource:
    1. Press Enter.

      The disk drive slot exits the Remove state and enters the Normal state.

    2. Exit to the RAID Hot-Plug Devices menu. Press the F3 or ESC 3 key to return
    3. Exit to the Task selection display.
    4. Select Log Repair Action.
    5. Select the disk drive that you replaced and then press Enter.
    6. Select Commit after you have made your selection and then press Enter.
    7. Exit to the command line.
  7. To rebuild data on the replacement disk drive, refer to the information for the controller to which the disk drive is attached:

    • If the disk drive is attached to a PCI-X SCSI RAID controller, see the PCI−X SCSI RAID Controller Reference Guide for AIX.
    • If the disk drive is attached to a PCI SCSI RAID adapter (feature code 2498), see the PCI 4−Channel Ultra3 SCSI RAID Adapter Reference Guide.

    For more information, see the AIX System Management Guide: Operating System and Devices.

  8. Go to Verifying a repair. This completes this procedure.

Send feedback | Rate this page

Last updated: Mon, April 25, 2011