Installing the 7042-CR7 and 7042-CR8 into a rack
Learn how to install the 7042-CR7 and 7042-CR8 Hardware Management Console (HMC) into a rack.
Complete a parts inventory. The following illustrations show the items that you need to install the server in the rack cabinet. If any items are missing or damaged, contact your place of purchase.
Figure 1. Cable management arm box contents
Figure 2. Rail box contents
Note: You will need both the slide rail box and the cable management
arm box for this installation.
To install a 7042-CR7 or 7042-CR8 HMC into a rack, complete
the following steps:
- Select an available 1 unit or 2 unit space (depending on
the server you are installing) in your rack to install your server. Figure 3. Identifying a rack space
 Note: When you install a 2 unit server, be sure to install the slide rails in the lower U of the 2 U area in the rack.
 - Each slide rail is marked as Left Front/Rear or Right
Front/Rear on its end. Select one of the slide rails and
pull the rear bracket all the way back until it clicks into place. Figure 4. Slide rail and the movable tab
 Note: Ensure that the movable tab remains extended and does not click back into place.
 - From the front of the rack, line up the two pins on the
rear of the slide rail in the selected U on the rear of the rack.
Push the rails so that the pins go into the holes and slide the rails
into the rack to lock the rear of the slide rails into the rack. Figure 5. Align the pins with the holes in the rear of the rack
 Note: If you are installing the slide rails into a 1 U space with devices already installed directly above and below this 1 U space, you must extend the rails to slide the rear of the slide rails into the rear of the rack.
 - Open the front slide rail latch. If they are closed when
you receive them, open the latches by pushing the blue button in and
by pushing the latch back. Figure 6. Front slide rail latch

- Pull the slide rails forward and locate the front latches
in the appropriate U spaces in front of the rack EIA rails. Adjust
the length of the rails. Ensure that the front end is being rotated
into position with the front latch in front of the EIA rail of the
rack. Figure 7. Rack front rail and pins

- Press the blue button to close the bracket with the pins.
Moving the slide rail up and down to ensure that the rail is fully
engaged. Repeat steps 1 - 5 to install the other rail into the rack.
Ensure that each front latch is fully engaged. Figure 8. Rack front rail and pins

- Pull the slide rails forward (1) until
they click, twice, into place. Carefully lift the server and tilt
it into position over the slide rails such that the rear nail heads (2) on
the server line up with the rear slots on the slide rails. Lower the
server down until the rear nail heads slip into the two rear slots,
and then slowly lower the front of the server (3) until
the other nail heads go into the other slots on the slide rails (by
hearing the clicks twice). Ensure that the front latch covers the
front nail head such that the system is secured to the slide rails. Figure 9. Slide rails extended, server nail heads aligned with slots in rail
 Figure 10. Lift points
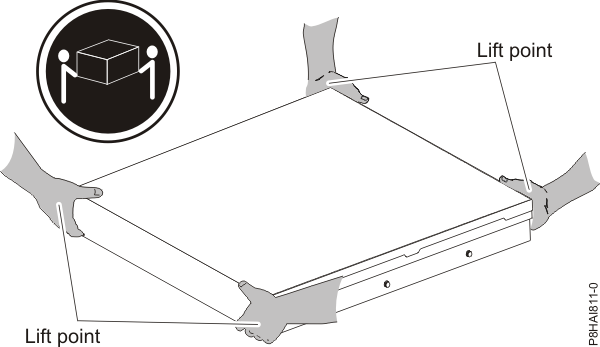 Note: Use safe practices while lifting. If you are installing a 2 U server, ensure that you have two people when lifting the server. Their hands must be positioned as illustrated in Figure 10.
 - Lift the locking levers (1) on the
slide rails and push the server (2) all the
way into the rack until it clicks into place. Figure 11. Release latches and server

- The cable-management arm can be installed on either side
of the server. The following figure shows it being installed on the
left side. To install the cable-management arm on the right side,
follow the instructions and install the hardware on the opposite side.
Connect one end of the support arm (1) to the
same slide rail to which you plan to attach the cable-management arm
so that you can swing the other end of the support arm (2) toward
the rack. Figure 12. Support arm connection

- Connect the other end of the support arm to the cable-management
stop bracket (1). Turn the bracket (2) to
secure it to the support arm. Figure 13. Cable-management stop bracket secured to the support arm

- The capital letters I and O are
printed on cable management arm pins to identify the inside and outside
pins. Install the cable management stop bracket (with capital letter O)
on the unattached end of the support arm. Ensure that the support
arm is securely installed. Figure 14. Connecting the stop bracket to the slide rail

- Place the cable-management arm on the support arm. Pull
out both the inside and the outside pins of the cable management arm
and then slide the cable management arm tabs into both the inside
and the outside slots of the slide rail. Push the tabs until they
snap into places. Figure 15. Cable-management arm connection

- To make it easier to rotate the cable management arm on
and off the cable management support arm, you can open the stop bracket
by pushing the tabs above and below the stop bracket for closing it. Figure 16. Cable management support stop bracket

- Attach the power cords and other cables to the rear of
the server (including keyboard, monitor, and mouse cables, if required).
Route the cables and power cords on the cable-management arm and secure
them with cable ties or hook-and-loop fasteners. Note: The location of the cable straps might be slightly different in different systems. Use the cable straps that are provided on the rear of the system to retain the cables and prevent them from sagging.Figure 17. Power cord attachment and cable routing

- Cables must be bundled with a hook-and-loop fastener for
proper movement of the cable management arm. Note: Ensure that the cables do not sag below the U space so they do not get caught on the lower systems. Allow slack in all cables to avoid tension in the cables as the cable-management arm moves.Figure 18. Hook-and-loop fastener

- If you are shipping the rack with the system installed
or if you are in a vibration-prone area, insert the M6 screws to the
rear of the slides. Use a cable tie to secure the free end of the
cable management arm to the rack if needed. Figure 19. Securing the server for shipping
