Product Documentation
Abstract
This document contains attached documents that describe how to configure ClearQuest for single sign-on with Lightweight Third-Party Authentication (LTPA), OpenID Connect, and Security Assertion Markup Language 2.0 (SAML2).
Content
Introduction
Single sign-on (SSO) prevents the need to sign on to multiple applications separately. Rather than having to sign on for each application, the user signs in once at an identity provider (IP) and this provides tokens to provide to other web applications and services. A token is like an ID card. You show it wherever you go and it is trusted in many places. If the ID card is trusted, you can do things such as rent a car, buy a magazine, fly on a plane, and so forth. The same goes for SSO tokens. For any application that is set up to trust the token, it will allow you to log in to that application as the authenticated user. SSO makes using many different applications easier and more secure because you need only to log in once and you only do so on the trusted login site.
Authentication and authorization are separate in SSO. The first time a user connects to one of the applications, the user must authenticate by logging in. When the token is valid (usually in 24 to 48 hours), the user does not need to authenticate again. Instead the previously obtained token is used to authorize access to the application.
Choosing an IP
Of the SSO standards available, ClearQuest supports these standards:
· OpenID Connect (OIDC)
· Security Assertion Markup Language 2.0 (SAML2)
· Lightweight Third-Party Authentication 2 (LTPA2)
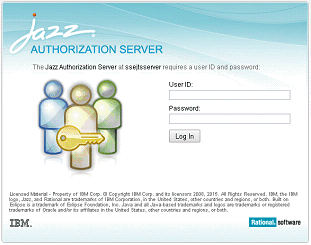
Of these, OIDC and SAML2 have a user experience that is more consistent and configurable. These two provides automatic redirects to the IP login site. This login site is usually customizable to provide a consistent login page that provides information about your enterprise and what applications might be available to the user. For example, Jazz Authorization Server (JAS) provides a login page you can customized. The default login page is shown below. The users logging in always see this same login page and will trust it when asked for their credentials.
Many SAML2 providers also have customizable login pages.
LTPA2, on the other hand, uses the browser’s basic authentication capability, which is a pop-up window that asks for a username and password. It might be confusing trying to figure out to what you are logging in.
If you have OIDC or SAML2 capability, we supply a script that can automate most of the OIDC and SAML2 setup for you. The script includes template configuration files you can use to as a starting point. The templates will work with a Liberty-based OpenID Connect provider (e.g. Jazz) and with IBM Security Access Manager. Included is also a template file you can use for configuring ClearQuest with Okta Single Sign On.
ClearQuest SSO support is available as of version 8.0.1.13 and 9.0.0.3. Improved support is available in 8.0.1.14 and 9.0.0.4, so these or later versions are recommended.
Configuration
Setting up SSO can be a complicated and time-consuming process. It involves a combination of setup on the WebSphere Application Server (WAS), ClearQuest, and the IP. We have written a script to automate most of the process. The script only works for OIDC and SAML2 (this might change in the future), and there are still some manual steps you will need to do. We recommend using one of these two SSO technologies and the supplied script for setting up SSO.
If you must use LTPA2, documentation for setting it up is attached to this page. Also attached are detailed instructions for setting up SSO with OIDC and SAML2 if you want to do so manually.
Using the Setup Script
About the script that automates most of the SSO setup for OIDC and SAML2, it needs a configuration file (examples are provided). Running the script does most of the setup steps for you. It does 100% of the setup for CQ Web and WebSphere, but you still must do some steps on the IP side.
For OIDC, you need to register the CQ Web application as a client of the SSO service. How you do this depends on which IP provider you use. For JAS, a command line tool is provided in the cli directory called ldclient. For a basic Liberty OIDC IP, you can add the registration directly into the server.xml. The OIDC standard provides for a REST interface that lets you register the client using a POST command. Instructions for how to register CQ Web are provided once the script finishes running. In addition, the script produces two files that you could use for the registration process: a JSON file that you can use for JAS/cli or REST POST, and an XML file with a snippet of XML that you could use for a server.xml based client registry.
For SAML2, clients and IPs exchange information using metadata files. As part of the script configuration, you will have provided the script a metadata file for the IP. When the script finishes running, it will produce a metadata file that you can import at the IP. This metadata file contains information about the SSO client (CQ Web) and what certificates it uses and should be trusted.
For information about how to create an SSO configuration file, see the example configuration files that come with the script.
When using the script, keep in mind:
- The cqssosetup.pl script must be run from the directory in which it was unzipped. There are supporting scripts in that directory that are used during setup.
- If your SSO configuration is not in ssoconfig.txt, you must specify the full path to it using the
-config option. - The script should be run with cqperl. This means that on Linux/UNIX you must source cq_setup before you can run it.
- When creating your CQ Web profile, you must enable administration security. If it is not already enabled, you must enable it. Consult the WebSphere documentation on how to do this.
Plugin Configuration
As part of the SSO for OIDC and SAML2, you will have added a new web service to your WAS profile. This service helps with the SSO parts. The service that was added depends on which SSO technology you use.
If you have configured http/https redirection (for example, CQ Web URL without a port), additional changes are required to the WebSphere plug-ins to ensure SSO properly forwards ports. Without these changes, you will see this error:
CWOAU0062E: The OAuth service provider could not redirect the request because the redirect URI was not valid. Contact your system administrator to resolve the problem
The configuration is mostly performed in the WAS console and assumes that you are familiar with a workaround that was needed to enable https redirect.
The plugin-cfg.xml file to modify is not located in <WebSphere>\Plugins as expected. A way to finding the file is to re-propagate your working plugins file in the WAS Console.
The process to do that:
- Log in to the WAS console.
- Select Servers>Server Types>Web Servers.
- Select webserver1, and click Propagate Plug-in
- Notice the location from which the plugins are propagated from.
When you know where the actual plugins file is, find it in the file system and open in your text editor. - Find this section of the file:
<UriGroup Name="default_host_server1_dfltNode_Cluster_URIs">
<Uri AffinityCookie="JSESSIONID" AffinityURLIdentifier="jsessionid" Name="/cqweb/*"/>
<Uri AffinityCookie="JSESSIONID" AffinityURLIdentifier="jsessionid" Name="/TeamWeb/*"/>
<Uri AffinityCookie="JSESSIONID" AffinityURLIdentifier="jsessionid" Name="/oslc/*"/>
<Uri AffinityCookie="JSESSIONID" AffinityURLIdentifier="jsessionid" Name="/cqemailrelay/*"/>
<Uri AffinityCookie="JSESSIONID" AffinityURLIdentifier="jsessionid" Name="/help/*"/>
<Uri AffinityCookie="JSESSIONID" AffinityURLIdentifier="jsessionid" Name="/ivt/*"/>
</UriGroup> - Add /oidcclient/* or /samlsps/acs to this UriGroup, for example, for OIDC:
<Uri AffinityCookie="JSESSIONID" AffinityURLIdentifier="jsessionid" Name="/oidcclient/*"/> - Or, for SAML2:
<Uri AffinityCookie="JSESSIONID" AffinityURLIdentifier="jsessionid" Name="/samlsps/acs/*"/> - Save the file and log back into the WAS console.
- You can now propagate the plugin to the correct file, Servers>Server Types>webserver1
- Select webserver1, and click Propagate plug-in.
- Click Save at the top of the screen to commit this change
- Restart services
Now, SSO with https://<hostname>/cqweb will work.
End User Experience
When SSO is configured for ClearQuest, the user experience is a little bit different. If the user has not already authenticated, then the user is asked to authenticated. How this looks depends on which SSO IP you use and how you customize it. OIDC and SAML2 typically provide the most user-friendly experience.
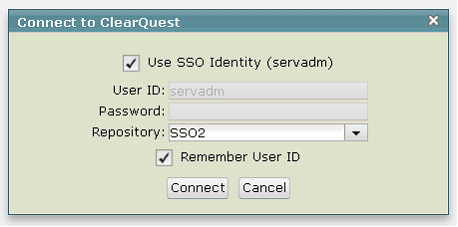
If only a single repository and database exist (not including test databases), then once the user is authenticated, CQ Web logs them in to that database automatically. If more than one repository or user exists, then you are presented with the Connect to ClearQuest dialog (as shown below). The username is pre-populated with the SSO user and the password is blank. Both are disabled because you are using SSO to connect.
You can log in to ClearQuest as a different user than the one you authenticated with using SSO. If you have already connected to a ClearQuest database, then log out first. When you see the login dialog, you can clear the Use SSO Identity checkbox. This re-enables the User ID and Password fields so that you can log in as a different user. CQ Web will remember this the next time you need to log in, whether it is after you log out, or the next time you load the browser. Similarly, you can select Use SSO Identity again to use the SSO identity. This too is remembered for the next time.
Limitations
Note the following limitations:
- When configuring Jazz/ClearQuest integrations with JAS SSO (OIDC), all Jazz integrations must use the same JAS SSO provider.
- JAS SSO is the only SSO supported for ClearQuest integrated with Jazz applications. LTPA2 and SAML2 SSO configurations have not been tested with CQ/Jazz integrations, but they might still work.
- When using Jazz/CQ integrations, you can only use the identity provided by the SSO authorization. For example, you cannot switch to a manual (non-SSO) login and continue to use the CQ/Jazz integration.
- For WebSphere and HTTP, use SSL certificates that are trusted
- CQ Web SSO has not been tested in load-balanced configurations.
- The SSO login will be assumed to be the ClearQuest login. However, the ClearQuest login can be mapped to a ClearQuest user using LDAP mapping. If the SSO login is an email, for example, you can use LDAP to map it to a ClearQuest user.
- Once a CQ Web server is configured for SSO, it can only be accessed if the user has an SSO account, even if they do not want to login as a SSO user.
- You cannot log out of SSO from ClearQuest. You must logout of SSO at the SSO IP. You can also clear cookies from the browser and that will effectively log you out.
- A CQ Web server that is both configured with JAS SSO and integrated via OSLC with Jazz applications (for example, CCM, RQM, GC), cannot be used for standalone Open Services for Lifecycle Collaboration (OSLC). Set up a separate CQ Web server for standalone OSLC requests.
Was this topic helpful?
Document Information
Modified date:
29 September 2018
UID
swg27049409