Question & Answer
Question
This Technote provides steps to enable SSL/HTTP for TM1Web, pmpsvc, and pmhub web applications for TM1 10.2.2 and Planning Analytics 2.0 Local using the IBM Java IKeyMan tool. To configure custom SSL certificiates without the use of IKeyMan please see: http://www-01.ibm.com/support/docview.wss?uid=swg21998395
Answer
To configure custom SSL certificates for Tomcat (TM1 10.2.2) or WebSphere Liberty Profile (PA 2.0 Local) the encryption certificate must be replace in the appropriate keystore.The IBM Java IKeyMan tool can be used to accesses these keystore files, remove the default encryption certificate, request a new encryption certificate, and import a signed encryption certificate.
Steps:
1 - Run the IKeyMan tool. This is found in the ./tm1_64/bin64/jre/7.0/bin/ directory of the TM1 installation, or in the IBM JRE installation if Linux or AIX is used.
2 - Open the appropriate keystore file. For TM1 10.2.2 this is the ./tm1_64/configuration/encryptkeypair/jEnckeystore file, and for PA 2.0 Local this is the ./tm1_64/configuration/certs/CAMKeystore file.
To open the keystore file click the open keystore button (![]() ), and select the file. The keystore database type is PKCS12.
), and select the file. The keystore database type is PKCS12.

The default password for the jEncKeystore and CAMKeystore file is NoPassWordSet
2 - Switch to the Personal Certificates section to examine the certificate with the label encryption.

The details of the certificate can be examined by double clicking on the certificate. The default encryption certificate provided by IBM is issued to CN=CAMUSER and issued by CN=CA.
We need to replace this certificate with our own certificate that will be issued to the name of the server running TM1Web. Select the encyprtion certificate and click the Delete button on the right side of the IKeyMan tool.
3 - Switch to the Personal Certificate Requests section and click the New... button, or click the New Personal Certificates Request button (
Fill in the details of the request as follows.
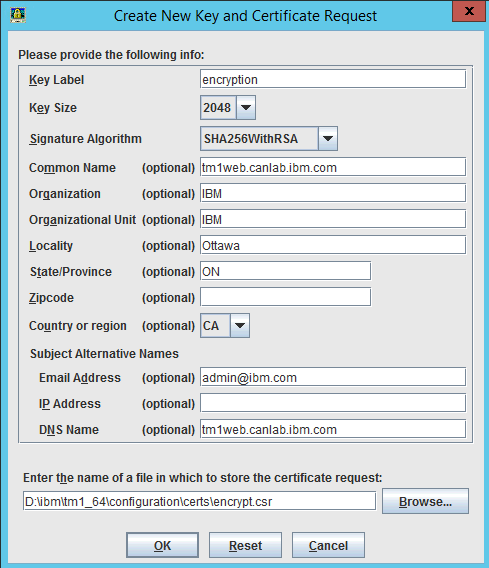
The Key Label must be encryption, Key Size 2048, and Signature Algorithm SHA256WithRSA.
Setting a Subject Alterative Name DNS Name is also strongly recommended as web browsers are starting to require a proper SAN to validate the certificate.
Set the name and location of the certificate request file.
At this point it is suggested to backup the jEncKeystore of CAMKeystore file. The certificate request process also generated a unique private key in the keystore. The certificate that will later be imported into the keystore is paired with the unique private key. If the keystore file is deleted or damaged after the certificate request file is generated, it will not be possible to import the certificate issued based on the request.
4 - The certificate request file must be provided to the signing certificate authority (CA). The CA will provide one or more files containing the signed encryption certificate and all required CA certificates in the chain.
5 - In IKeyMan (using the same jEncKeystore or CAMKeystore file as previous steps) switch back to the Personal Certificates section, and click the Receive button. Select the certificate file provided by the CA. If this file contains both the CA chain and signed certificate, all certificates will be imported during the Receive process. If the file being received does not contain the full chain, then it is required to add the CA certificates before the signed certificate can be received.
To import the CA certificates switch to the Signer Certificates section in the IKeyMan tool. Click the Add button and select the file(s) containing the CA certificates. If a single file contains multiple CA certificates (e.g a root and multiple intermediate certificates) then multiple certificates can be selected for imported. IKeyMan will prompt for a label for these certificate. A specific label is not required for the CA certificates. After the CA certificates have been added to the Signer Certificates section, switch back to the Personal Certificate section and Receive the signed encryption certificate.
Once the signed encryption certificate has been received into the keystore, we can click on the details of the encryption certificate and verify the certificate is issued to the system running TM1Web, and issued by one of the CA certs in the chain.
6 - Additional steps required in Cognos Configuration for TM1Web, pmpsvc, and pmhub to use the custom SSL certificates.
Add the following property under the Local Configuration - Advanced Properties section.

Update the TM1 Applications settings in Cognos Configuration to specify https.
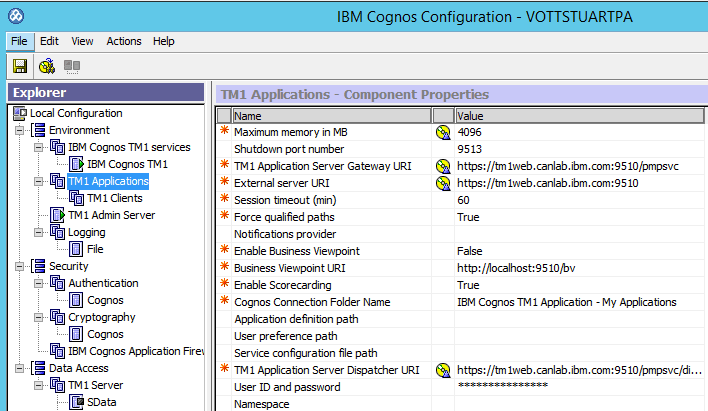
Set use third part CA to true in the Security - Cryptography - Cognos section of Cognos Configuration.

7 - Add the TM1 Server CA Certificate to CAMKeystore (for PA 2.0 Local only)
After configuring SSL for TM1Web we must also add the TM1 Servers CA certificate into the CAMKeystore keystore file. If this step is missed TM1Web will not be able to connect to any TM1 Servers. This step must be completed even if the TM1 Server is not using custom SSL certificates.
Use IKeyMan to open the CAMKeystore file, and switch to the Signer Certificate section. Click the Add... button and select the ./tm1_64/bin64/ssl/ibmtm1.arm file (assuming the TM1 Server uses the certificate provided by IBM, otherwise select your own file containing your CA certificate). There is no requirement for a specific label for certificates added to the Signer Certificates section of IKeyMan.
8 - Restart the IBM Cognos TM1 Applications service (TM1 10.2.2) or IBM Cognos TM1 service (PA 2.0 Local) and test TM1Web by accessing https://tm1webserver.yourdomain.com:9510/tm1web. Verify the web browser does not display any certificate warnings.
Was this topic helpful?
Document Information
Modified date:
15 June 2018
UID
swg22004239