Question & Answer
Question
Answer
OpenSSL software is not included with Windows. OpenSSL implementations for Windows can be downloaded from these locations.
- https://code.google.com/archive/p/openssl-for-windows/downloads
- https://slproweb.com/products/Win32OpenSSL.html
Steps
1 - Generate a private key and certificate request file.
openssl req -out request.csr -new -newkey rsa:2048 -nodes -keyout my.key
When creating the certificate request you will be prompted for the CN (common name) for the certificate. This should match the fully qualified domain name of the system running the TM1 Admin Server and TM1 Server. In this example we are using tm1server.canlab.ibm.com. A password for the private key will also be required.
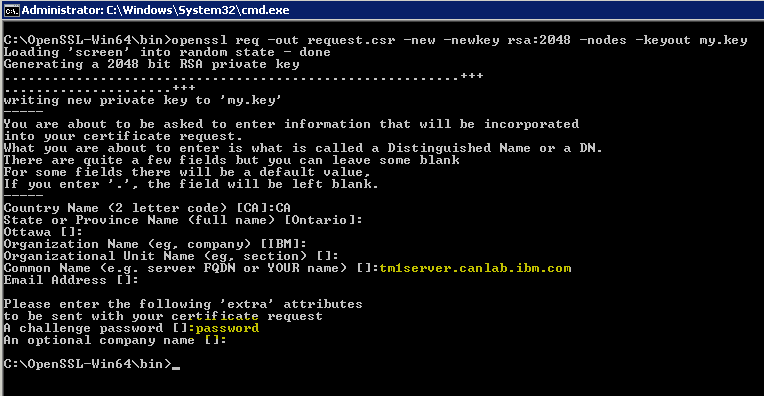
In the above example the my.key and request.csr file are created in the C:\OpenSSL-Win64\bin\ directory.
2 - Provide the request.csr file to the certificate authority (CA). The CA will provide one or more files containing the signed certificate and the CA certificates included in the signed certs chain (root and intermediate CA certs).
3 - Convert the certificate file and a private key to PKCS12 (extensions can be either.pfx or .p12) file. In this example the certificate.crt file contains the certificate issued by the CA, and the cacerts.crt file contains the root and intermediate CA certs. The certificate files may have other extensions (.cer, .der, .pem, .crt).
openssl pkcs12 -export -out keystore.pfx -inkey my.key -in certificate.crt -certfile cacerts.crt
4 - Convert the PKCS#12 file (.pfx .p12) containing an encrypted private key and certificates to pem format.
openssl pkcs12 -in keystore.pfx -out keystore.pem
When exporting the private key to an encrypted pem file you will be prompted for a password. We will need to use the tm1crypt.exe program (found in the .\tm1_64\bin64\ directory) to encrypt this password into a private key password and password key file. The TM1 Admin Server and TM1 Server use the files created by tm1crypt to access the private key in the encrypted pem file.
To encrypt the password for the encrypted pem file run the following command.
tm1crypt -pwd password -keyfile keyfile.dat -outfile outfile.dat –validate
The output should look like this.

In the above example the outfile.dat and keyfile.dat files are created in the .\tm1_64\bin64\ directory.
Copy the keyfile.dat and outfile.dat files into the .\tm1_64\bin64\ssl\ directory of the TM1 Admin Server and TM1 Server install.
5 – The root and intermediate CA certs (cacerts.crt file) must also be placed into a single pem file using base 64 notation. Assuming the root and intermediate CA certs are already in base 64 notation the cacerts.crt file can simply be renamed to cacerts.pem. The cacerts.pem file must be copied into the .\tm1_64\bin64\ssl\ directory.
At this point the .\tm1_64\bin64\ssl\ directory should contain the following files:
- keystore.pem - encrypted PEM file containing the issued certificate, the private key, and all CA certificates
- cacerts.pem - PEM file containing all CA Certificates
- outfile.dat - File containing the encrypted password to access the private key in the keystore.pem file
- keyfile.dat - File containing the key for the outfile.dat file.
Configure the TM1 Admin Server using Cognos Configuration
This screenshot assumes the name of the system running the TM1 Admin Server and TM1 Server is tm1server.canlab.ibm.com.

Save Cognos Configuration and start the TM1 Admin Server after making the above changes.
Configure the tm1s.cfg file for the TM1 Server
Add or update the following parameters in the tm1s.cfg file
UseSSL=T
AdminSvrSSLCertID=tm1server.canlab.ibm.com
AdminSvrSSLCertAuthority=D:\Program Files\ibm\cognos\tm1_64\bin64\ssl\cacerts.pem
SSLCertificate=D:\Program Files\ibm\cognos\tm1_64\bin64\ssl\keystore.pem
SSLCertAuthority=cacerts.pem
SSLCertificateID=tm1server.canlab.ibm.com
SSLPrivateKeyPwdFile=D:\Program Files\ibm\cognos\tm1_64\bin64\ssl\outfile.dat
SSLPwdKeyFile=D:\Program Files\ibm\cognos\tm1_64\bin64\ssl\keyfile.dat
The path must NOT be included for the SSLCertAuthority parameter, but should be included for all other parameters. This parameter assumes the file containing the CA certificates is in the .\tm1_64\bin64\ssl\ directory.
Save the tm1s.cfg file and start the TM1 Server after making the above changes.
Configure Architect and Perspectives
The cacert.pem file MUST be copied into the .\tm1\bin64\ssl\ or .\tm1\bin\ssl\ directory of the TM1 Architect or Perspectives client install (bin64\ssl\ for 64 bit clients and bin\ssl\ directory for 32 bit clients). This file must NOT renamed as it must much the name of the file referenced be the SSLCertAuthority parameter in the tm1s.cfg file.
Open the options for the client and configure as follows.

At this point Architect and Perspectives should be able to see and connect to the TM1 Admin Server and TM1 Servers that were configured with the custom SSL certificates. If no TM1 Servers are listed in Architect was unable to connect to the TM1 Admin Server, or the TM1 Server was not able to register with the TM1 Admin Server. If Architect can see the TM1 Server but fails to connect (with no error) then the problem is likely with the client configuration.
Configure TM1Web
The CA certificates from the cacerts.pem file must be imported into the cacerts files of the JRE being used for Tomcat. For Windows installations of TM1Web the cacerts can be found in the .\tm1_64\bin64\jre\7.0\lib\security\ directory. The CA certs can be imported using the Java keytool command.
keytool.exe -import -trustcacerts -file "D:\Program Files\ibm\cognos\tm1_64\ssl\cacerts.pem" -keystore ..\lib\security\cacerts -storepass changeit -alias tm1server.canlab.ibm.com
The keytool.exe command can be found in the .\tm1_64\bin64\jre\bin directory. This directory will also contain a ikeyman.exe program that can be used to import the CA certs into the cacerts file.
Linux installs of the TM1 Web Tier include a .\tm1_64\bin64\pmpsvcTrustStore file that is used instead of a cacerts file. The keytool command can be used on Linux to import the CA certs into the pmpsvcTrustStore file.
keytool -import -trustcacerts -file /opt/ibm/cognos/tm1_64/ssl/cacerts.pem -keystore /opt/ibm/cognos/tm1_64/bin64/pmpsvcTrustStore -storepass changeit -alias tm1server.canlab.ibm.com
Troubleshooting
To enable SSL debug logging the TM1 Admin Server edit the .\tm1_64\bin64\tm1admsrv-log.properties. The rootLogger and logger sections should be updated from the default INFO logging level to DEBUG as follows.
log4j.rootLogger=DEBUG, R1
log4j.logger.TM1=DEBUG
SSL debug logging is written to the tm1admsrv_<datetimestamp>.log files in the bin64 directory.
To enable SSL debug logging for the TM1 Server configure the tm1s-log.properties file to include the following line.
log4j.logger.TM1.Comm.SSL=DEBUG
The tm1s-log.properties file is an optional file that can be found in the same directory as the tm1s.cfg file. If this file is not present then it can be copied from the .\tm1_64\samples\tm1\PlanSamp\ sample TM1 model directory. There is no need to restart the TM1 Server after placing this file in the same directory as the tm1s.cfg file, or updating this file. The SSL debug logging will be written to the tm1server.log file.
Was this topic helpful?
Document Information
Modified date:
30 May 2019
UID
swg21998260