Question & Answer
Question
I have configured my Spatial objects, but now I need my data into Maximo. How can I configure the ArcGISDataSync Spatial Crontask to help me with this?
Cause
After configuring the Spatial objects, the next step is to bring your data into Maximo. This documentation will assist in helping to bring that information into Maximo
Answer
Before we can bring the data into Maximo, you will need to:
1) Complete configuring your GIS objects for the Spatially enabled application. You can follow the link below for more information:
http://www-01.ibm.com/support/docview.wss?uid=swg21982632
2) Configure your JMS Queues before activating the ArcGISDataSync crontask
3) Ensure your admin mode is turned off.
Information on this crontask can be found at the link below:
https://ibm.biz/Bd4Vvy
Please follow the steps below for guidance:
The object created when using the Map Manager, is what we will now attempt to load in Maximo. In this example, we'll use "WMAINS" Object, and we will be using the Feature Server layer http://sampleserver6.arcgisonline.com/arcgis/rest/services/Water_Network/MapServer/16 as an example. You can use your feature service when following this document.
First: The Crontask Configuration
Bring up the ArcGISDataSync crontask. You can configure for Asset, Location or Service Address. We will do this for the Asset.
1) Select the AssetSync Cron Task Instance

2) In the Parameters (see https://ibm.biz/Bd4Vv6 for more information), set the following:
a) GISOBJECTNAME = WMAINS (Or what you've named your GIS Object)
b) URL : http://sampleserver6.arcgisonline.com/arcgis/rest/services/Water_Network/MapServer/16/query?where=activeflag=1&outFields=*&f=pjson
(Information how to get this URL, please see link: http://www-01.ibm.com/support/docview.wss?uid=swg21983319 )
c) PROCESSEDFLAG: activeflag=0 (Currently, it may be set to MXCREATIONSTATE. This is the field we'll update to tell the crontask not to process this field again)
d) NUMREQUESTS: 0 (Default is 0, this tells the cron to continue until there are no more records in the feature service to process)
Second: The JSON Mapping
Open up the JSON Mapping application and create a new record
1) Set a name for the mapping. Set the Direction to INBOUND and the object to ARCGISASSET
2) Use the link to get another URL: http://www-01.ibm.com/support/docview.wss?uid=swg21983319 and instead of the activeflag, use something similar to objectid < 400 as your search.
The purpose of this is to get the format of the JSON to map the attributes. We'll use the link as an example: https://sampleserver6.arcgisonline.com/arcgis/rest/services/Water_Network/MapServer/16/query?where=objectid+%3C+400&outFields=*&f=pjson
3) Copy this URL into the URL Field of the JSON Mapping tab, and then tab out. After a few seconds, you will notice the JSON Document field populate.
4) Click the properties tab
5) Click on "Map More Objects"
6) Select "ASSET"
7) Follow the same process until it looks similar to below:
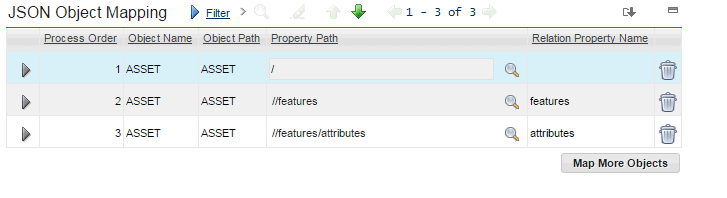
8) Click number 3 (//features/attributes) and then below in the JSON Properties Mapping, click new row. This is where the real mapping occurs.
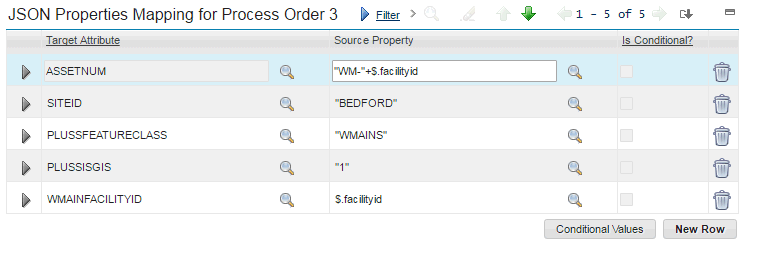
a) Set the Target Attribute: Click the magnifying glass and select ASSETNUM
b) Set the Source Property -> Click the magnifying glass and select $.facilityid. You can then change this to "WM-"+$facilityid. This way, your assets will begin with WM-, followed by your facilityID.
Continue this for as many attributes as you'd like. Below are the required ones:
Third: The Map Manager
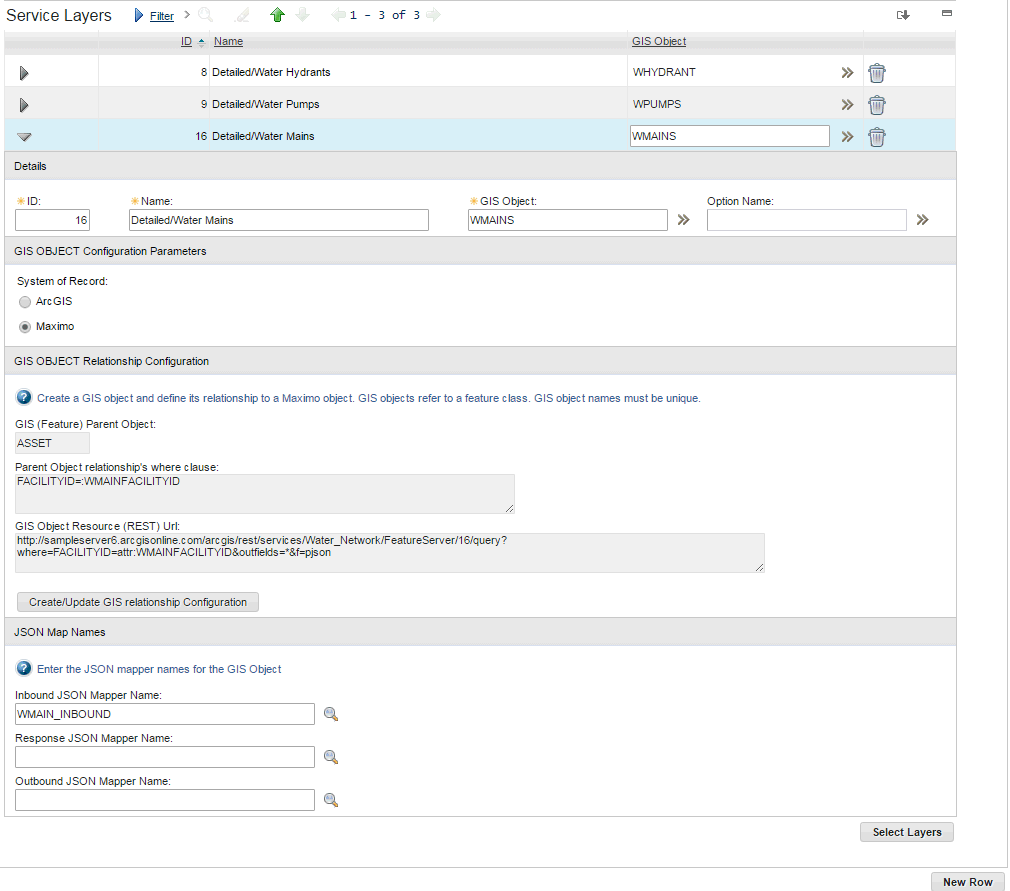
1) Bring up your map manager application
2) Open the map, and then open the Map Service that contains the Object you've created
3) In the Service layers, open this up and then in the "Inbound JSON Mapper Name", enter your JSON Mapping name.
4) Save the record
Finally: Activating the Cron:
1) Go to the Crontask application
2) Bring up the ArcGISDataSync crontask
3) Change the schedule if needed and then Check the "Active" box for the AssetSync:

4) Save and then reload the Crontask:

The Result:
You can now go to your assets application, and you will see the assets were brought in. When completed, you can turn the crontask off.

Was this topic helpful?
Document Information
Modified date:
17 June 2018
UID
swg21983324