Question & Answer
Question
This Technote provides alternative steps to using ADPlus to capture crash dump files during a TM1 server crash.
The advantages of Windows Error Reporting over ADPlus are as follows:
1 - No additional software needs to be installed. WER is included with Windows Server (since Windows Server 2008).
2 - No process to start before the TM1 Server crash.
3 - A user does not need to remain logged into the system running TM1.
Answer
WER is configured by using Windows registry settings. See: https://learn.microsoft.com/en-us/windows/win32/wer/collecting-user-mode-dumps
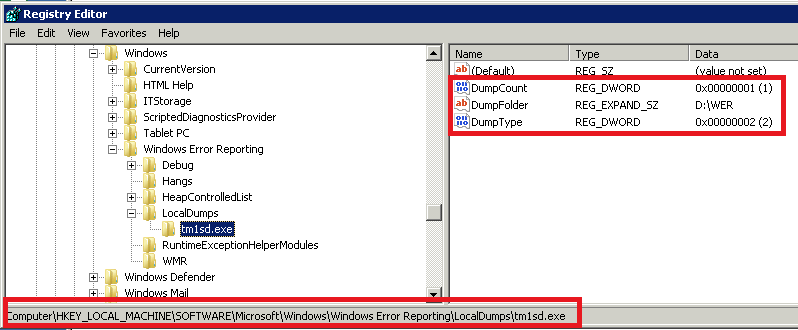
This screenshot provides an example of the registry keys and values required to capture crash dumps for the tm1sd.exe process. In this example, we assume a directory D:\WER was created to capture any crash dump files.
DumpType 2 is recommended to capture a full crash dmp file.

The new registry key is
HKEY_LOCAL_MACHINE\SOFTWARE\Microsoft\Windows\Windows Error Reporting\LocalDumps\tm1sd.exe
Typically, both the LocalDumps and tm1sd.exe keys need to be created.
Crash dump files can be very large: ensure the drive containing your DumpFolder directory has sufficient free disk space to capture any crash dumps files.
It is possible to produce a much smaller minidump file by setting DumpType to 1 instead of 2. A minidump can be used to extract the same stack trace that a full dump provides. However, the minidump file does not contain as much useful information as a full dump. The minidump is usually used to determine whether the stack of the crash is already known. Otherwise, a full dump file is suggested, and might even be required to diagnose TM1 Server crashes in some scenarios.
The dmp file created by WER is equivalent to the second chance exception that is created by DebugDiag or ADPlus. WER only creates a DMP file for second chance exceptions (exceptions not handled by the application).
What is TM1 Server crashes, but no dump is generated?
Checklist:
1) Verify the <DumpFolder> has been correctly set: the folder must exist.
2) Sufficient disk space in the <DumpFolder>. Rule of thumb: if the TM1 Server takes X amount of RAM, disk space should be at minimum 2*X (a 750 GB model would need at least 1 ,5 TB of disk space)
3) Time: when crash dump starts to be generated, Windows keeps writing to the DMP file until it is done. During this time, the DMP file is locked and nothing should be attempted to do anything to it. Process Explorer or Task Manager should be used to monitor the tm1sd process: once tm1sd process is gone from the list, the dump creation is complete. For a 750Gb model, the entire process can take up to 45 minutes.
4) Exclude the dump folder from antivirus scan
5) Exclude werfault.exe (in Windows\system32) from antivirus scan
6) Exclude tm1sd.exe (in tm1_64\bin64) from antivirus scan (if allowed by your company policies)
7) Verify DEP (Data Execution Prevention) is set to "Turn on DEP for essential Windows programs and services only". Here are the steps: from Control Panel, System and Security, System, Advanced system settings, Advanced tab, click Settings button in Performance section, click Data Execution Prevention tab, and change the option.
8) Verify that the dump file was not created in the following folder, instead of the folder specified by <DumpFolder>:
C:\ProgramData\Microsoft\Windows\WER\ReportQueue (or subfolder)
9) Stop and restart "Windows Error Reporting Service"
10) Clean up WER archives: stop the "Windows Error Reporting Service" first, then delete the content of these folders:
C:\ProgramData\Microsoft\Windows\WER\ReportArchive\
C:\ProgramData\Microsoft\Windows\WER\ReportQueue\
Optional:
Once the dump file is generated, you might want to check the validity of this dump file before it is sent to IBM Support.
It can be achieved by installing "Windows 10 SDK" ( https://developer.microsoft.com/en-us/windows/downloads/windows-10-sdk ) and then by running dump check:
cd "C:\Program Files (x86)\Windows Kits\10\Debuggers\x64"
.\dumpchk <Dump_Path>
If the dump is ok then we can go on.
In case the dump file is too big, it is best to create a multi-part zip file by using the compress tool of your choice.
Once done, upload the multi-part zip file to the IBM support case by using this link: https://www.secure.ecurep.ibm.com/app/upload_sf
[{"Product":{"code":"SS9RXT","label":"Cognos TM1"},"Business Unit":{"code":"BU053","label":"Cloud \u0026 Data Platform"},"Component":"TM1 Server","Platform":[{"code":"PF033","label":"Windows"}],"Version":"9.5.2;10.1.0;10.1.1;10.2;10.2.2","Edition":"All Editions","Line of Business":{"code":"LOB10","label":"Data and AI"}},{"Type":"MASTER","Line of Business":{"code":"LOB10","label":"Data and AI"},"Business Unit":{"code":"BU059","label":"IBM Software w\/o TPS"},"Product":{"code":"SSCTEW","label":"IBM Planning Analytics Local"},"ARM Category":[{"code":"a8m3p000000PC9LAAW","label":"Planning Analytics-\u003EServer Data Tier"},{"code":"a8m3p000000PC9VAAW","label":"Planning Analytics-\u003EServer Data Tier-\u003ELogging"}],"Platform":[{"code":"PF033","label":"Windows"}],"Version":"All Versions"}]
Was this topic helpful?
Document Information
Modified date:
16 March 2023
UID
swg21959499