Question & Answer
Question
This document will walk you through adding IBM Cognos 10.2.1 Web Parts to Microsoft SharePoint 2013. Please note, as of today, SharePoint 2013 is not officially supported by IBM Cognos 10.2.1. This document is based on Microsoft Windows Server 2012 operating system, Microsoft SQL Server 2012 database server, IBM Cognos Business Intelligence Server 10.2.1 and Microsoft SharePoint 2013 server. SharePoint 2010 has been also tested by my colleague with this document.
Answer
0. Getting Ready.
The following prerequisite must be met before integrating Cognos 10.2.1 with SharePoint 2013.
a. A working Cognos 10.2.1 BI server with non SSL certificate enabled gateway, if your Cognos uses SSL certificate enabled gateway, you will have to install a separate gateway without SSL certificate enabled. (In this example, the Cognos gateway is on http://localhost:81/cognos)
b. A working SharePoint 2013 site. (In this example, the SharePoint 2013 site is on http://VM-Server2012)
c. Both SharePoint and Cognos are authenticated against the same Active Directory authentication provider. The Cognos is configured to use REMOTE_USER Single Sign-On (SSO), i.e. in the security namespace for Cognos, the Active Directory namespace has an advanced properties name of singleSignonOption and value is IdentityMapping.
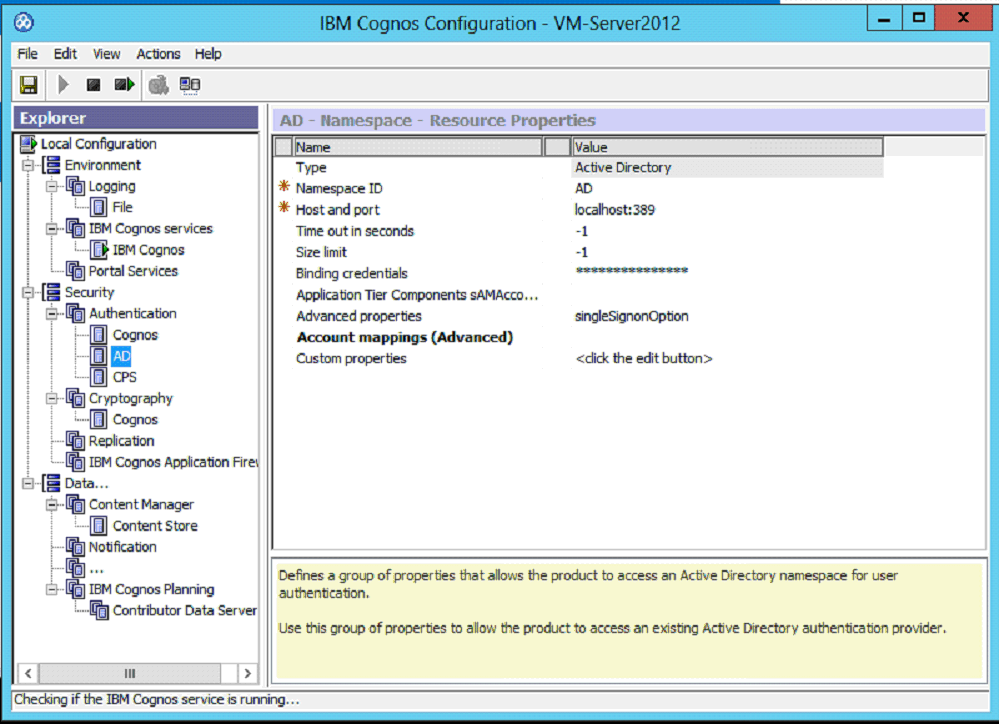
1. Configuring Shared Secret Namespace.
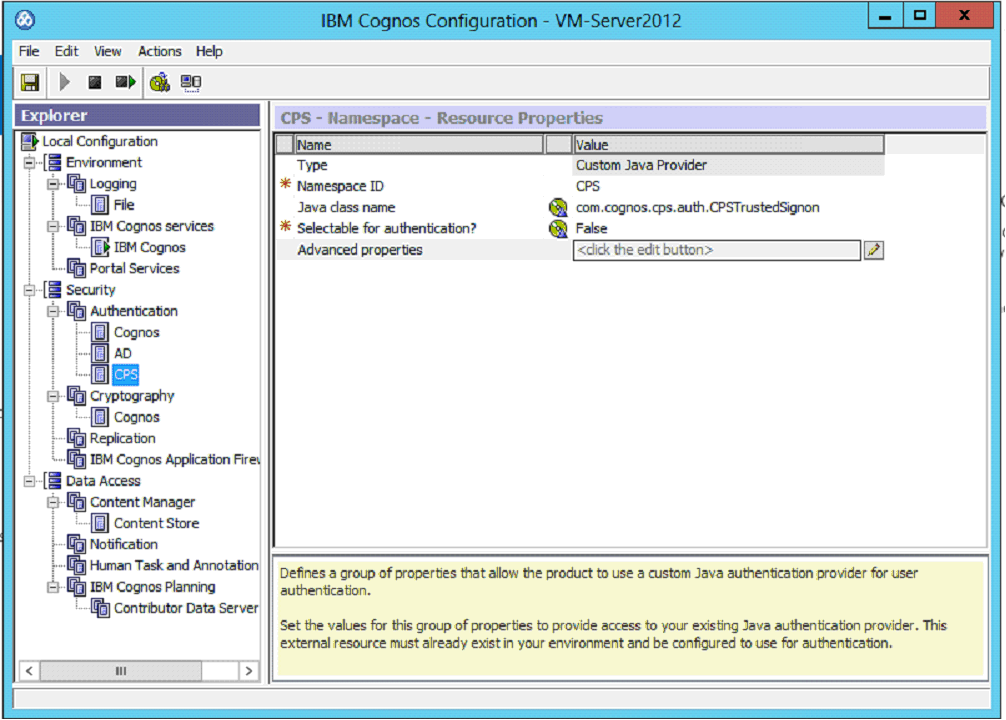
a. Open IBM Cognos Configuration for your Content Manager(s) and create a new security namespace. In this example, I call it “CPS” and select type Custom Java Provider.
b. Give it a Namespace ID, in this example, I call it “CPS”. The Java class name is “com.cognos.cps.auth.CPSTrustedSignon”. Selectable for authentication set to “False”.
2. Configuring Portal Services.
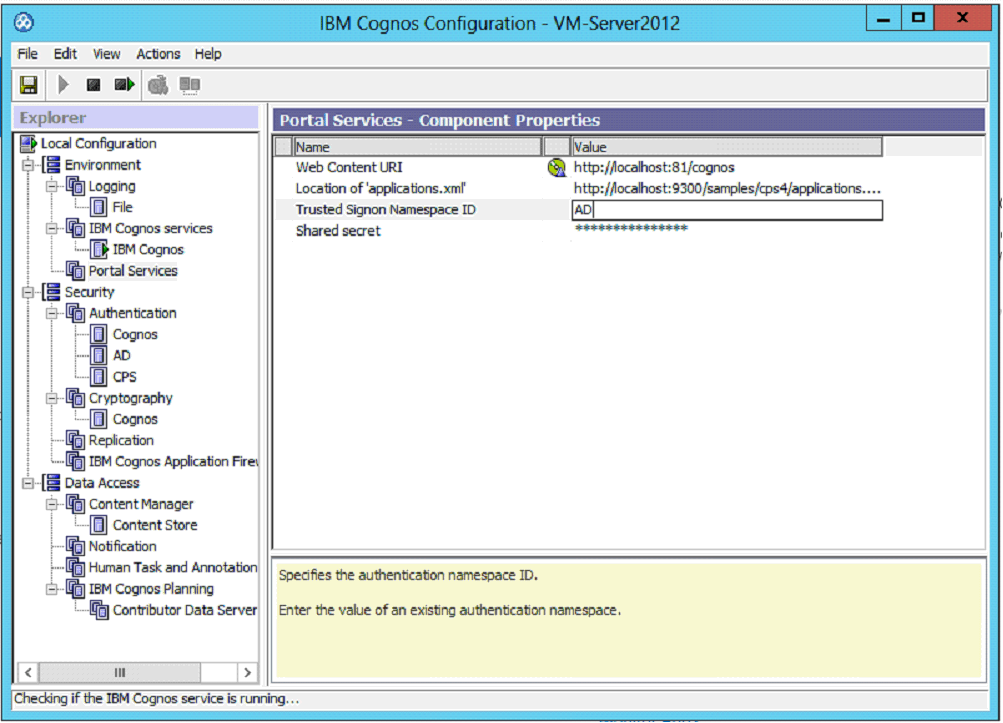
Open IBM Cognos Configuration for your all your Content Managers and Dispatchers. Navigate to Portal services.
Set Web Content URI to your actual Web Content URL, in this example, it’s http://localhost:81/cognos.
Set Location of ‘applications.xml’ to where you want to store your applications.xml file, in this example, I set it to http://www.localhost:9300/samples/cps4/applications.xml
Trusted Signon Namespace ID set to your Active Directory authentication provider. In this example, I set it to AD.
For the Shared secret, if you don’t want to set shared secret, just leave it blank, if you want to set a shared secret, just set one.
3. IBM Cognos Application Firewall Settings.
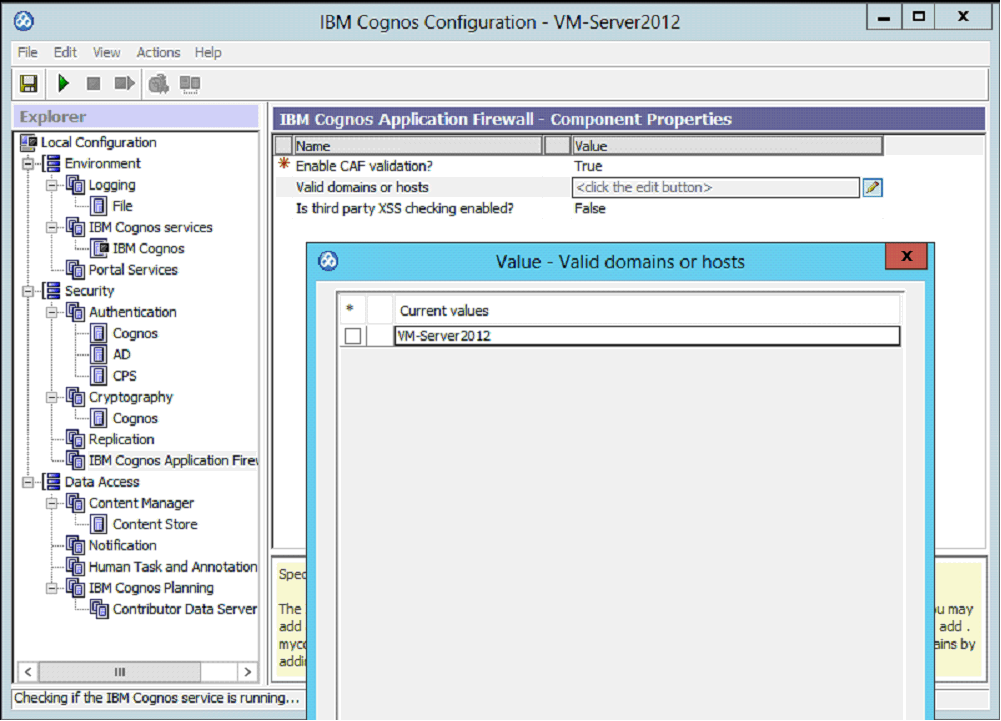
You will need to add the SharePoint site URL to the Valid domains or hosts in Cognos Configuration on all your content managers and dispatchers.
In this example, I use VM-Server2012
4. Editing the Cognos Web Parts Catalog Files.
a. Navigate to <Cognos installation folder>\c10_64\cps\sharepoint\solution, edit the build.properties
· gateway.wsdl.url: Set it to your Gateway URL, in this example, I use http://localhost:81/cognos/cgi-bin/cognos.cgi.
· authentication.sharedSecret: If you set it in Step 2, add it here, if you didn’t set in Step 2, just leave it blank.
· authentication.namespace: Use the CPS namespace ID you created in Step 1, in this example, I use CPS
· authentication.excludeDomain: If your user name for Cognos is a domain name such as DOMAIN\username, set it to false, if your user name for Cognos is not a domain name such as username, set it to true. In this example, I set it to true.
· webcontent.url: Set it to your web content URL, in this example, I use http://localhost:81/cognos.
· gateway.url: Set it to your Gateway URL, in this example, I use http://localhost:81/cognos/cgi-bin/cognos.cgi.
· Keep the rest ones as default.
b. Save the build.properties file and run the build.bat file.
c. If the SharePoint is installed on a different server than Cognos server, copy the newly created ibmcognos_webparts.wsp file under <Cognos installation folder>\c10_64\cps\sharepoint\solution\package folder to any location on the SharePoint server.
d. Navigate to SharePoint server. From the start menu, navigate to Microsoft SharePoint 2013 products and open the SharePoint 2013 Management Shell.
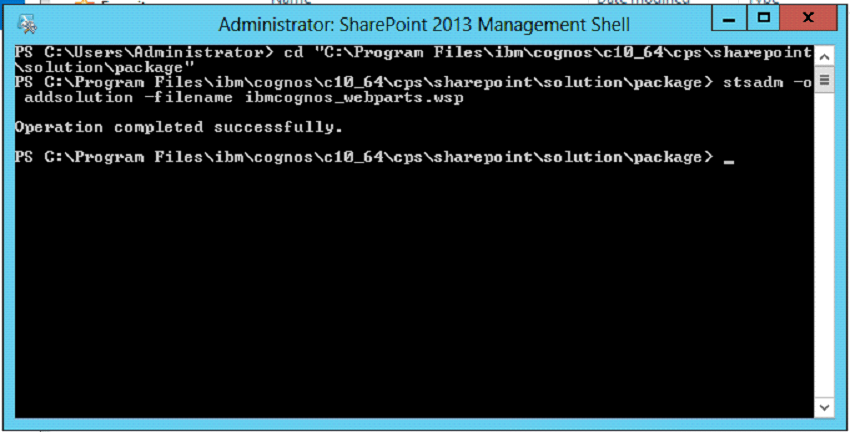
e. Navigate to the folder for ibmcognos_webparts.wsp file and run the following command:
stsadm -o addsolution -filename ibmcognos_webparts.wsp
5. Deploying the Solution File in SharePoint.
If you haven’t restarted Cognos service after you made the changes in Step 1 through Step 3, please save the settings and restart Cognos service.
a. From the start menu on the SharePoint server, select Microsoft SharePoint 2013 Products and then select SharePoint 2013 Central Administration.
b. Navigate to System Settings -> Click on Manage Farm Solution.
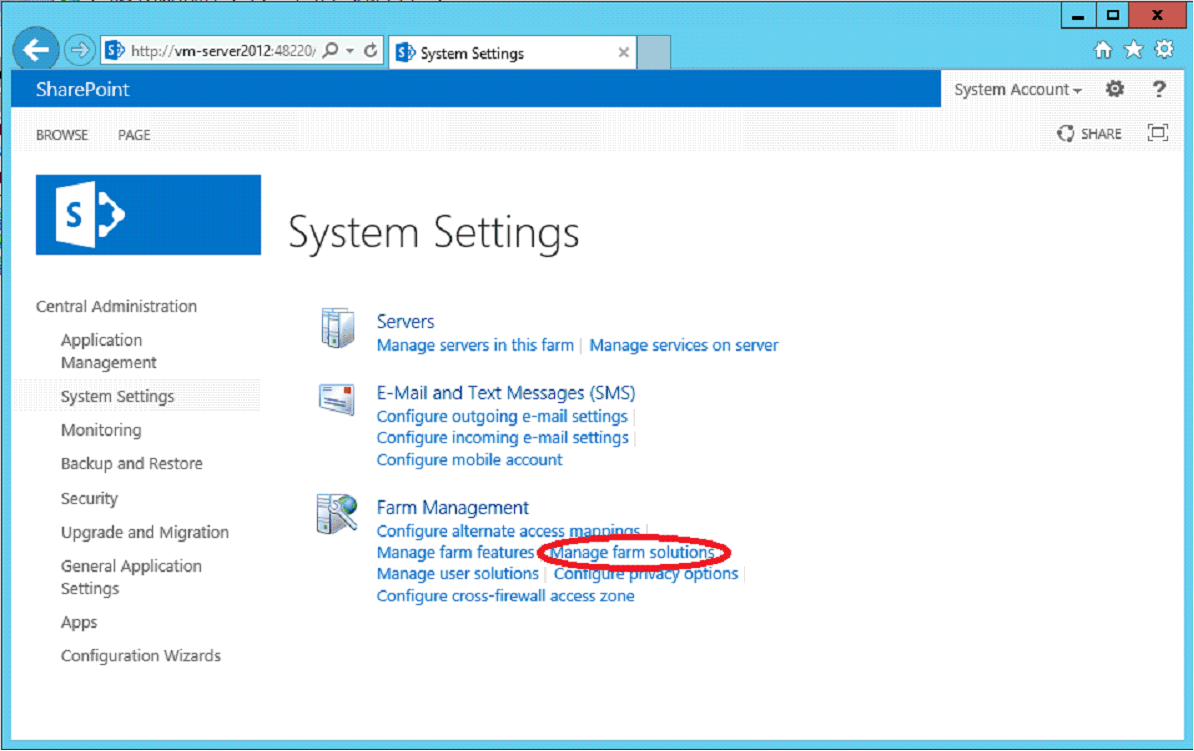
c. Click on ibmcognos_webparts.wsp
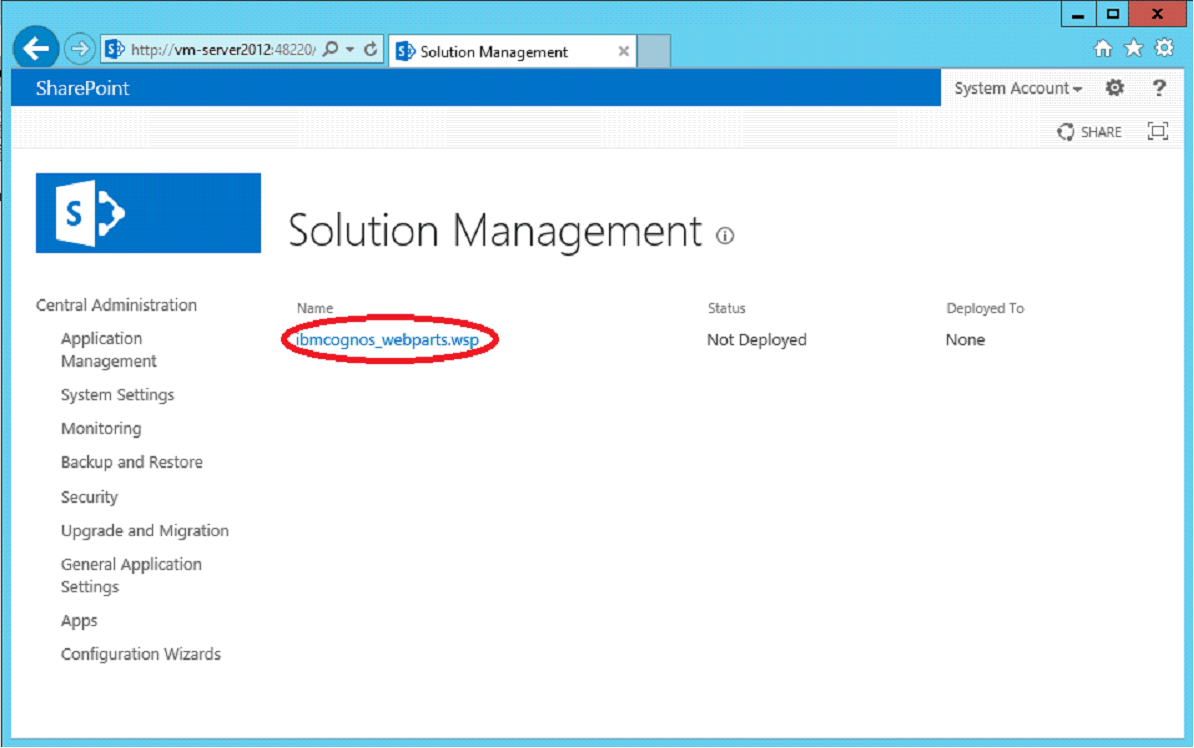
d. Click on Deploy Solution.
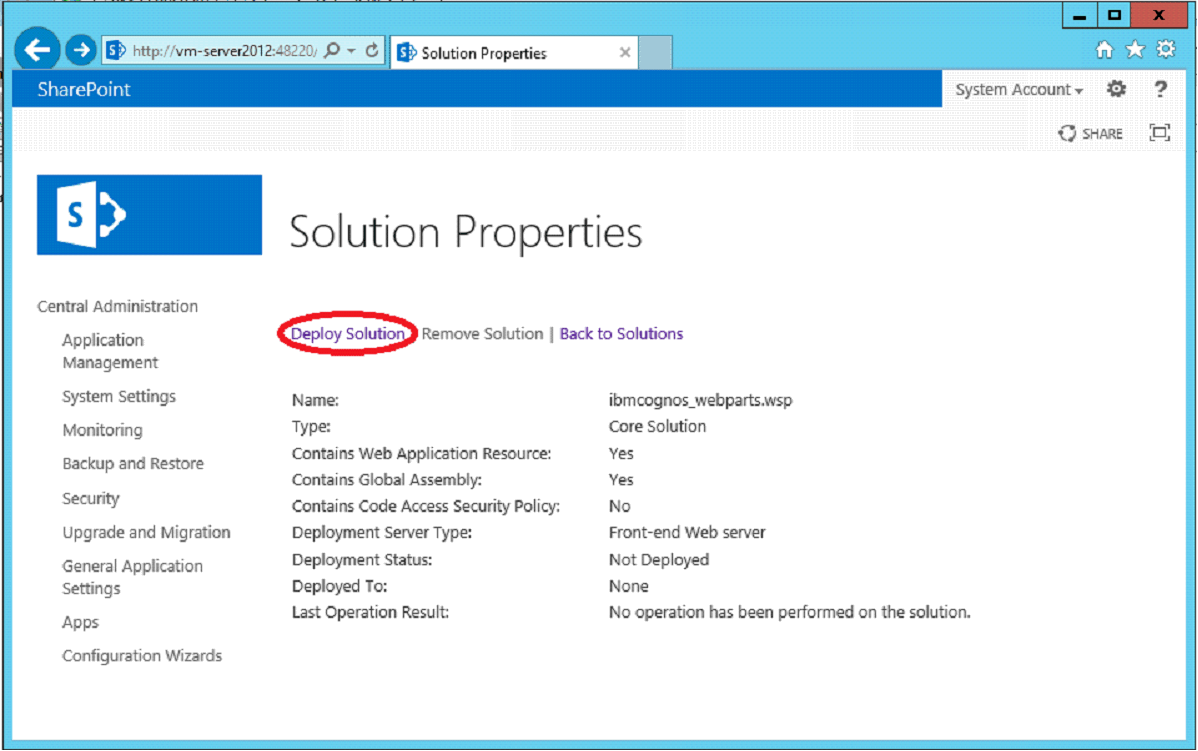
e. Select the site you want to deploy to, in this example, I use http://vm-server2012/, then deploy the solution.

f. You should see the solution file has been successfully deployed.
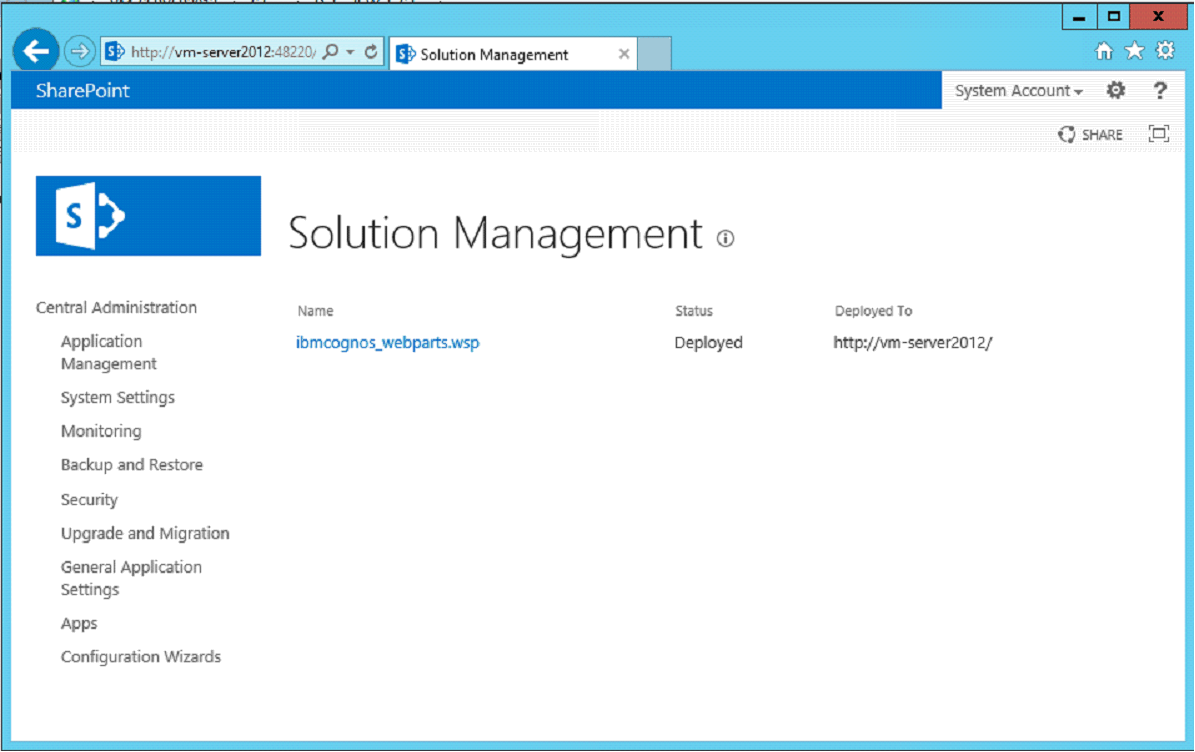
6. Adding a Cognos Web Part to a SharePoint Page.
a. Open the SharePoint site, Edit page.
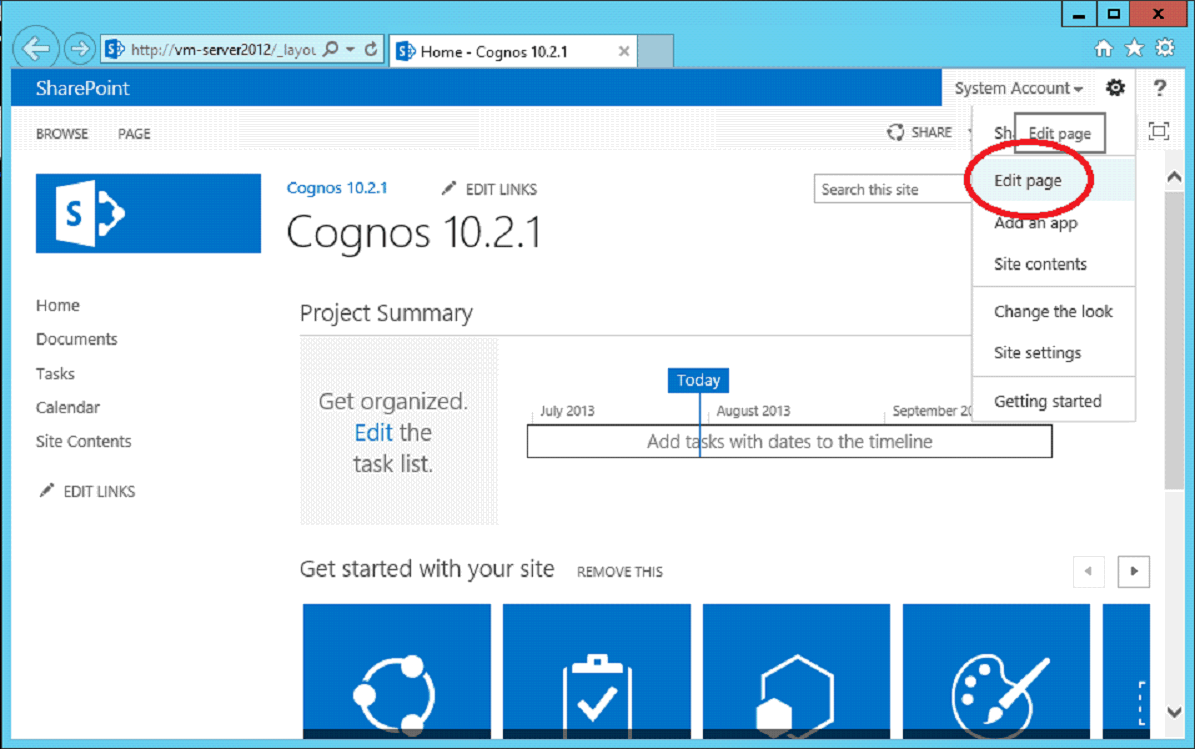
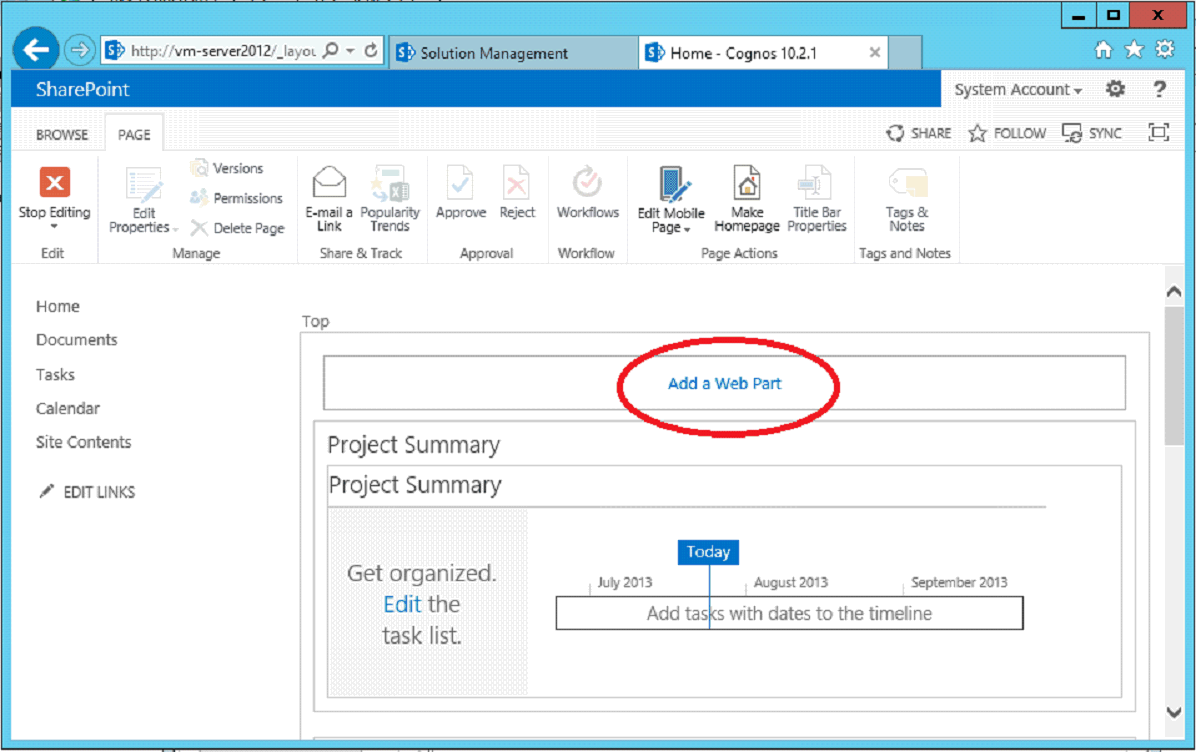
b. Add a Web Part.
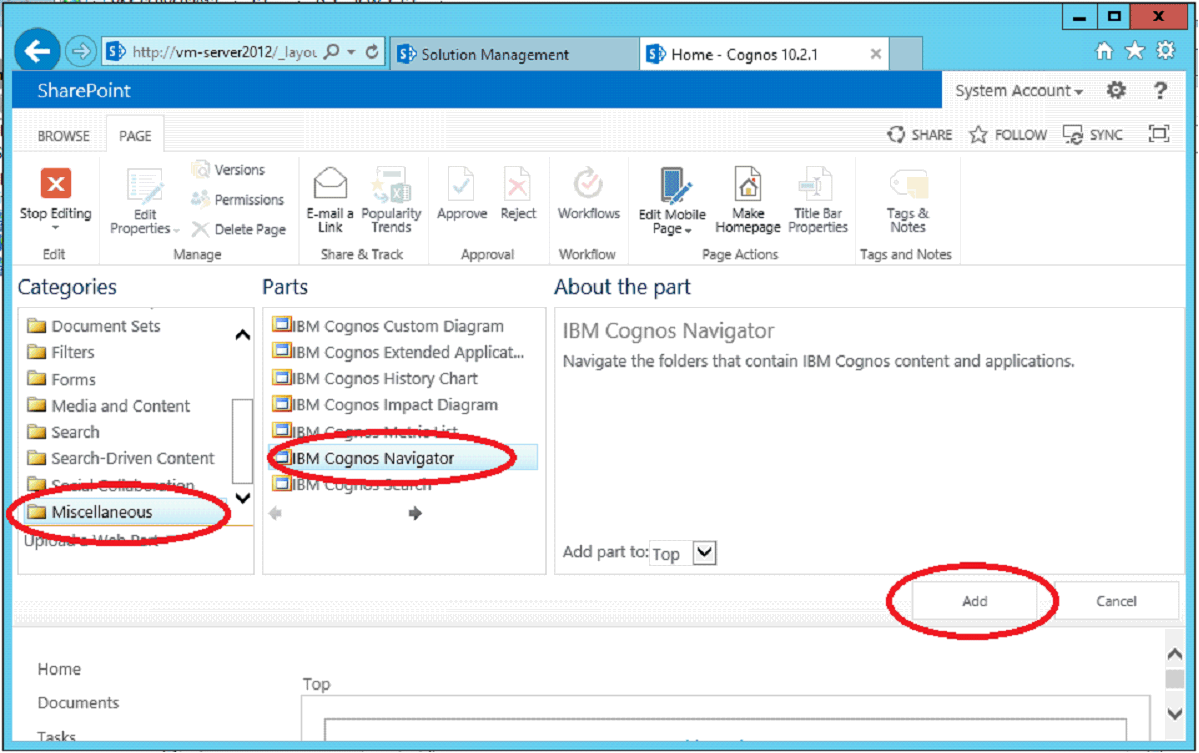
c. Click on Miscellaneous under Categories, Select a Cognos Web Part from the Parts menu, then click on the Add button.
d. You have successfully configured the Cognos and SharePoint integration.

7. Adding a Session Module to Internet Information Services (IIS) 8.
In order for the Publish and Discuss function for IBM Cognos Viewer Web Part work and IBM Cognos Metrics Manager related Web Part work, you will need to add a Session State Module, this can be done with the following steps:
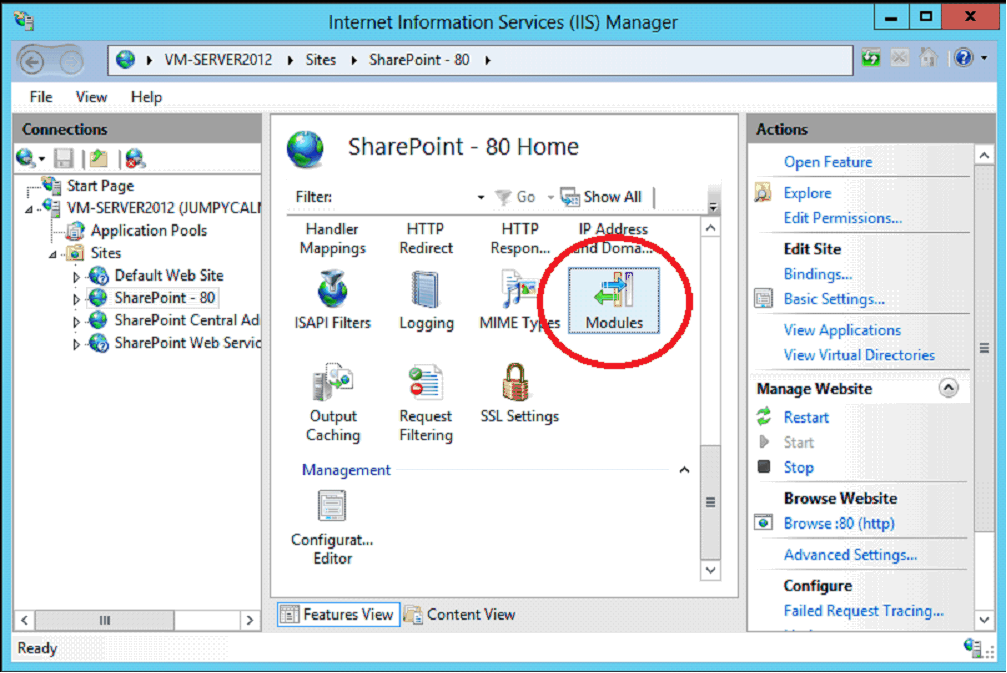
a. Open IIS, navigate to the SharePoint site, in this example, it’s SharePoint – 80, then click on Modules:
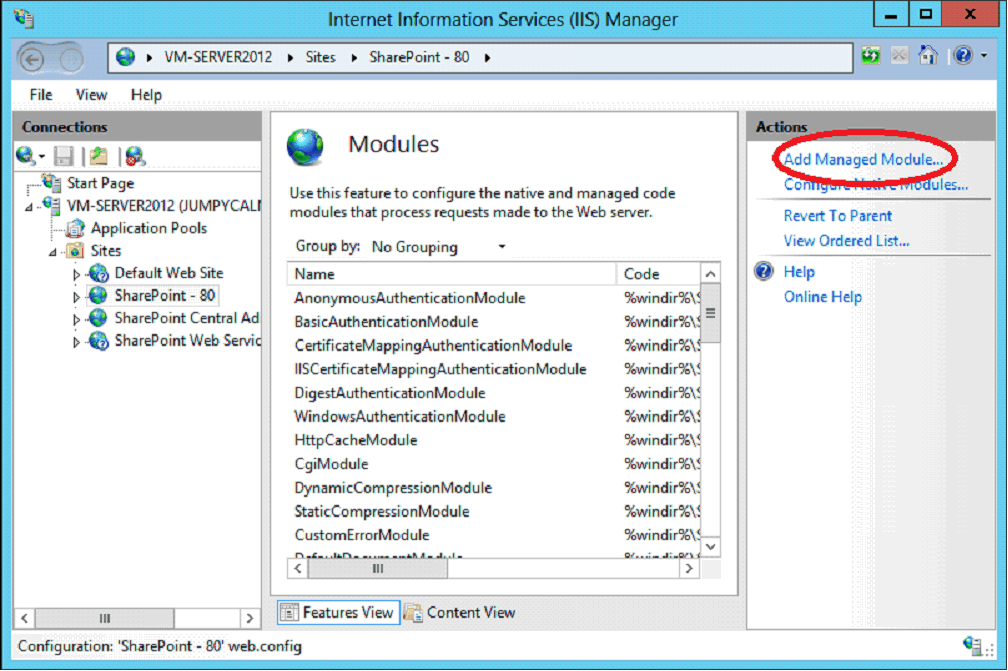
b. Click on Add Managed Module.
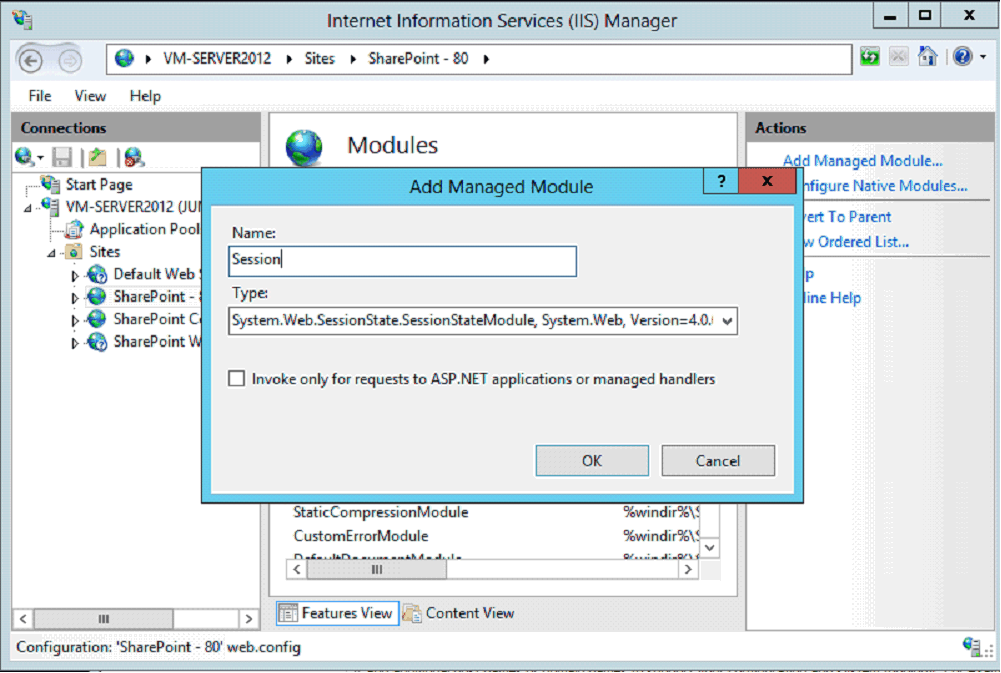
c. Add a new module named Session and Select System.Web.SessionState.SessionStateModule as the Type then click on OK.
Was this topic helpful?
Document Information
Modified date:
15 June 2018
UID
swg21645484