Troubleshooting
Problem
After installing FileNet P8 5.0, opening the process Java applets returns a logon window and then a "Failed to get configuration file WcmApiConfig.properties" error.
Symptom
When launching PCC the first time, a user logon prompt appears. When the user name and password are provided the message "Failed to get configuration file WcmApiConfig.properties" is returned.
Cause
The Region Key was not updated in Process Task Manager.
Environment
Windows Server 2008, Process Engine 5.0, Application Engine 4.0.2
Resolving The Problem
Check the following:
- Make sure a supported Java version is installed on the client machine being used to run the PE applets.
- Make sure the version of the PE client is installed on the application engine matches the version of the Process Engine PE server.
- Check the DNS name used in the PE Region ID referenced by the Connection Point and make sure it returns the correct IP address of the PE or the virtual IP of the PE farm. This can be done by opening a command prompt or console window and pinging the name referenced in the PE Region ID.
- Update the region key
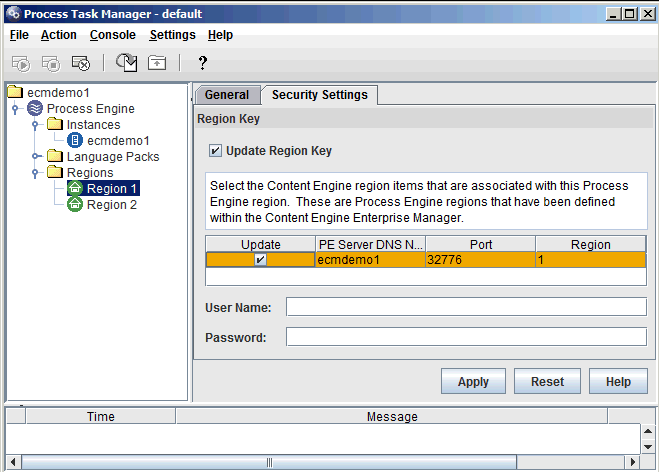
- Open Process Engine Process Task Manager and expand the Regions folder and select the region having the problem.
- Go to the Security Settings tab and check the "Update region key" box. A list of the connection points defined in Content Engine Enterprise Manager will appear.
- Check the "Update" box for the connection point. Enter the user name and password that were defined when the associated PE Region ID was created and click Apply.
- Clear the Java cache on the client.
- The applets should now open normally, without displaying a login window. If the error persists, than the application server's session management and cookie handling is not setup properly. To resolve it, use the WebSphere Integrated Solutions Console to correct the configuration.
5. Check for "com.ibm.ws.security.addHttpOnlyAttributeToCookies" in Security > Global Security > custom properties. If found, delete it.
6. Check for the custom property "com.ibm.ws.webcontainer.HTTPOnlyCookies" in Server > Server Types > WebSphere application servers > server_name > Web Container Settings > Web Container > Custom properties. If found, delete it.
7. Uncheck "Restrict cookies to HTTPS sessions" and "Set session cookies to HTTPOnly to help prevent cross-site scripting attacks" (only in WAS 8.x) and check "Override session management" at the application level. This has to be done in two places.
7.1 Go to Applications > Application Types > WebSphere enterprise applications > Workplace XT > Modules >Manage Modules > WorkplaceXT > Session Management.
a. Under General Properties, check the box next to "Override session management" and click Apply.
b. Enable cookies should be checked. Click the "Enable cookies" link in the Session tracking mechanism section.
c. Under General properties, verify that Cookie name is set to JSESSIONID and uncheck "Restrict cookies to HTTPS sessions" and "Set session cookies to HTTPONly to help prevent cross-site scripting attacks" (WAS 8.x)
7.2 Go to Applications > Application Types > WebSphere enterprise applications > Workplace XT > Web Module Properties >Session Management.
a. Under General Properties, check the box next to "Override session management" and click Apply.
b. Enable cookies should be checked. Click the Enable cookies link in the Session tracking mechanism section.
c. Under General properties, verify that the Cookie name is set to JSESSIONID and uncheck "Restrict cookies to HTTPS sessions" and "Set session cookies to HTTPONly to help prevent cross-site scripting attacks" (WAS 8.x) and click Apply.
8. For WebSphere Application Sever 8.0.0.x and above, disable HTTP Only settings globally for SSO. (See Running P8 Client Applications with WebSphere Application Server 8.0.0.x for details)
Note: This step is required for all Workplace XT deployments. Skip this step for Workplace (Application Engine), unless you are using SSO or a Container Managed configuration.
a. Navigate to Security > Global security > Authentication > Web and SIP security > Single sign-on (SSO).
b. Under General properties, uncheck "Set security cookies to HTTP Only to help prevent cross-site scripting attacks" and click Apply
9. Enable cookies and disable HTTP Only settings at the server level setting when using SSL.
a. Navigate to Servers > Server Types > WebSphere application servers.
b. Select the server where Workplace/Workplace XT is deployed.
c. Click Session Management.
d. Click the Enable cookies link under Session tracking mechanism.
e. Uncheck "Set session cookies to HTTP Only to help prevent cross-site scripting attacks".
10. Save the changes to the master configuration and restart WebSphere. If the application is running in a cluster, all nodes and the deployment manager must be restarted.
11. Clear the Java cache at the browser level and through the Java console on the clients running the applets.
The applets should now launch normally, without displaying a login window.
Related Information
Was this topic helpful?
Document Information
Modified date:
17 June 2018
UID
swg21597635