Troubleshooting
Problem
When accessing TM1Web, users can sometimes be presented with a Windows authentication dialog before reaching the TM1Web website. This can happen when a client is using TM1 Integrated Login (single-sign-on against Active Directory) for TM1Web and access/authentication settings do not allow automatic authentication against the IIS instance serving the website.
Symptom
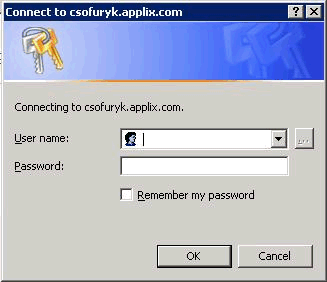
Unexpected Windows authentication dialog displayed when accessing TM1Web:
Cause
This issue is typically caused by security settings preventing the automatic authentication of an end-user on the machine hosting IIS/TM1Web, or IIS resources on that machine.
If a client chooses to hit 'Cancel' in this dialog, there are two possible outcomes:
1 - The error 'Error: Access is denied' (or similar string) is displayed.
2 - The TM1Web home-page does appear, but malformed, missing several screen-elements.
In the former case, the cause is lack of direct access to the IIS virtual folder. It can be caused by access settings within IIS or a client-side setting within the browser. In the latter-case it's typically access to files/scripts that make up the TM1Web website (access to the website directly vs file-level access behind the website).
For case 2, since the client can authenticate against IIS, you can typically skip straight to step 5 in 'Check Settings within IIS'..
Resolving The Problem
Check Settings within IIS:
Steps for IIS6:
1 - On the TM1Web server, Start -> Run -> Inetmgr
2 - Drill down to the TM1Web virtual-folder, right-click and choose 'Properties'
3 - Within the Directory Security Tab, choose the top-most Edit button in 'Anonymous Access and Authentication Control'. The 'Authentication Methods' dialog appears.
4 - Within this dialog, ensure the only check-box enabled is 'Integrated Windows Authentication'.
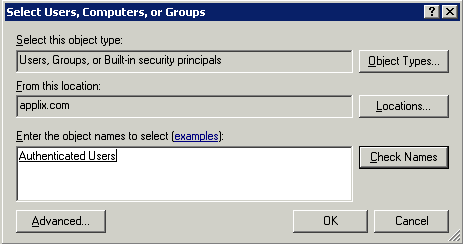
5 - Return to the IIS Management Console, right-click the TM1Web virtual folder, pick 'Permissions'.
6 - Ensure the group 'Authenticated Users' is set to have Full Control over this folder. If the group doesn't appear in the list of defined users, add the group and set control as noted:
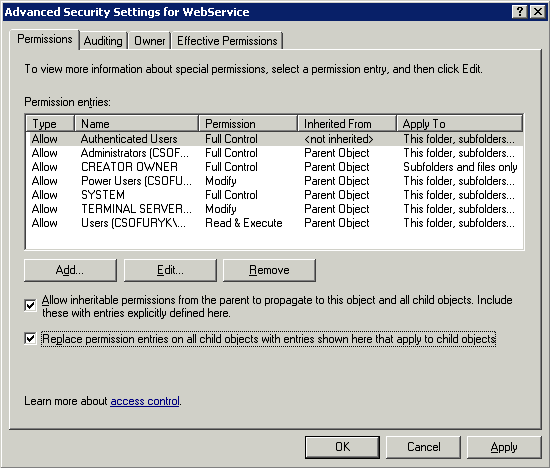
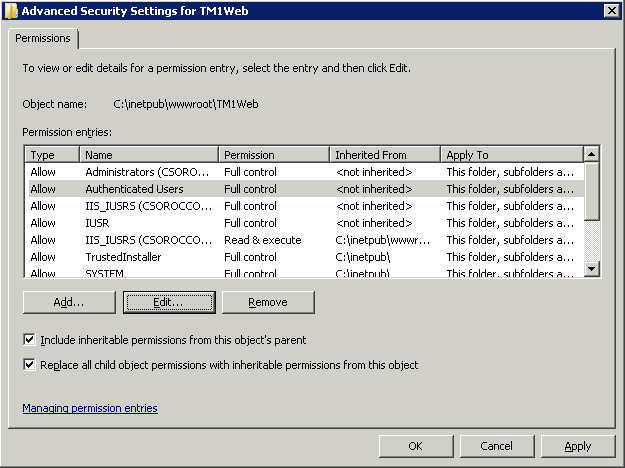
7 - Within the same dialog, click the Advanced, button to display the 'Advanced Security Settings for WebService' dialog. Within this dialog, ensure that BOTH checkboxes are enabled:
8 - Click Apply, then OK, and OK again to back out of the permissions dialog.
9 - Repeat steps 5 -> 8 on the TM1WebEx folder within IIS.
10 - Close the browser and attempt to reconnect.
Steps for IIS7:
1 - On the TM1Web server, Start -> Run -> Inetmgr
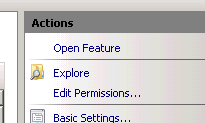
2 - Drill down to the TM1Web virtual-folder, left-click to select.
3 - Within the Actions pane on the right, select 'Edit Permissions':
The TM1Web Properties dialog appears.
4 - Within this dialog, click the Security tab, then the 'Advanced' button. The Permissions dialog appears.
5 - Within the Permissions dialog, click the 'Change Permissions' button to show the Add/Edit/Remove buttons. Ensure the group 'Authenticated Users' is set to have Full Control over this folder. If the group doesn't appear in the list of defined users, add the group and set control as noted:

6 - Within the same dialog, ensure that BOTH checkboxes are enabled:
7 - Click Apply, then OK, OK, and OK again to back out of the permissions dialog.
8 - Repeat steps 2 -> 7 on the TM1WebEx folder within IIS.
9 - Close the browser and attempt to reconnect.
Check the client-side settings:
1 - Open IE. Click Tools -> Internet Options -> Security tab.
2 - Click the Trusted Sites zone, then the Sites button.
3 - Ensure that the URL used to access TM1Web is listed therein. It's important to note that if one uses a short or long name in the URL, this must be reflected in the list.
eg: Accessing TM1Web via [...//machine_name/TM1Web], would be entered as [.../machine_name] within Trusted Sites, versus [...//machine_name.domain.com/TM1Web] being listed as [...//machine_name.domain.com].
4 - Click OK, then still in the Security tab with Trusted Sites selected, click the 'Custom Level' button.
5 - Scroll down to the bottom, under the 'User Authentication' node, ensure the radio-button 'Automatic login with current user name and password' is set.
6- Close the browser and attempt to reconnect.
Was this topic helpful?
Document Information
Modified date:
15 June 2018
UID
swg21501177