Question & Answer
Question
What happens if there are issues with installing Fix Packs/Interim Fixes via the WebSphere Update Installer when trying to update the ITIM Application ear? Is there a manual method of installing the fixes?
Cause
This could be caused due to running the WebSphere components as non-root, multiple Deployment Manager Profiles on a machine, problems with executing wasadmin, unsupported conditions or any other issues.
Answer
There is a manual method of installing fix packs that uses a combination of the update installer which performs all steps except the updating of the ITIM ear and the WebSphere Console to update the ITIM ear.
The first step in this manual process is to place the Fix Pack/Interim Fix PAK file in the update installers maintenance directory as would normally be done.In the <ITIM-HOME>/properties/version/nif/config/install directory, copy the backdoors.properties file to a file called backdoors_user.properties. Then modify the backdoors_user.properties file, changing the following parameters to “true” (all others should remain set to “false”):
- #Skip the Export (Backup) Ear action
skip.exportear=true
#Skip the Update EAR action
skip.updateear=true
#Skip the Start Websphere action
skip.startwassingleserver=true
#Skip the Stop Websphere action
skip.stopwassingleserver=true
#Skip the Stop ITIM Application action
skip.stopitimappsingleserver=true
- #Skip the RunConfig action
skip.runconfig=true
#Skip the Merge ITIM Property Files action
skip.mergeitimpropertyfiles=true
Run the update installer as it would normally be run.
In this case the ITIM application will not be upgraded when the update installer has completed. dbUpgrade, ldapUpgrade and runConfig will be run as part of the update installer process. Updating the ITIM Application will need to be done via the WebSphere Console!
To install the ITIM Application manually, unzip the contents of the PAK file that resides in the update installers maintenance directory. What is needed from the PAK file is the ITIM.partial.ear file (the path for the file will be “repository/itim.ear”). The extension of the PAK file might need to be changed to “zip” so that it can be opened with a zip tool.
Before proceeding, for a single server ITIM environment, the ITIM Application Server will need to be started. For a clustered configuration, the Deployment Manager and the Node Agent for each node must be started (the messaging App Server and ITIM App Server on each node should be stopped).
Once the ITIM.partial.ear has been extracted, follow these steps in the WebSphere Console:
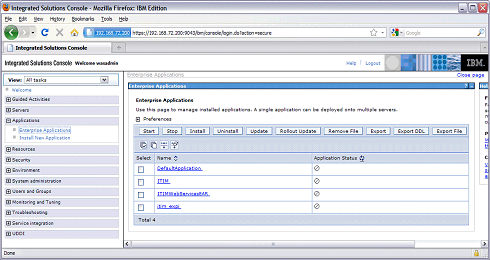
1. Expand “Applications” and the click on “Enterprise Applications”
2. Stop the “ITIM” application if it is not stopped, by selecting the “ITIM” Application and clicking on the “Stop” button
3. Select the “ITIM” application and click “Update”

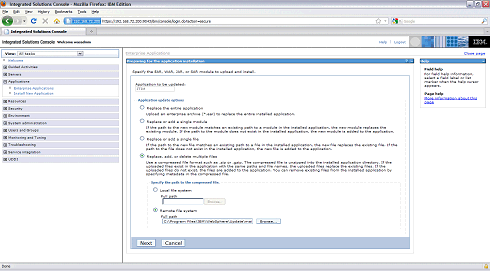
4. Scroll to the bottom of the page and select “Replace, add or delete multiple files”. User the “Remote file system” option to navigate to the update installers maintenance directory and select the “ITIM.partial.ear” file. Then click “Next”.

5. Click OK on the next frame and the upgrade process will start.
6. Click on “Save Config” to push the new ITIM Application to the nodes
This completes the fix pack installation process!
Product Synonym
itim tim isim sim
Was this topic helpful?
Document Information
Modified date:
16 June 2018
UID
swg21457232