Troubleshooting
Problem
IBM Rational Insight Data Service for IBM Rational RequisitePro fails to run the Rational Insight ETL process for large projects of Rational RequisitePro 7.1.1.3 or Rational RequisitePro 7.1.2.
Symptom
The JDBC driver records a "java.io.IOException: Premature EOF" exception and some of the ETL builds fail.
Cause
Delivery of data into the Rational Insight data warehouse is slow when Rational RequisitePro projects contain too much data. The HTTP connection used by the JDBC driver for delivering data is interrupted.
Resolving The Problem
Customize the ETL process to deliver raw data directly to a temporary table and then to transform that data into the target table. This consists of the following four high-level steps:
- Create a temporary table with the correct privileges.
- Configure WebSphere Application Server.
- Customize the ETL process.
- Execute the ETL job.
Here are the details for these steps.
Step 1: Create a temporary table with the correct privileges
Use the code snippet appropriate for your database. Substitute <USER_NAME> with the user name used for running the ETL jobs.
- To create the table in an IBM DB2 database:
SET CURRENT SCHEMA RIODS;
  	CREATE TABLE TEMP_REVISION_HISTORY (
  		VERSION_ID CHAR(40) NOT NULL,
  		REQ_UNIQUEID CHAR(40) NOT NULL,
  		REVISION_NUMBER VARCHAR(50) DEFAULT '0' NOT NULL,
  		USER_ID CHAR(40) DEFAULT '-1' NOT NULL,
  		CHANGE_DATE DATE DEFAULT CURRENT DATE NOT NULL,
  		SOURCE_ID VARCHAR (36) DEFAULT '-1' NOT NULL
  	)IN VNF_32K INDEX IN VNF_IDX;
GRANT SELECT, UPDATE, INSERT, DELETE on "RIODS"."TEMP_REVISION_HISTORY" to USER <USER_NAME> - To create the table in an Oracle database:
ALTER SESSION SET CURRENT_SCHEMA= RIODS;
  	CREATE TABLE TEMP_REVISION_HISTORY (
  		VERSION_ID CHAR(40) NOT NULL,
  		REQ_UNIQUEID CHAR(40) NOT NULL,
  		REVISION_NUMBER VARCHAR(50) DEFAULT '0' NOT NULL,
  		USER_ID CHAR(40) DEFAULT '-1' NOT NULL,
  		CHANGE_DATE DATE DEFAULT CURRENT_DATE NOT NULL,
  		SOURCE_ID VARCHAR (36) DEFAULT '-1' NOT NULL
  	) TABLESPACE VNF_32K ;
GRANT SELECT, UPDATE, INSERT, DELETE on "RIODS"."TEMP_REVISION_HISTORY" to <USER_NAME> ; - To create the table in an SQL Server database:
USE $(DBNAME)
  	GO
  	CREATE SCHEMA AUTHORIZATION RIODS
  	GO
  	CREATE TABLE TEMP_REVISION_HISTORY (
  		VERSION_ID NCHAR(40) NOT NULL,
  		REQ_UNIQUEID NCHAR(40) NOT NULL,
  		REVISION_NUMBER NVARCHAR(50) DEFAULT '0' NOT NULL,
  		USER_ID NCHAR(40) DEFAULT '-1' NOT NULL,
  		CHANGE_DATE DATETIME DEFAULT GETDATE() NOT NULL,
  		SOURCE_ID NVARCHAR (36) DEFAULT '-1' NOT NULL
  	) ON VNF_32K
  	GO
  	GRANT SELECT, UPDATE, INSERT, DELETE on RIODS.TEMP_REVISION_HISTORY to <USER_NAME>
  	GO
Step 2: Configure WebSphere Application Server
- Open the WebSphere Application Server admin console.
- Locate the view named WebSphere application server. By default, it is listed under Servers > Server Types.
- Click the resource listed on the main page. By default, the resource name is RationalReportServer.
- Click the Configuration tab. Then click Server Infrastructure > Java and Process Management > Process Definition.
- Click Java Virtual Machine.
- In the Generic JVM arguments field, put the following string: -DRJCB_IN_MTA_ONLY='RJCB' -Xquickstart
3 Customize the ETL process
- Restore the Rational Insight sample ETL catalog. For instructions, see Preparing the ETL catalog.
- Configure all database connections. For instructions, see Creating the data warehouse connections.
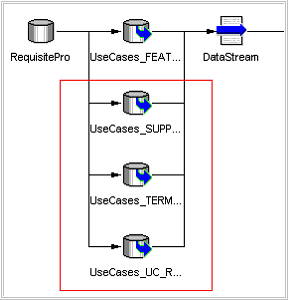
- Create a copy of the ReqProUseCase_ReqRevision_Lookup node.
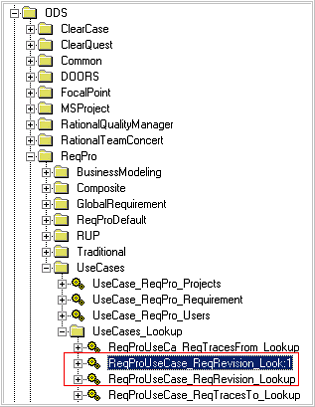
- Right-click ReqProUseCase_ReqRevision_Lookup, and click Properties.
- Change the Name and Business Name to ReqProUseCase_ReqRevi_Lookup_STG, and click OK.
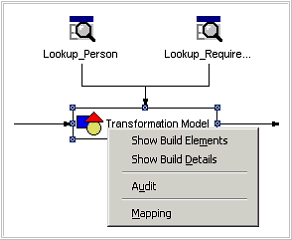
- Select ReqProUseCase_ReqRevi_Lookup_STG and, on the panel at the right, right-click Transformation Model and click Mapping.
- Delete the elements highlighted in red.
Then click Auto Map > Create new elements as attribute, and click OK. To close the Add New Elements dialog, click OK.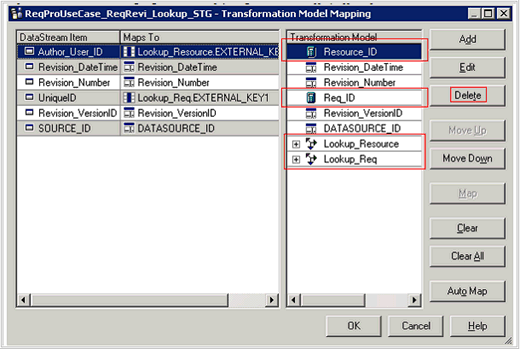
- Double-click the table delivery node to open the properties dialog.

- Change the properties as follows:
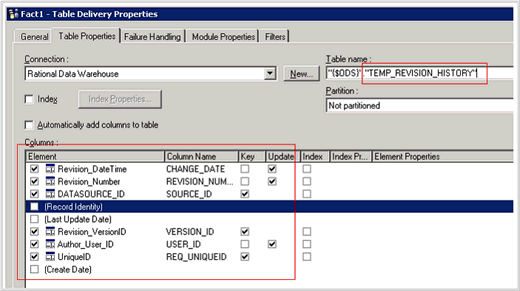
- Click the Module Properties tab, change the Refresh Type to REPLACE. Click OK.
- Locate the copy that you created in step 3. Follow steps 4 and 5 to change the name of the node to ReqProUseCase_ReqRevision_Lookup.
- Select ReqProUseCase_ReqRevision_Lookup and on the panel at the right, delete all except one of the data
sources. - Right-click the remaining data source and click Properties.
- Click the Query tab and make the following changes:
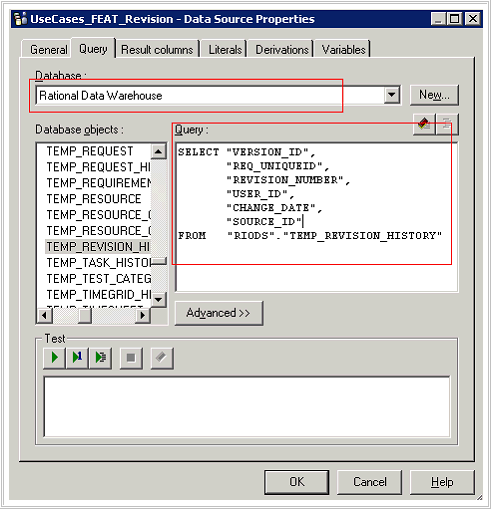
- Click the Result columns tab, click Refresh, and then click OK.
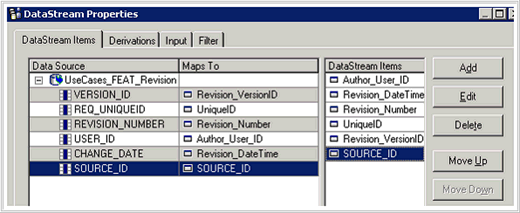
- Double-click the Data Stream node to open its properties dialog.
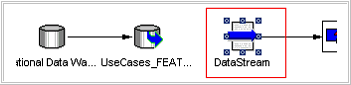
- Map the stream items as shown below and then click OK.
- Select the UseCase job.
- Locate the reference to the original node ReqProUseCase_ReqRevision_Lookup, and delete the link after that node.

- Right-click anywhere in the empty space and click Insert Fact Build Node.
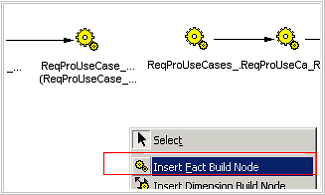
- Move mouse to the place where teh new node is to be placed and click. A Fact Build Node Properties dialog Opens. Specify the Associated Build property by clicking the browse button and selecting the node named ReqProUseCase_ReqRevision_Lookup that you created in step 11.
Click OK to close the Item List dialog and the Fact Build Node Properties dialog.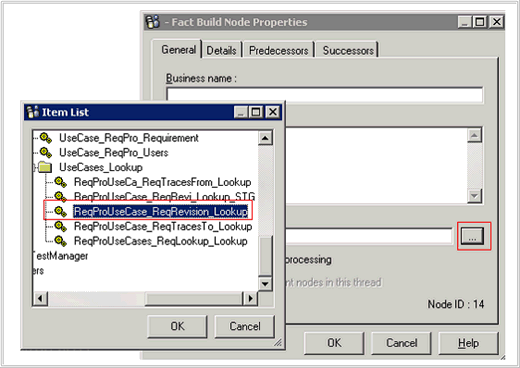
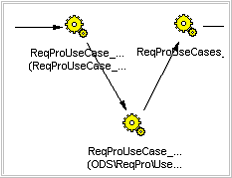
- Build up the link as shown below:
- To save all changes, click the Save button on the tool bar.
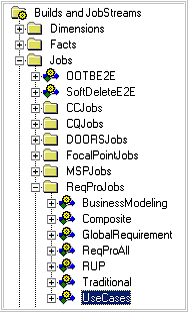
- Repeat steps 3 through 23 for all builds named ReqProXXX_ReqRevision_Lookup in the following folders: UseCases, Composite, BusinessModeling, GlobalRequirement, RUP and Traditional.
- Save all changes.
Step 4: Execute the ETL job
Right-click the OOTBE2E node and click Execute.
Was this topic helpful?
Document Information
Modified date:
16 June 2018
UID
swg21455870