Question & Answer
Question
How do you configure JSF 2.0 in IBM Rational Application Developer for WebSphere Software v8.0 and IBM WebSphere Application Server v8.0(Beta)? Note: WAS 8.0.x supports MyFaces JSF 2.0 runtime libraries by default, so users can now specify the default JSF Implementation (which is MyFaces 2.0 on WAS 8.0), or optionally some other JSF 2.0 Implementation Library as before. The following instructions are applicable to WAS v8.0 Beta.
Answer
Java Server Faces (JSF) is a Java-based Web application framework intended to simplify development integration of web-based user interfaces.
As stated in JSR 314 documentation:
"JSF v1.x introduced many great ideas but no standard specification that delivers them to developers and the marketplace. In fact, many of these great ideas are built on top of the Java Server Faces Specification but, are not, themselves, standards. It is time to harvest these ideas and bring them to a wider audience in manner consistent with the rest of the Java Platform".
Some of the new features in JSF v2.0 are as follow:
- Annotations instead of XML
- Facelets integration
- Component creation & templating
- Integrated AJAX support
- New event systems
- Built in resource handling
- Bean validation
Rational Application Developer for WebSphere Software v8.0 can be configured for creating dynamic web projects that support Java Server Faces (JSF) v2.0 targeting WebSphere Application Server v8.0 runtime environment.
Note: It should be noted that this functionality is "as is" and the clients may use it as their own risk.
Here are the steps to configure Rational Application Developer for WebSphere Software v8.0 to support creation of dynamic faces project based on JSF v2.0:
How to get supported libraries
- Launch Rational Application Developer for WebSphere Software and open a new workspace
- Create a Dynamic Web project and the option "Add project to an EAR" is checked.
This option will create an Enterprise Application Project.
image 1

- Under the "Configuration" section click on "Modify" and ensure "Java" version is set to 1.6, and "Java Server Faces" is selected and set to 2.0 and click OK.
image 2

- On next page accept defaults and click "Next".
image 3

- On next page accept defaults and click "Next".
image 4

- On the next page under "JSF Implementation Library" set "Type" to User Library and click on "Download" icon and make sure the option "Include libraries with this application" is selected.
It should be noted that to get the following page you need to perform step 3 to select "java serve faces" facet for the application.
image 5

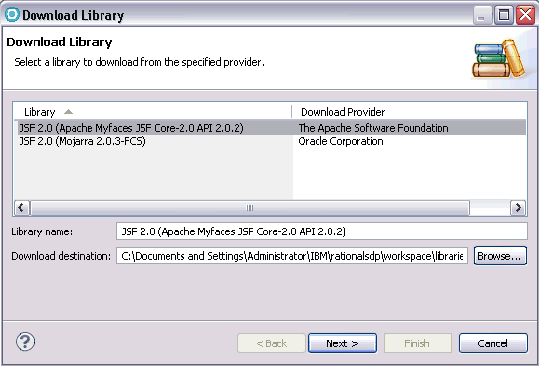
- Select "JSF 2.0 (Apache MyFaces JSF Core-2.0 API 2.0.2) and click "Next".
This action will package all the required libraries to support JSF v2.0 with the application.
image 6

How to integrate MyFaces libraries into the workspace
There are two options to integrate JSF v2.0 libraries into the workspace:
- Package all Libraries with application (this option is discussed below)
- Place all Libraries into common project and use "Deployment Assembly" functionality. To access "Deployment Assembly", right click on the web project > Properties
Package all Libraries
- Right-click on ".EAR" project > Java EE > WebSphere Application Server Deployment.
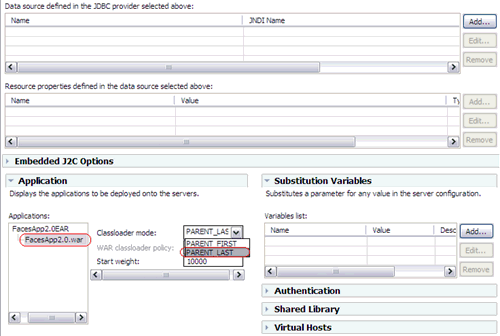
- Under "Application" section, select ".WAR" module and set the "Classloader mode" to "PARENT-LAST" and save the file. The ".EAR" setting must not be changed.
image 7

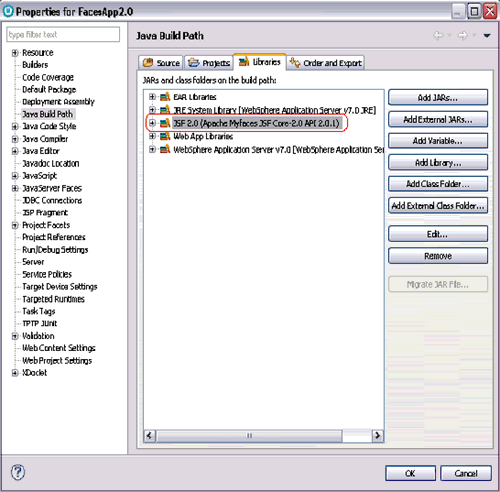
- Open "Java Build Path" dialog by right-clicking on the web project > Java Build Path
- Move "Web App Libraries" to the top of the list if it is not and click OK.
image 8

- Copy JSF 2.0 libraries from "workspace\libraries\JSF 2.0 (Apache Myfaces JSF Core-2.0 API 2.0.1)\myfaces-core-2.0.1-bin\lib." into "WebModule\WebContent\WEB-INF\lib".
image 9

- Remove JSF 2.0 libraries from "WebModule\Java Resources\Libraries"
right-click on web module > properties > Java Build Path > Libraries tab and select JSF 2.0 libraries and click remove.
image 10

- Perform a project clean within workbench > project > clean
Create and test a Facelet page in the Web project
- Create a new web page by right-clicking on "WebContent" folder located under the Web project and select "New".
- Under "Template" section, select "Facelet" template and click "Finish" to create the page.
- All the JSF components will be available in the "Palette" view under "Standard Faces Components".
image 11

- Drag & Drop some components into the web page to verify the components.
image 13

Related Information
Was this topic helpful?
Document Information
Modified date:
16 June 2018
UID
swg21450184