Question & Answer
Question
How do you configure and use the IBM Rational RequisitePro integration within Rational Software Architect?
Answer
Note: The technote assumes that Rational RequisitePro and Rational Software Architect are installed and configured properly independently of one another.
Supported versions of RequisitePro 1
Setting up RSA for the RequisitePro Integration
Linking Requirements to Elements
Configuring Requirement Creation Policy
Creating Requirements from Elements
Configuring Element Creation Policy
Creating Elements from Requirements
Configuring Synchronization Policy
Configuring Drag and Drop Policy
Supported versions of RequisitePro
The RSA - RequisitePro integration is supported with the following versions of RequisitePro:
2003.06.13 or later
Setting up RSA for the RequisitePro Integration
- Start RSA
- Click Window -> Open Perspective -> Requirement
Note: If you do not see the Requirement then you did not install this optional features - Click Window -> Preferences...
- Select Requirement Management
- Set the Default Project Logon Username and click Apply and OK
Note: This selection is optional - Click Window -> Open Perspective-> Other -> Requirement
Recommendation: Move the Requirement Explorer to default location of the
Outline view in the Modeling perspective - Right click in the Requirement Explorer
- Click Open a RequisitePro Project...
- Navigate to the location of the .rqs file
- Click Open
- Log into the project
- Click OK
Configuring the Link Policy
There are two types of links that can be created with the integration: direct and indirect (proxy). Indirect links provide traceability between requirements and domain elements and have a many-to-one relationship. Direct links do not provide traceability and have a one-to-one relationship.
- Select the RequisitePro project in the Requirement Explorer
- Right-click, and click Properties...
- Select Link Policy
- Set the proxy type
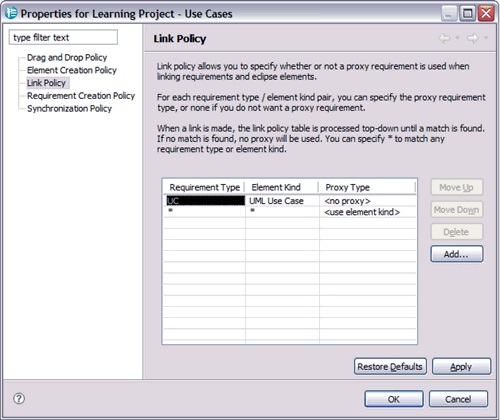
Note: Setting the proxy type to no proxy will create a direct link, setting the type to element kind will create an indirect link.
Note: Additional pairs can be added to the Link Policy by clicking Add... . The Link Policy is read by RSA in top-down order, meaning the integration will use the first applicable policy that it encounters starting from the top. - Click Apply
- Click OK
Linking Requirements to Elements
- Select the requirement in the Requirement Explorer
- Right click and click Linkability -> Add to Link Clipboard
- Select the domain element in the Project Explorer
- Right click and click Linkability -> Create Link to
Configuring Requirement Creation Policy
- Select the RequisitePro project in the Requirement Explorer
- Right click and click Properties...
- Select Requirement Creation Policy
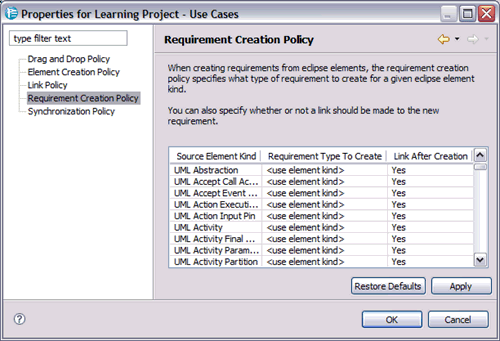
- Double-click in the Requirement Type to Create column to change the type
Note: You could possibly see PR or SR or the defined types in your project - Click Apply
- Click OK
Creating Requirements from Elements
- Select the domain element in the Project Explorer
- Right click and click Linkability -> Add to Link Clipboard
- Select the container (project or package) in the Requirement Explorer
- Right click and click Linkability -> Create Requirement from
Configuring Element Creation Policy
- Select the RequisitePro project in the Requirement Explorer
- Right click and click Properties...
- Select Element Creation Policy
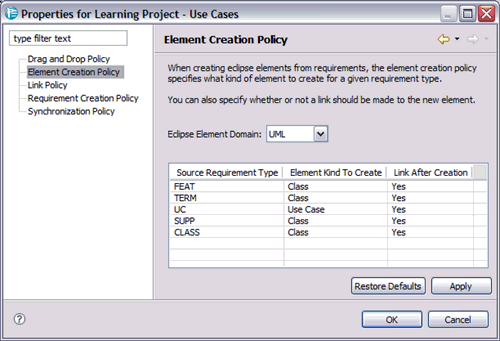
- Double-click in the Element Kind To Create column to change the type
- Click Apply
- Click OK
Creating Elements from Requirements
- Select the requirement in the Requirement Explorer
- Right click and click Linkability -> Add to Link Clipboard
- Select the container (model or package) in the Project Explorer
- Right click and click Linkability -> Create Element from
Configuring Synchronization Policy
The Synchronization policy controls the synchronization of name and documentation between the domain elements and the requirements that are directly linked.
- Select the RequisitePro project in the Requirement Explorer
- Right-click and click Properties...
- Select Synchronization Policy
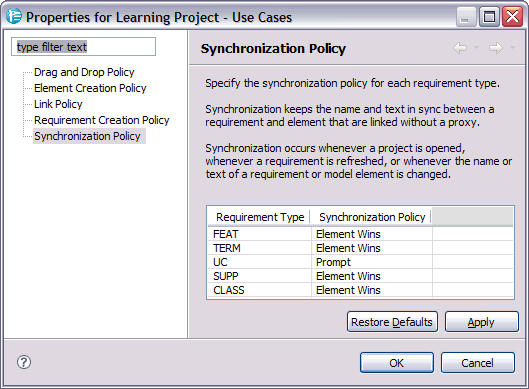
- Double-click in the Synchronization Policy column to change the policy
Note: The dialog below will appear if the Synchronization Policy is set to prompt
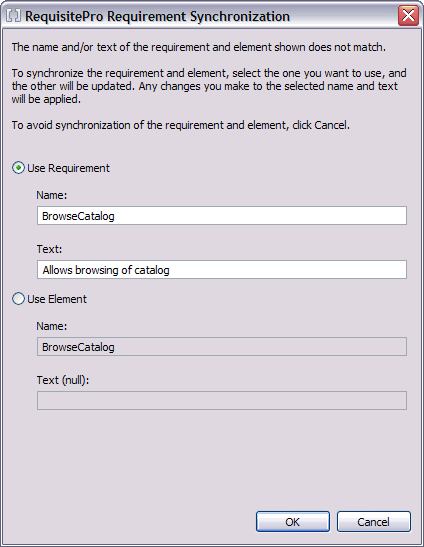
- Click Apply
- Click OK
Configuring Drag and Drop Policy
The Drag and Drop Policy controls whether elements or requirements are created in the container or a link is created to the container.
A container, in terms of the integration, is the RequisitePro project, packages and the UML model.
- Select the RequisitePro project in the Requirement Explorer
- Right-click and click Properties...
- Select Drag and Drop Policy

- Make desired selection
- Click Apply
- Click OK
Related Information
Was this topic helpful?
Document Information
Modified date:
10 September 2020
UID
swg21257387