Troubleshooting
Problem
- Customer needs the SNMP MIB for SVC. - The user is not notified of errors detected by the SAN Volume Controller. - Call home records sent to IBM are incomplete or incorrect. - The call home test record cannot be sent. - The call home test records are sent but true SVC errors are not.
Cause
When the SAN Volume Controller detects errors that require a user or a service action, an SNMP trap is sent to the master console. This trap is received by IBM Director and an E-mail notification is sent to the user specified address and optionally to IBM. The E-mail notifications might not be received or might be incorrect if:
1. The SAN Volume Controller SNMP Error Notification Settings are not configured to send traps to the master console.
2. The SAN Volume Controller cannot access the master console via the Ethernet network.
3. The master console registry settings do not permit the SNMP trap to be received by IBM Director.
4. The latest version of the SAN Volume Controller MIB is not installed on the master console.
5. IBM Director is not correctly configured to process the SNMP traps and generate the E-mail messages.
By default these setting are correct but they might have become corrupted or inadvertently changed.
Resolving The Problem
1. To verify the Error Notification Settings:
2. Launch the SAN Volume Controller Application.
3. In the portfolio expand the Service and Maintenance option and click Set Error Notification.
4. Verify that the SNMP Error Notification Level is set to either All or Hardware only.
5. Verify that the master console SNMP Community name and Address are included in the list of current SNMP Destinations. (SAN Volume Controller versions below V2.1 only permit a single IP address to be entered).
6. To verify the Ethernet path between the SAN Volume Controller and the master console, from the master console, ping the SAN Volume Controller cluster.
7. From a Command Prompt window type ping clustername. Where clusternameis the name or IP address of the SAN Volume Controller cluster that you are expecting to send the SNMP traps. If the ping request times out you might have a master console hardware problem or an IP network configuration problem. See the master console installation procedures for performing an Ethernet wrap test. See the customer network administrator if you suspect a network configuration problem.
8. To verify the master console registry and service settings, perform the following steps:
9. Registry settings must include:
"trapdSharePort162"=dword:00000000
"trapdTrapReceptionPort"=dword:000026de
If you are unsure if the settings are correct, perform the following steps:
10. Copy TrapFix.reg and NetviewFix.bat to C:\temp on the master console. (If this folder does not exist then create it).
![]()
![]()
11. Double click NetviewFix.bat.
12. Open the folder C:\temp\NetviewFix.log. The output messages should look like this:
TrapFix.reg imported into the registry
Stopping Tivoli NetView Service..........
Tivoli NetView Service stopped.
Tivoli NetView Service removed.
Tivoli NetView Service installed.
13. If any output message indicates that the script has failed call your support center for assistance.
14. Verify that the SNMP Service is set to Automatic, is started, has the SNMP community name included and is set to accept SNMP packets from any host. To do this:
15. From the desktop click Start->Settings->Control Panel.
16. Double click Administrative Tools.
17. Double click Services.
18. Double click SNMP Service.
19. Under the General tab the Startup type must be set to Automatic and the Service Status must be Started.
20. Under the Security tab the Accepted community names must include the community name that is set in the Error Notification Settings for the SAN Volume Controller. (See step 1 of this procedure). If that community name is not included, use the Add button to add the Community name and set the Community rights to READ WRITE.
vii. Under the Security tab verify that the Accept SNMP packets from any host radio button is checked.
21. Verify that the SNMP Trap Service is set to Manual and is stopped. To do this:
22. From the desktop click Start->Settings->Control Panel.
23. Double click Administrative Tools.
24. Double click Services.
25. Double click SNMP Trap Service.
26. Under the General tab the Startup type must be set to Manual and the Service Status must be Stopped.
27. The master console must now be rebooted to activate any changes that have been made.
28. The latest version of SVC software returns additional data in the SNMP trap. To correctly translate the SNMP data and include it in the E-mail the latest version of the SAN Volume Controller MIB must be installed. If you are in doubt about the version of the SAN Volume Controller MIB currently installed on IBM Director perform the following steps. If the correct version of the MIB is already installed performing these steps will do no harm:
29. Download the SVC MIB and IBM Director action plan from the link at the bottom of this page and copy them to the Master Console.
30. Start the IBM Director Console by double clicking on the IBM Director Console Desktop icon.
31. If the Event Action Plan Builder Wizard window pops up, close it.
32. In the Tasks pane, right click on SNMP Browser and select Compile a new MIB.
33. Navigate to the directory where the SVC MIB was downloaded to and select the MIB file.
34. Click OK. A Compile MIB status screen will pop up.
35. If no errors are displayed, MIB compilation has been successful and the Compile MIB status screen can be closed.
36. Event Action Plans on IBM Director specify the actions that need to be taken when the SNMP traps are received.
37. From the master console desktop, start the IBM Director console.
38. Click Tasks on the main menu bar and check Event Action Plan Builder.
39. In the Event Action Plans pane, fully expand all the menus.
40. In the Event Filters pane expand the Simple Event Filter menu entry.
41. In the Actions pane expand the Send and Internet (SMTP) E-mail menu entry.
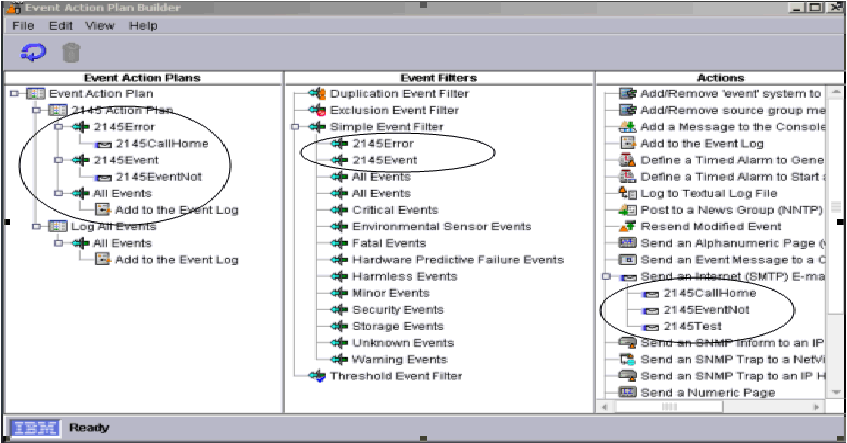
42. Verify that the menu entries are exactly as shown in the circled items in Figure 1 below.
43. If the event action plans have not been created as shown, or you have just installed the latest MIB or you suspect that any of the action plans are not correctly configured, perform the following steps:
44. The next steps will delete the existing action plans and customization of the plans. Some of the customization data might be useful when you restore the action plans. The content of the existing plan can be saved as follows:
45. In the Event Action Plan(s) pane, right click the Event Action Plan that you want to save. This might be 2145 Action Plan or Log All Events.
46. Click File->Export->HTML Document. The Export HTML Format window is opened.
47. Navigate to the directory where you would like to save this file (for example C:\temp).
48. Enter a file name and click OK.
49. The file that is saved can be used as a reference when you are restoring the action plan customization data later in this procedure.
50. In the Event Action Plan(s) pane right click and select delete for all references to 2145 Action Plan, 2145Error and 2145Event.
51. In the Event Filters pane, right click and delete all references to 2145Error and 2145Event.
52. In the Actions pane, right click and delete all references to 2145CallHome and 2145EventNot.
53. Ensure the IBM Director Action Plan has been copied to the Master Console.
54. From the Event Action Plan Builder window, click File->Import->Archive. The Select Archive File For Import window is opened.
55. Navigate to the directory where the 2145.plan is located, click the plan name and then click OK. The Import Event Action Plan window is opened.
56. Click the Import button. The 2145 Action Plan is loaded.
57. In the Actions pane, right click 2145CallHome and select Update. The Customize Action: 2145CallHome window is opened.
58. Fill in the E-mail address field. If the SAN Volume Controller is located in North America, Latin America, South America or the Caribbean Islands, enter: callhome1@de.ibm.com. If the SAN Volume Controller is located anywhere else in the world, enter: callhome0@de.ibm.com.
59. Fill in the Reply to address. Enter the E-mail address to which you want replies to be directed.
60. Fill in the SMTP E-mail server. Enter the name or IP address of the SMTP mail server.
61. Fill in the SMTP port. Enter the port number through which E-mail is sent to your E-mail server. The default is 25.
62. Fill in the following in the Body of E-mail Message. Complete the following text fields, replacing the text shown in italics. Do not change any other fields in the body of the E-mail message:
# Contact name = contact_name (maximum 72 characters)
# Contact phone number = telephone_number (maximum 72 characters)
# Offshift phone number = telephone_number (maximum 72 characters)
# Machine location = machine_location (maximum 72 characters)
63. Click File->Save.
64. In the Actions pane, right click 2145EventNot and select Update. The Customize Action: 2145EventNot window is opened.
65. Fill in the Internet E-mail Address. Enter an E-mail address (for example, the E-mail address of the system administrator).
66. Fill in the Reply to address. Enter the E-mail address to which you want replies to be directed.
67. Fill in the SMTP E-mail server. Enter the name or IP address of the SMTP mail server.
68. Fill in the SMTP port. Enter the port number through which E-mail is sent to your E-mail server. The default is 25.
69. Fill in the following in the Body of E-mail Message. Complete the following text field replacing the text shown in italics.
# Machine location = machine_location (maximum 72 characters)
70. Click File->Save.
71. If the 2145Test E-mail action is missing or you suspect that it is corrupted, perform the following steps:
72. If the 2145Test E-mail action is missing, double click Send an Internet (SMTP) E-mail.
73. Fill in the E-mail address field. If the SAN Volume Controller is located in North America, Latin America, South America or the Caribbean Islands, enter: callhome1@de.ibm.com. If the SAN Volume Controller is located anywhere else in the world, enter: callhome0@de.ibm.com.
74. Fill in the Reply to address. Enter the E-mail address to which you want replies to be directed.
75. Fill in the SMTP E-mail server. Enter the name or IP address of the SMTP mail server.
76. Fill in the SMTP port. Enter the port number through which E-mail is sent to your E-mail server. The default is 25.
77. Fill in the Subject of Message as 2145 Call Home Test.
78. Fill in the following in the Body of E-mail Message. Complete the following text fields replacing the text shown in italics.
# Contact name = contact_name (maximum 72 characters)
# Contact phone number = telephone_number (maximum 72 characters)
# Offshift phone number = telephone_number (maximum 72 characters)
# Machine location = machine_location (maximum 72 characters)
#Record type = 4
# Machine Type/Model = this is the machine type and model of any installed SAN Volume Controller. This will be either 21454F2 or 21458F2.
# Serial Number = the serial number of the machine type and model identified above.
Note: When filling out the machine type, model number and the serial number use the serial number of any SAN Volume Controller node that you have installed. For SAN Volume Controller model 4F2 the serial number label is located on the right edge of the front panel. For model 8F2 the label is located on the center of the front panel. Do not enter any hyphens in the machine type or serial number fields.
79. Click File->Save As.
80. Enter 2145Test in the pop-up box and click OK.
81. In the display in the Event Action Plan Builder window, the circled items should now appear as shown in Figure 1. If they do not then review the steps that you have taken above.

Figure 1
82. The 2145 Event Action Plan must be associated with all devices.
83. From the master console desktop start the IBM Director console.
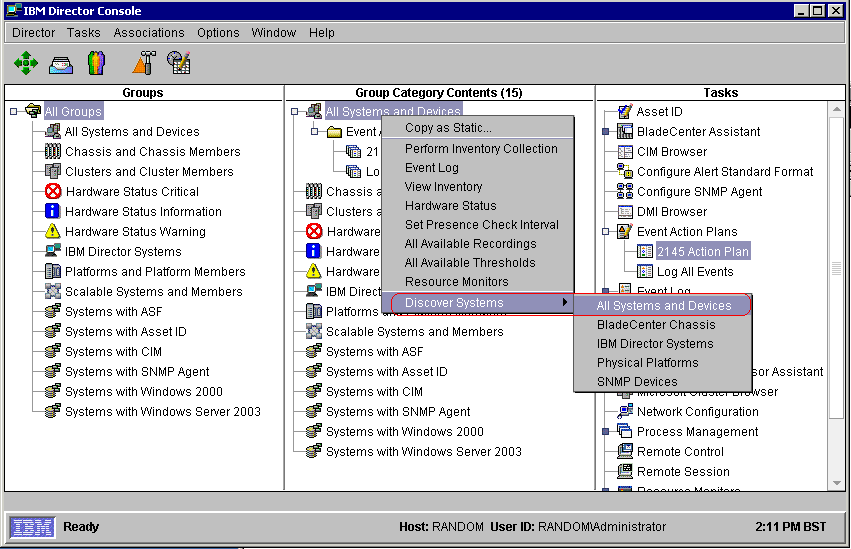
84. IBM Director has a requirement that at least one device must be discovered before Event Action Plans can be applied to All Systems and
devices. To do this left mouse click to select and highlight All Systems and Devices, then move the mouse pointer over Discover Systems, a
sub menu will appear, select by highlighting and left mouse click on All Systems and Devices.

Figure 2
85. Click Associations on the main menu bar and check Event Action Plans.
86. In the Groups pane click All Groups.
87. In the Group Category Contents pane expand All Systems and Devices and Event Action Plans.
88. In the Tasks pane expand Event Action Plans.
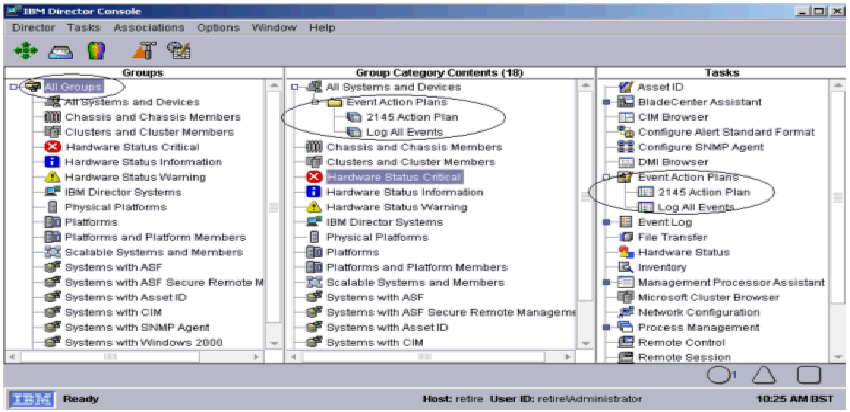
89. The 2145 Action Plan should be listed under Event Action Plans in the Group Category Contents pane as shown in Figure 3 below. If it is not as shown then perform the following:
90. Use the left mouse button to drag 2145 Action Plan from the Tasks pane to All Systems and Devices in the Group Category Contents pane.

Figure 3
Related Information
Was this topic helpful?
Document Information
Modified date:
17 June 2018
UID
ssg1S1002798