Question & Answer
Question
This document explains how to import a certificate using Heritage Digital Certificate Manager (DCM) that has a .p12 or .pfx extension.
Cause
Certificates are used to secure connections between clients and servers using TLS. Sometimes it is required that the IBM i platform install an external server's certificates on the system using Heritage Digital Certificate Manager (DCM).
Answer
Certificates with .pfx and .p12 extensions generally contain more than one certificate (they are sometimes referred to as certificate bundles). In most cases, it is the full certificate chain, meaning it contains the root certificate authority (CA), the intermediate CA, and the server certificate, with the private key information.
To import a .pfx or .p12 certificate into Heritage DCM, you will first need to move the file to the IFS. This can be done using binary FTP (preferred) or a mapped drive or, if available.
To import a .pfx or .p12 certificate into Heritage DCM, you will first need to move the file to the IFS. This can be done using binary FTP (preferred) or a mapped drive or, if available.
The root / directory is being used here as our sample directory where the certificate file is located.
You should do the following:
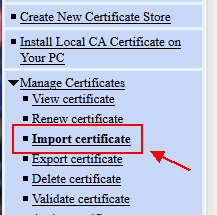
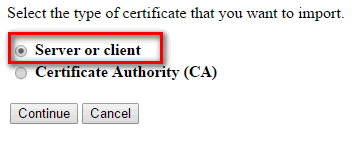
1. Select Manage Certificates and then click on Import certificate. The right side of the screen will have a radio button for Server or Client. Select it and click Continue.


2. You will see a field called Import file. Fill in the path and filename here. The example is using the root IFS directory which is just / and the file is called certificate.pfx so you should type /certificate.pfx here. This same method works for a certificate with the .p12 extension. Click Continue.

Note: If the certificate file includes the private key information, you will be prompted for a password when you click continue here. If you were given a password, enter it in the Password field.

3. You should receive a successful message here:

4. Click OK and you will be brought back to the Manage Certificates screen.
You should now be able to see the server certificate that was imported by going to Fast Path and then Work with server and client certificates. The newly imported certificate will be at the top. Note that it will not be called certificate.pfx. This is just the name of the file that the certificates were in (like a shell). In this example, the server certificate was called SFT Key.

You can now work with any certificates that were imported to complete whatever application setup the certificates were needed for.
[{"Line of Business":{"code":"LOB57","label":"Power"},"Business Unit":{"code":"BU058","label":"IBM Infrastructure w\/TPS"},"Product":{"code":"SWG60","label":"IBM i"},"ARM Category":[{"code":"a8m0z0000000CISAA2","label":"Digital Certificate Manager"},{"code":"a8m0z0000000CSxAAM","label":"Digital Certificate Manager-\u003EFAQs"}],"Platform":[{"code":"PF012","label":"IBM i"}],"Version":"7.1.0;7.2.0","Type":"MASTER"}]
Was this topic helpful?
Document Information
Modified date:
23 August 2022
UID
nas8N1019818