Troubleshooting
Problem
This document provides instructions for configuring a Personal Communications 5250 (PC5250) printer session profile when using V7R1M0 (7.1) or V6R1M0 (6.1 or R610) IBM i Access for Windows, or V5R4M0 (R540) iSeries Access for Windows.
Resolving The Problem
| Important Note: This document discusses IBM i Access for Windows, as well as older versions of "Client Access" including System i Access for Windows, iSeries Access for Windows and Client Access Express. These names essentially refer to the same product; however, the functionality and name changed over the last several releases. For the purposes of this document, the terms System i Access, iSeries Access and Client Access Express may be used interchangeably. Where a difference is important, the version of the product is used to identify the differences. |
This document provides instructions for configuring a Personal Communications 5250 (PC5250) printer session profile when using V7R1M0 (7.1) IBM i Access for Windows (5770XE1), V6R1M0 (6.1 or R610) IBM i Access for Windows (5761XE1), or V5R4M0 (R540), V5R3M0 (R530) or V5R2M0 (R520) iSeries Access for Windows (5722XE1).
A PC5250 printer session can be used to print a spooled file to a printer that can be accessed from the PC. This includes printers that are directly attached to the PC and printers that are attached to the network and configured in the Windows Printers and Faxes folder on the PC . Of course, there are exceptions to this. In general, if you can print to the printer from a specific PC, you should be able to print through a PC5250 printer session to the same printer.
This document was last updated on 13 June 2014.
Options for Configuring a PC5250 Printer Session
The following ways can be used to configure a PC5250 printer session, each with its own benefits:
| 1. | Configure the PC5250 printer session to use a Windows printer driver. This is the easiest way to configure a PC5250 printer session; however, it gives you only a small amount of control over how the output is printed. This is done by selecting File > Printer Control > Text on the menu bar and clicking on the Options or Advanced button (depending on the version of Client Access/400 you are using). Note: Configuring the PC5250 printer session to use a Windows printer driver is the only option available for Host-based or Windows-only printers. Some users have had issues with the font selection when printing to a Host-based or Windows-only printer, however it may help to download, install and select a Universal Print Driver from the printer manufacturer, assuming a Universal Print Driver is available. |
| 2. | Configure the PC5250 Printer Session to use a Printer Definition Table (PDT). This gives you control over how the output is printed by allowing you to copy and modify a Printer Definition Source File (PDF) and then create your own PDT file. |
| 3. | Configure the PC5250 printer session to use Host Print Transform (HPT). This causes the conversion from the SCS printer data stream of the operating system to the data stream for the printer to be done on the operating system. This is especially beneficial if several different printer emulation packages are being used (for example, PC5250, RUMBA/400, WSF, and others) because all of the output would look very similar. This also provides control over how the output is printed by allowing you to retrieve, modify, and create your own Workstation Customization Table (WSCST). Note: If printing to a host-based HP LaserJet printer that also supports HP PCL5e, or a host-based HP OfficeJet that also supports PCL3, you may be able to still use Host Print Transform (HPT) with a PC5250 printer session. However, it is recommended that you configure a second instance that uses the HP Universal Print Driver for Windows, which you can download from hp.com. Your Windows applications can continue to use the printer driver supplied with the printer, but you can setup the PC5250 printer session to use the HP Universal Print Driver for Windows. |
Some Information About Specifying a Workstation ID
PC5250 printer sessions support device naming (requesting a specific operating system device description name) by specifying a workstation ID under Communication > Configure. It is recommended that you specify a specific workstation ID for your PC5250 printer sessions so you can rely on it always having the same name. Otherwise, your printer session could connect with one device description name one day and a different device name the next day. If a specific name is used all the time, that name can be specified in a user profile or a printer file to direct output to that specific printer.
The workstation ID must follow the same rules as any other operating system device description:
| o | Must be 10 characters or less |
| o | Must start with an alphabetic character (A through Z) |
| o | The remaining characters can be an alphabetic character (A through Z), a numeric character (0 through 9), "$", "#", "@", "_" or "." |
Note: V5R1M0 Client Access Express added several enhancements for specifying a workstation ID. These enhancements include:
| o | Use computer name. Use the name of the computer as defined on the Identification tab of the Network properties page of the Windows Control Panel. |
| o | Use Windows user name. Use your Windows logon user ID. |
| o | Specify workstation ID. Provides a space for you to type the name of this workstation (up to 10 characters, must not start with a numeric and cannot contain a blank or any of the following characters: &, *, %, =, and +). |
| o | Add prefix to indicate printer or display. Specify this option to append a P or an S to the beginning of the device name. |
| o | Avoid duplicate names on this workstation. Specify this option to append a short session ID (A, B, C, and so on) to the end of the device name. This ensures that your workstation ID will not conflict on this workstation. |
| o | Avoid duplicate names with other workstations. Specify this option to append a character in the range of 1 through 9 and A through Z to the end of the device name. This ensures that your workstation ID does not conflict with the workstation IDs from other workstations. If you specify Avoid duplicate names on this workstation in addition to this option, the short session ID is appended first. |
| o | Truncate. Specify to truncate from the beginning or from the end of the workstation ID, when necessary. The workstation ID must not exceed 10 characters. This includes the characters that are added if you select Add prefix to indicate printer or display, Avoid duplicate names on this workstation, and Avoid duplicate names with other workstations. By default, the ending characters of the workstation ID are truncated. |
-
 Configuring a PC5250 Printer Session
Printer Must First be Installed within Windows
To configure a PC5250 printer session, the printer must first be installed and configured within Windows and the Windows PC must be able to successfully print to that printer.
1. Bring up the Windows Printers and Faxes folder by clicking on the Windows Start button and selecting Printers and Faxes. 2. If the printer is not listed, then follow the instructions provided by the printer manufacturer to install and configure the printer within WIndows, which will most likely involve using the Add Printer Wizard.
3. After the printer has been successfully installed and configured within Windows, right click on the printer and select Properties from the context or pop-up menu, click on the Print Test Page button.
4. Confirm that Windows was able to successfully print to the printer.
Warning: If printing to a Host-based or Windows-only printer, or if you run into issues with garbage output or get a "No printer" error when printing using a PC5250 printer session, try clicking on the Advanced tab and un-checking the "Enable advanced printing features" option.
For example:
Note: You may also need to try selecting "Start printing after last page is spooled" rather than "Start printing immediately".
Configure the PC5250 Printer Session to Select the Printer
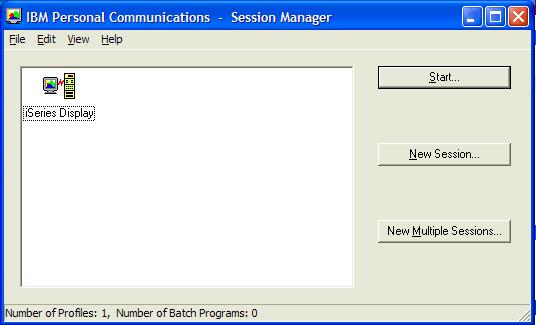
After it has been confirmed that you are able to print a Windows Test Page to this printer, use the following step-by-step instructions to configure a PC5250 printer session:1. If running 7.1 or 6.1 IBM i Access for Windows (5761XE1), you can configure a new PC5250 printer session by clicking on the Windows Start button, then selecting Programs > IBM i Access for Windows > Emulator > Start or Configure Session and then clicking on the New Session button from the IBM Personal Communication - Session Manager dialog box.
If running V5R4M0 (R540), V5R3M0 (R530) or V5R2M0 (R520) iSeries Access for Windows (5722XE1), you can configure a new PC5250 printer session by clicking on the Windows Start button then selecting Programs > IBM iSeries Access for Windows > Emulator > Start or Configure Session, and then clicking on the New Session button from the IBM Personal Communication - Session Manager dialog box as shown below.
2a. Next, you will see the Configure PC5250 dialog box. Verify that the correct System name is listed. If not, click on the pulldown next to the System name, and choose the system name from the list. If the system name is not shown, type the name of the system or the IP address for that system, and iSeries Access automatically establishes a connection to that system.
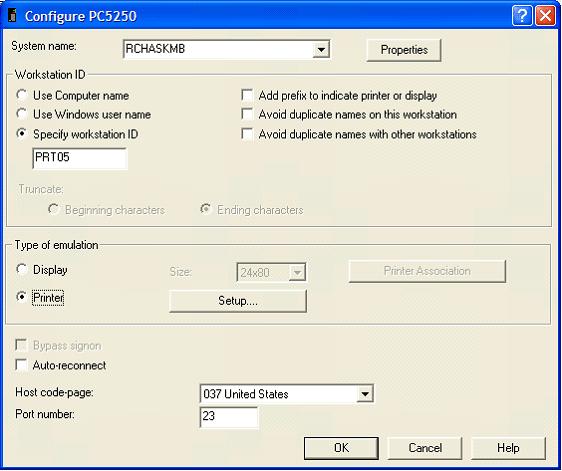
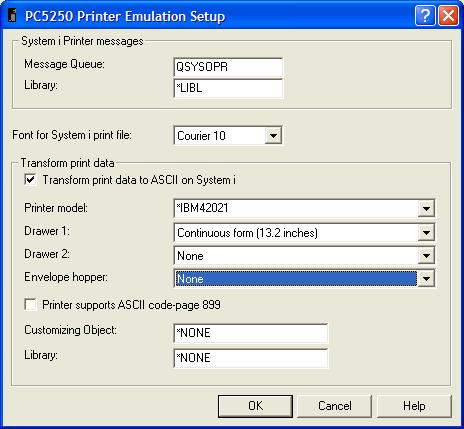
2b. Set the Workstation ID to the name that you want to use for the printer device description (for example, PRT05, P5, or JOHNPRT). 2c. Set the Type of emulation to Printer. 2d. Click on the Setup button for additional options available only for PC5250 printer sessions. This will bring up the PC5250 Printer Emulation Setup dialog box:

Messages pertaining to the printer writer will, by default, go to the QSYSOPR message queue. Another message queue can be specified; however, that message queue must already exist before configuring the PC5250 printer session; otherwise, the session will be unable to connect.
A font can be specified, which corresponds to the Font identifier (FONT) parameter in the *VRT printer device description that gets created on the system. However, this typically has no effect on the font used when printing spooled files because the FONT parameter in the printer device description is only used when the FONT parameter in the spooled file attributes is set to *DEVD, which is rare.
The remainder of the settings on the PC5250 Printer Emulation Setup dialog box pertain to the use of Host Print Transform (HPT). HPT is generally recommended when printing to an HP PCL-capable laser printer, an HP PCL3-capable ink jet printer, or an IBM Proprinter or Epson-compatible dot matrix or line printer. However, HPT cannot be used when printing to a Host-based or Windows-only printer. For more information, refer to the section titled "Configuring a PC5250 Printer Session to use Host Print Transform (HPT)" below.
If printing to a host-based HP LaserJet printer that also supports HP PCL5e, or a host-based HP OfficeJet that also supports PCL3, you may be able to still use Host Print Transform (HPT) with a PC5250 printer session. However, it is recommended that you configure a second instance that uses the HP Universal Print Driver for Windows, which you can download from hp.com. Your Windows applications can continue to use the printer driver supplied with the printer, but you can setup the PC5250 printer session to use the HP Universal Print Driver for Windows.
Note: To determine whether or not a specific printer model is a Host-based or Windows-only printer, refer to your printer manuals. Then, search on the manufacturer Web site, contact the manufacturer directly, or see if the Rochester Support Center software knowledgebase has any information on your specific printer model, or a similar printer model, starting with the following document:
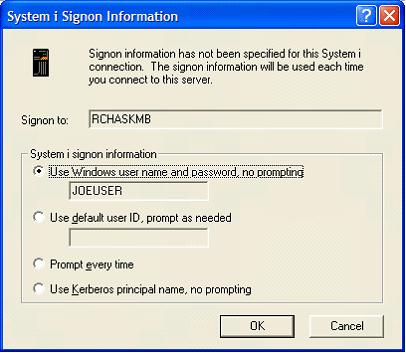
N1019605: Information on Printers from Various Manufacturers2e. Select "Auto-reconnect" if you want the session to automatically attempt to reconnect to the system if the session gets disconnected for some reason other than a normal disconnect. 2f. The Host code-page indicates the default translation table that is to be used to map IBM i EBCDIC codes from the IBM i system to the appropriate ANSI graphics on the PC. 2g. The Port number is typically set to 23 unless a Secure Sockets Layer (SSL) connection is needed, in which case it should be set to 992. 2h. After selecting your options, click OK to close the PC5250 Printer Emulation Setup dialog box. 2i. Click OK to close the Configure PC5250 dialog box. 3. If you have not yet connected to the server, you will see a System i Signon Information dialog box or an AS/400 Signon Information dialog box. This dialog box lets you specify the sign-on information that is used each time you connect to this server.
4a. A *VRT 3812 printer device description in library QSYS and an output queue in library QUSRSYS should automatically be created on the server, using the workstation ID specified in Step 2a above, prior to the PC5250 printer session connecting. There is no need to manually create the printer device description and output queue ahead of time. After all of this has been done, the PC5250 printer session should show you the Printer Status pop-up dialog box with the Ready and On-Line lights turned on.
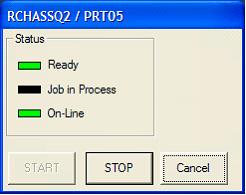
If the Printer Status pop-up dialog box is not shown, select Edit > Preferences > Appearance > Print Session Setup from the menu bar and verify that Show Dialog is selected (beneath Print Status Dialog).
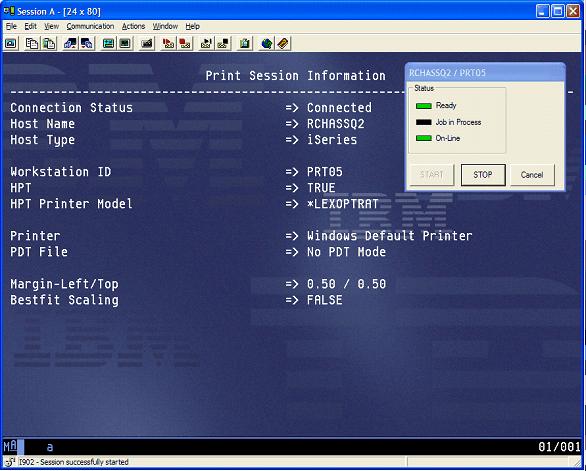
Note: If Show Dialog is selected but the Printer Status pop-up dialog box is shown, the PC5250 printer session is unable to connect for some reason. If the device description and output queue have been created, the device may be in use through another session on the same or another PC. If the device description and output have not been created, check the QAUTOVRT (Autoconfigure virtual devices) system value and verify that it is not set too low. Also, verify that you have not specified an incorrect setting on the PC5250 Printer Emulation Setup dialog box; for example, the message queue or customizing object name/library.4b. If running 7.1 or 6.1 IBM i Access for Windows, or a newer version of iSeries Access for Windows, the main PC5250 printer session window will show Print Session Information (unless you select Edit > Preferences > Appearance > Print Session Setup from the menu bar and uncheck the option to Show Text Information). The information shown includes the Connection Status, Host Name, Host Type, Workstation ID, HPT, HPT Printer Model, Printer, PDT File, Margin-Left/Top, and Bestfit Scaling. For example:
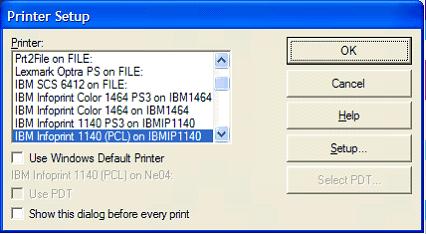
5a. Select File > Printer Setup on the menu bar for the PC5250 printer session to bring up the Printer Setup dialog box. Click on the appropriate Windows printer driver, and click Setup to bring up the printer driver settings. This helps PC5250 remember the printer driver that has been selected.
Note: Configuring the PC5250 printer session to use a Windows printer driver is the only option available for Host-based or Windows-only printers. Some users have had issues with the font selection when printing to a Host-based or Windows-only printer, however it may help to download, install and select a Universal Print Driver from the printer manufacturer, assuming a Universal Print Driver is available.5b. Click OK to exit the printer driver settings without making any changes.

Then click OK to exit the Printer Setup panel.6. Select File > Save As on the menu bar to save the PC5250 printer session workstation profile. Give the workstation profile an appropriate name (for example, printer.ws, prt05.ws, p5.ws, or JohnPrt.ws), and specify a description (such as Printer Session), if desired, and then click Save.

7. At this point, your new PC5250 printer session should be shown in the IBM Personal Communications - Session Manager dialog box.

Note: In the future, the printer session can be started by clicking on the Windows Start button, then selecting Programs > IBM i Access for Windows > Emulator > Start or Configure Session, and then double-clicking on the icon added for the printer session. A shortcut to this icon can also be created on the Windows Desktop for more convenience in starting the printer session, or a shortcut can be created in the Windows Startup folder to have the printer session started automatically each time the PC is rebooted.
- Configuring a PC5250 Printer Session to use a Windows Printer Driver
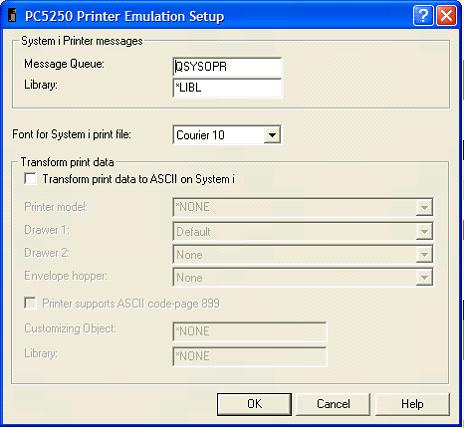
At this point, the PC5250 printer session will be configured to use the Windows printer driver without Host Print Transform (HPT) or a Printer Definition Table (PDT) file, unless the "Transform print data to ASCII on System i" or "Transform print data to ASCII on iSeries" option was selected on the PC5250 Printer Emulation Setup dialog box or the "Use PDT" option was selected on the Printer Setup dialog box.
Host Print Transform (HPT) is generally recommended when printing to an HP PCL-capable laser printer, an HP PCL3-capable ink jet printer, or an IBM Proprinter or Epson-compatible dot matrix or line printer. Printer Definition Table (PDT) files are also generally recommended. Both options provide a way to control how the output is printed by allowing you to create either a modified Workstation Customizing Object (WSCST) or a modified PDT file. However, neither HPT nor a PDT file can be used when printing to a Host-based or Windows-only printer. For more information, refer to the section titled "Configuring a PC5250 Printer Session to use Host Print Transform (HPT)" and the section titled "Configuring a PC5250 Printer Session to Use a Printer Definition Table (PDT)" below.
Usually the deciding factor on which option to choose is whether the printer is a Host-based or Windows-only printer, since the PC5250 printer session will not print to a Host-based or Windows-only printer when configured to use Host Print Transform (HPT) or a Printer Definition Table (PDT) file. However, the output received can vary depending on the options selected, so it is a good idea to test your printer session with several different types of spooled files before deciding whether to configure the PC5250 printer session to use Host Print Transform (HPT), a Printer Definition Table (PDT) File, or the Windows Printer Driver alone.
Changing the Path to PC5250 Emulator Files (6.1 and 7.1 IBM i Access for Windows)
If running 6.1 or 7.1 IBM i Access for Windows, change the Path to PC5250 emulator files option from "My Application Data" or "User specified path" to "All Users Application Data" prior to editing or replacing your PCSPD.DAT and PCSPDW.DAT files.
This will cause IBM i Access for Windows to use the \IBM\Client Access\Emulator\private folder under the Windows All Users\Application Data folder for PC5250 display and printer emulation sessions, By default, this folder would be:
C:\Documents and Settings\All Users\Application Data\IBM\Client Access\Emulator\private
This change can be made by doing the following:1. Close all PC5250 display and printer sessions. 2. Bring up the IBM i Access for Windows Properties from the Windows Control Panel, or by clicking on the Windows Start button and navigating to All Programs > IBM i Access for Windows > IBM i Access for Windows Properties. 3. Click on the PC5250 tab and set the "Path to PC5250 emulator files" to "All Users Application Data". For example:
4. Click on OK to close the IBM i Access for Windows Properties panel. 5. Restart your PC5250 display and printer sessions.
Note: After making this change, you may need to manually move your *.ws, *.bat and *.ini files from the previous "My Application Data" folder, or user specified path, to the "All Users Application Data" folder (for example, "C:\ProgramData\IBM\Client Access\Emulator\private"). You may also need to manually change or replace any existing icons or shortcuts that point to your PC5250 display and printer sessions (*.ws) or multiple sessions batch (*.bat) files.
If this does not resolve the issue, you can try changing the font mapping using the instructions in the following document:
N1016634: IBM i Access for Windows: Changing the Font Mapping in PC5250 to Use Courier New Rather Than Courier
- Configuring a PC5250 Printer Session to Use a Printer Definition Table (PDT)
Configuring the PC5250 Printer Session to use a Printer Definition Table (PDT) gives you control over how the output is printed by allowing you to copy and modify a Printer Definition Source File (PDF) and create a PDT file. However, not all printers are supported with PDT files. For instance, there are no PDT files available for PostScript printers or for any Host-based or Windows-only printers.
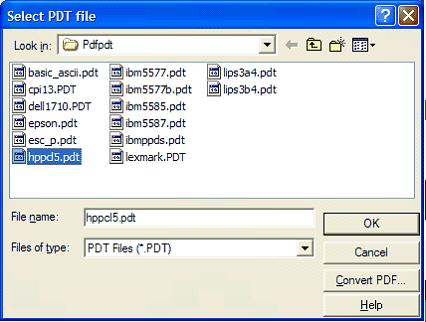
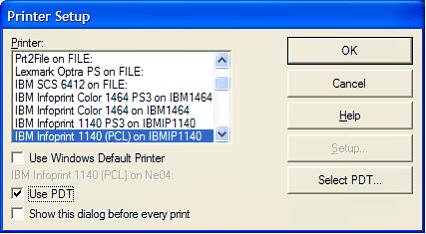
To configure a PC5250 printer session to use a Printer Definition Table (PDT) file, do the following:1. Select File > Printer Setup on the menu bar to bring up the Printer Setup screen. Place a check on Use PDT, and then click on the Select PDT button to bring up the Select PDT file screen.

2. Look through the list of file names for a PDT file that corresponds to the Windows printer driver being used (for example, hpdskjt.pdt for most of the HP DeskJet printers). Click on the PDT file to select it, and click OK to exit the Select PDT file dialog box.
Note: Not all printers are supported with a Printer Definition Table (PDT) file. If you cannot find a PDT file that corresponds to your printer, check the printer manual to see what other types of printers that your printer emulates. For example, there are no PDT files listed for the Lexmark Optra printers or the HP LaserJet 5, 6, 4000, or 8000 printers; however, because they all emulate the HP LaserJet 4 printer, you can use the hplj4.pdt file.
Another option would be to look through the Rochester Support Center Knowledge Base documents for information on your particular model of printer, starting with the following document:
N1019605: Information on Printers from Various Manufacturers3. Click OK to exit the Printer Setup dialog box.
4. Select File > Save on the menu bar to save the changes.
- Configuring a PC5250 Printer Session to use Host Print Transform (HPT)
General Information About Host Print Transform (HPT)
Note: This information can also be found in the following document:
N1019470: Using Host Print Transform (HPT) with a PC5250 Printer Session
ASCII printers can be attached to the System i server through a PC (using WSF, RUMBA/400, PC5250, or a third-party emulation package) or through hardware (for example, a 3179 or 3477 display, an ASCII Workstation Controller, a Lexmark MarkNet XLE, or an HP JetDirect card).
Host Print Transform is an operating system function that converts an operating system spooled file (in the *SCS or *AFPDS data stream) into an ASCII printer data stream. This can be used in conjunction with most printer emulation software and hardware. One of its benefits is that it can create the same look and feel when printing through a variety of printer emulation software and hardware. For instance, if you have printers connected to some PCs running WSF under Client Access for DOS with Extended Memory, others running RUMBA/400 under Client Access for Windows 3.1, others running PC5250 under Client Access/400 for Windows 95/98/NT, and still others connected to the LAN with an IP address, you can use Host Print Transform with all of these. The output will look very similar across all of the ASCII printers.
Some printer emulation software (such as PC5250 and WSF) require that Host Print Transform (HPT) is specified in the printer session profile. When the printer session connects to the operating system, the emulation software automatically changes the printer device description to reflect the settings made in the printer session profile. If you change the printer device description instead, your changes are automatically removed the next time you connect the PC5250 printer session.
Note: Not all printers are supported with Host Print Transform. This includes all PostScript printers and any of the new Windows-only printers such as the HP DeskJet 820 Series printers, the Lexmark 2070 printer, or the Lexmark WinWriter 150 printer.
Note: If printing to a host-based HP LaserJet printer that also supports HP PCL5e, or a host-based HP OfficeJet that also supports PCL3, you may be able to still use Host Print Transform (HPT) with a PC5250 printer session. However, it is recommended that you configure a second instance that uses the HP Universal Print Driver for Windows, which you can download from hp.com. Your Windows applications can continue to use the printer driver supplied with the printer, but you can setup the PC5250 printer session to use the HP Universal Print Driver for Windows.
Configuring a PC5250 Printer Session to Use Host Print Transform (HPT)
To configure a PC5250 printer session to use Host Print Transform (HPT), do the following:1. Select Communication > Configure on the menu bar to bring up the Configure PC5250 dialog box.

2. Verify that the Type of emulation is set to Printer, and then click Setup to bring up the PC5250 Printer Emulation Setup dialog box.

3. Select Transform print data to ASCII on System i or Transform print data to ASCII on AS/400.

4. Click on the down arrow next to Printer Model, and look through the list for a printer that corresponds to the type of printer hardware being used. Click on the printer to select it.

Tip: If you cannot find a printer in the list that corresponds to your printer, check your printer manual or refer to the following document to see what other types of printers it emulates:
N1019605: Information on Printers from Various Manufacturers
If you find a manufacturer type and model (MFRTYPMDL) setting suggested for your printer, but that setting is not available in PC5250, please refer to the following document:
N1019698: Printer Model Settings for Host Print Transform (HPT)
to find out the name of the system-supplied Workstation Customizing Object (WSCST) that corresponds to that MFRTYPMDL setting, then follow the instructions in the section titled "Configuring a PC5250 Printer Session to use Host Print Transform (HPT) with a Workstation Customizing Object (WSCST)".
Tip: If printing to an HP LaserJet or compatible printer but you are unsure which printer model to select, try using *HP4, *HP5SI, *HP4000 or *HPCOLORLJ to see one of these is better for drawer selection. If you wish to print 132-column spooled files in a larger 13.3 character per inch (CPI) font when performing Computer Output Reduction (COR) processing, then try specifying *LEXOPTRA, *RICOHAP3200 or *LEXOPTRAC to see if any of those settings work any better.
Tip: If printing to a dot matrix or line printer but you are unsure which printer model to select, see if you can find out whether the printer is in IBM Proprinter or Epson emulation mode, then try using either *IBM42021 (IBM Proprinter XL) or *EPFX1170 (Epson FX-1170).
Caution: Do not leave the Printer Model set to *NONE and do not leave it set to IBM 3812 Pageprinter unless you are actually printing to an old IBM 3812 ASCII printer. The Printer Model refers to the type of printer that is attached to your PC, not the type of printer emulation that is done on the operating system. 5a. If printing to an HP PCL-capable laser printer or ink jet printer, or if printing to a dot matrix or line printer that uses an automatic cut-sheet feeder, then set Drawer 1 and Drawer 2 to the appropriate paper size, such as "Letter (8.5 x 11 inches)" or "Legal (8.5 x 14 inches)".
Set Envelope hopper to the appropriate envelope size, such as "Number 9 (3.875 x 8.875 inches)", "Number 10 (4.125 x 9.5 inches)" or "None".
The option for Printer supports ASCII Code Page 899 can be checked if the printer hardware supports ASCII Code Page 899 (Symbol - Personal Computer). However, this is typically not needed unless printing symbols using the old OfficeVision/400 (OV/400) product.
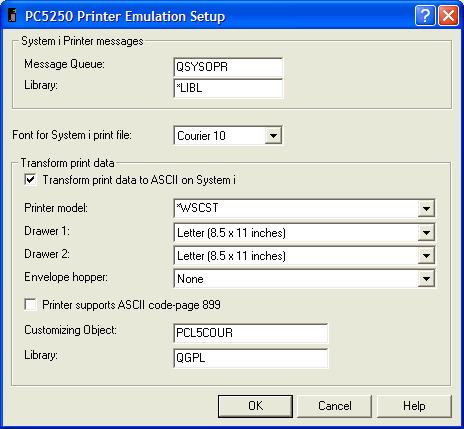
Set Customizing Object to the name of the system-supplied or modified Workstation Customizing Object (WSCST). Also specify the name of the library that contains this modified workstation customizing object. You can specify *LIBL if the library is in one of the libraries that is in the system-library list (such as QGPL or QUSRSYS), but specifying the exact library name is preferred.

Note: Leave the Customizing Object set to *NONE unless using a system-supplied or modified Workstation Customizing Object (WSCST). For more information on the Customizing Object option, refer to the section titled "Configuring a PC5250 Printer Session to use Host Print Transform (HPT) with a Workstation Customizing Object (WSCST)" below.5b. If printing to a dot matrix or line printer that uses continuous-form paper or if printing to a thermal label printer or receipt printer, then set Drawer 1 to either "Continuous form (8.0 inches)" or "Continuous form (13.2 inches)". If printing to a line printer that has a multiple tractor feeder you can set Drawer 2 to "Continuous form (8.0 inches)" or "Continuous form (13.2 inches)", otherwise it should be set to "None".
Set Envelope hopper to the appropriate envelope size, such as "Number 9 (3.875 x 8.875 inches)", "Number 10 (4.125 x 9.5 inches)" or "None".
The option for Printer supports ASCII Code Page 899 can be checked if the printer hardware supports ASCII Code Page 899 (Symbol - Personal Computer). However, this is typically not needed unless printing symbols using the old OfficeVision/400 (OV/400) product.
Set Customizing Object to the name of the system-supplied or modified Workstation Customizing Object (WSCST). Also specify the name of the library that contains this modified workstation customizing object. You can specify *LIBL if the library is in one of the libraries that is in the system-library list (such as QGPL or QUSRSYS), but specifying the exact library name is preferred.
Note: Leave the Customizing Object set to *NONE unless using a system-supplied or modified Workstation Customizing Object (WSCST). For more information on the Customizing Object option, refer to the section titled "Configuring a PC5250 Printer Session to use Host Print Transform (HPT) with a Workstation Customizing Object (WSCST)" below.6. Click OK to exit the PC5250 Printer Emulation Setup panel, which will bring you back to the Configure PC5250 panel.

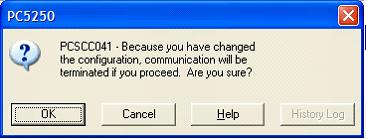
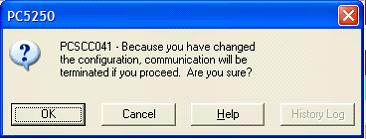
7. Click OK to exit the Configure PC5250 panel. You will then see a PC5250 dialog box that displays message, PCSCC041 - Because you have changed the configuration, communication will be terminated if you proceed. Are you sure? Click OK. This causes PC5250 to disconnect the display session and reconnect as a printer session using the workstation ID that you specified.
8. Select File > Save on the menu bar. 9. Sign onto a PC5250 display session. Use the Display Device Description (DSPDEVD) command to verify that Host Print Transform has been set up correctly on the operating system.
- Configuring a PC5250 Printer Session to use Host Print Transform (HPT) with a Workstation Customizing Object (WSCST)
Host Print Transform provides a way to change the way it converts spooled files into the ASCII printer data stream. This is done by retrieving a workstation customization table, editing the source file member, creating a new workstation customizing object, and using that modified workstation customizing object (WSCST) with a PC5250 printer session, a *LAN 3812 device description, or a Remote Output Queue (RMTOUTQ).
Note: PC5250 printer sessions can be configured to specify a system-supplied WSCST object, as well as a modified WSCST object. For a list of the system-supplied Workstation Customizing Objects (WSCSTs) that correspond to each of the available MFRTYPMDL settings, please refer to the following document:
N1019698: Printer Model Settings for Host Print Transform (HPT)
To configure a PC5250 printer session to use Host Print Transform (HPT) with a system-supplied or modified Workstation Customizing Object (WSCST), do the following:1. Select Communication > Configure on the menu bar to bring up the Configure PC5250 dialog box.

2. Verify that the Type of emulation is set to Printer, and then click Setup to bring up the PC5250 Printer Emulation Setup dialog box.
3. Select Transform print data to ASCII on System i or Transform print data to ASCII on AS/400.

4. Click on the down arrow next to Printer Model, scroll down to the bottom of the list, and select *WSCST.
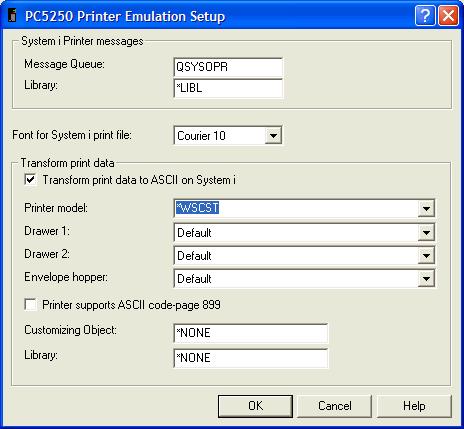
Caution: Do not leave the Printer Model set to *NONE and do not leave it set to IBM 3812 Pageprinter unless you are actually printing to an old IBM 3812 ASCII printer. The Printer Model refers to the type of printer that is attached to your PC, not the type of printer emulation that is done on the operating system.
Note: Typically, if you cannot find a printer in the list that corresponds to your printer you should check your printer manual or refer to Rochester Support Center knowledgebase document New to see what other types of printers it emulates. However, the printer model setting is overridden (other than the implied paper size that is used if Drawer 1 or Drawer 2 are left set to "Default") when specifying a customizing object.5a. If printing to an HP PCL-capable laser printer or ink jet printer, or if printing to a dot matrix or line printer that uses an automatic cut-sheet feeder, then set Drawer 1 and Drawer 2 to the appropriate paper size, such as "Letter (8.5 x 11 inches)" or "Legal (8.5 x 14 inches)".
Set Envelope hopper to the appropriate envelope size, such as "Number 9 (3.875 x 8.875 inches)", "Number 10 (4.125 x 9.5 inches)" or "None".
The option for Printer supports ASCII Code Page 899 can be checked if the printer hardware supports ASCII Code Page 899 (Symbol - Personal Computer). However, this is typically not needed unless printing symbols using the old OfficeVision/400 (OV/400) product.
Set Customizing Object to the name of the system-supplied or modified Workstation Customizing Object (WSCST). Also specify the name of the library that contains this modified workstation customizing object. You can specify *LIBL if the library is in one of the libraries that is in the system-library list (such as QGPL or QUSRSYS), but specifying the exact library name is preferred.
As an alternative, you can set the printer model to one of the *WSCST choices that indicate a specific paper size (such as *WSCSTLETTER for letter-sized paper, *WSCSTLEGAL for legal-sized paper) but setting the Printer model to *WSCST and setting Drawer 1 and Drawer 2 is sufficient.
Note: In the above example, the Customizing Object is set to PCL5COURIER in library QGPL, which is one of the pre-built Workstation Customizing Objects (WSCSTs) supplied by the following document:
N1019007: Pre-Built Workstation Customizing Objects (WSCSTs) from IBM iSeries Remote Technical Support5b. If printing to a dot matrix or line printer that uses continuous-form paper or if printing to a thermal label printer or receipt printer, then set Drawer 1 to either "Continuous form (8.0 inches)" or "Continuous form (13.2 inches)". If printing to a line printer that has a multiple tractor feeder you can set Drawer 2 to "Continuous form (8.0 inches)" or "Continuous form (13.2 inches)", otherwise it should be set to "None".
Set Envelope hopper to the appropriate envelope size, such as "Number 9 (3.875 x 8.875 inches)", "Number 10 (4.125 x 9.5 inches)" or "None".
The option for Printer supports ASCII Code Page 899 can be checked if the printer hardware supports ASCII Code Page 899 (Symbol - Personal Computer). However, this is typically not needed unless printing symbols using the old OfficeVision/400 (OV/400) product.
Set Customizing Object to the name of the system-supplied or modified Workstation Customizing Object (WSCST). Also specify the name of the library that contains this modified workstation customizing object. You can specify *LIBL if the library is in one of the libraries that is in the system-library list (such as QGPL or QUSRSYS), but specifying the exact library name is preferred.
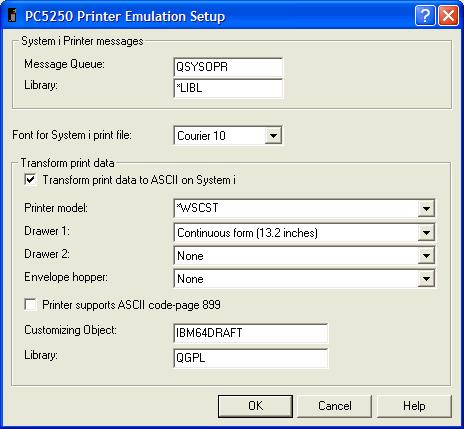
As an alternative, you can set the printer model to one of the *WSCST choices that indicate a specific paper size (such as *WSCSTCONT80 for 80-column or narrow-carriage continuous form paper, or *WSCSTCONT132 for 132-column or wide-carriage continuous form paper) but setting the Printer model to *WSCST and setting Drawer 1 and Drawer 2 is sufficient.
Note: In the above example, the Customizing Object is set to IBM64DRAFT in library QGPL, which is one of the pre-built Workstation Customizing Objects (WSCSTs) supplied by the following document:
N1019007: Pre-Built Workstation Customizing Objects (WSCSTs) from IBM iSeries Remote Technical Support6. Click OK to exit the PC5250 Printer Emulation Setup panel, which will bring you back to the Configure PC5250 panel.

7. Click OK to exit the Configure PC5250 panel. You will then see a PC5250 dialog box that displays message, PCSCC041 - Because you have changed the configuration, communication will be terminated if you proceed. Are you sure? Click OK. This causes PC5250 to disconnect the display session and reconnect as a printer session using the workstation ID that you specified.
8. Select File > Save on the menu bar. 9. Sign onto a PC5250 display session. Use the Display Device Description (DSPDEVD) command to verify that Host Print Transform has been set up correctly on the operating system.
- For More Information
For more information on configuring PC5250 Printer sessions, please refer to the following documents:
N1018606: Print Status Dialog Box does not Display on a PC5250 Printer Session
N1019636: Capabilities and Limitations of Printing when Using iSeries Access for Windows
Historical Number
495529808
Was this topic helpful?
Document Information
Modified date:
18 December 2019
UID
nas8N1018716