Troubleshooting
Problem
This document will give the basic steps to SLIP (replace over the top of the current installed) install the operating system from tape or optical or Virtual Optical.
Resolving The Problem
This document will give the basic steps to SLIP install the operating system from tape or CD or Virtual optical. We will not be going into great detail. This document will provide only the basic steps you will need to perform this action. While this document covers most all installations, it in no way implies that it will fit every situation.
You will need to have your tape that includes a SAVSYS or the operating system discs (V5Rx = B29xx_01 and B29xx_02 CDs, V6R1 = B29xx_01 DVD).
You will need to have your tape that includes a SAVSYS or the operating system discs (V5Rx = B29xx_01 and B29xx_02 CDs, V6R1 = B29xx_01 DVD).
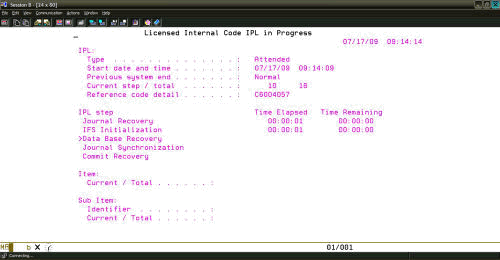
You will need to load the media and put the system in a B/Manual mode and start an IPL of the system. The first screen that you will come to will be the IPL or install the operating system screen.
Using image catalog:
If you are at V7R1 or V7R2 and using Virtual Optical images inside an Image Catalog, you are required to have both the I_BASE_01 and the B_GROUPx_01 images loaded into the Image Catalog. At V7R3 and above this is not a requirement but it is a good practice. Also, make sure that you have all other optical drives and image catalogs unloaded with the exception of the virtual device you want to use. Another good practice but not a requirement at R720 and above is to use the VFYIMGCLG command before you B M IPL the system. You need to load the images into the image catalog and mount at the very least the I_BASE_01 image. It is also suggested you mount the B_GROUPx_01 image but again not a requirement in my testing. See the *NOTE at Step 3 further down in this document.
1. The first screen that you will come to will be the IPL or install the operating system screen as shown below:
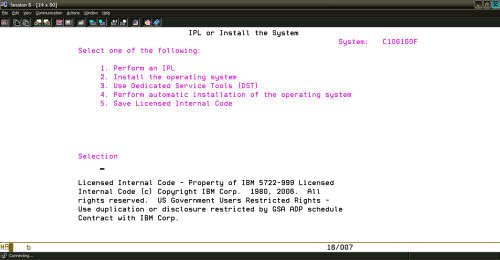
2. On this screen, you will need to select Option 2 to install the operating system.

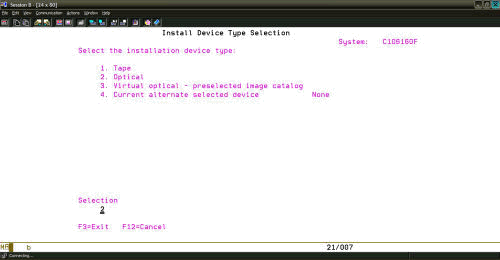
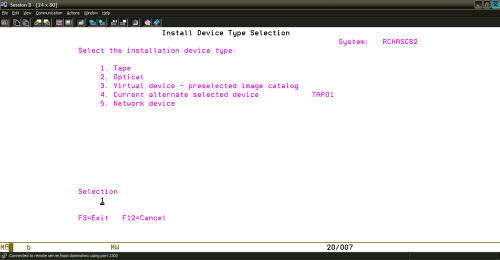
3. Once you select the option to install the operating system, you will be presented a screen to select the media to install from. At V6R1, you have one additional option on this screen. It has been included in Step 4, and it is the only difference between the releases. When looking at these two screen shots, they show that two different types of installation devices have been selected. You will need to select the one appropriate to your situation.
Screenshot from V5R4 and below
Screenshot from V6R1 and above
1. The first screen that you will come to will be the IPL or install the operating system screen as shown below:
2. On this screen, you will need to select Option 2 to install the operating system.
3. Once you select the option to install the operating system, you will be presented a screen to select the media to install from. At V6R1, you have one additional option on this screen. It has been included in Step 4, and it is the only difference between the releases. When looking at these two screen shots, they show that two different types of installation devices have been selected. You will need to select the one appropriate to your situation.
Screenshot from V5R4 and below
Screenshot from V6R1 and above
*NOTE: If you are installing only the IBMi i5 OS and using image catalog you would select Opton 3 to use the image catalog you loaded before the B M IPL was started.
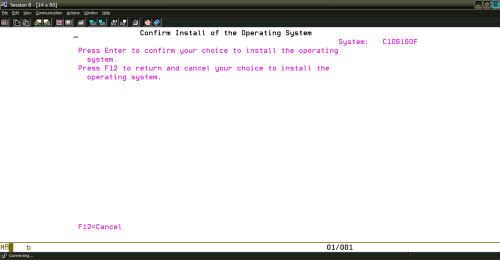
4. Once you have selected your installation device, you will need to confirm your choice to install the operating system by pressing Enter.
5. After pressing Enter on the screen above, you will go into the start of an IPL.
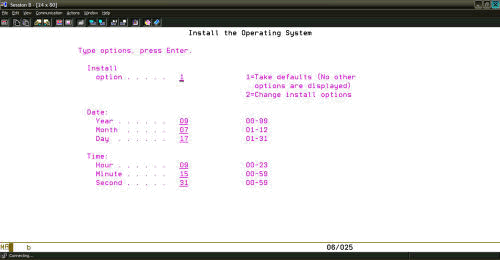
6. You will come to the Install the Operating System options screen. For a normal SLIP, you should select option 1 for the defaults. Option 2 would be used for what is called an abbreviated installation. Verify that the system date and time is correct.
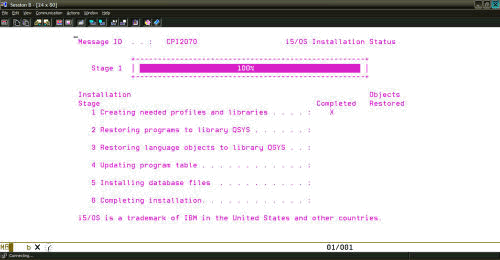
7. You will see the six stages of the actual operating system being installed. This replaces all of the IBM-supplied objects and does not affect user data.
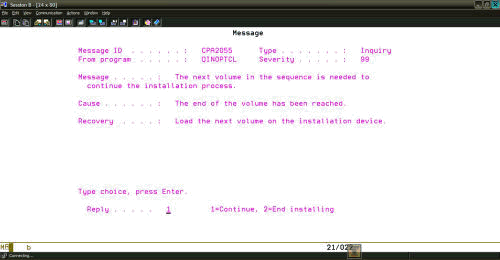
8. If you are installing from CD, you will be prompted to load the next volume in the set. If you are installing from tape, you may not be prompted to load additional media.
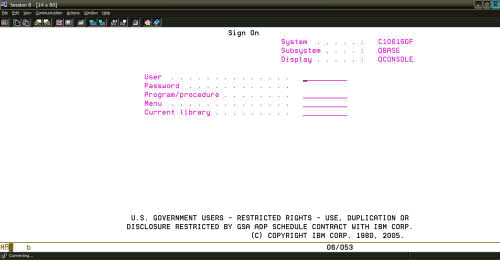
9. You will be prompted to sign on during the installation. Normally, you would sign on as QSECOFR.
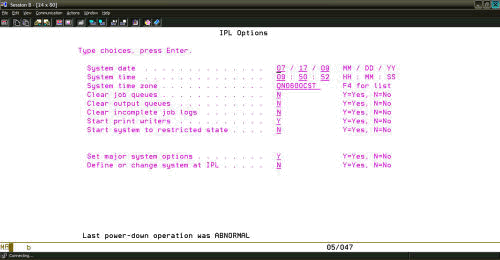
10. The IPL Options screen will be displayed. You should verify the system date, time, and time zone. The Set major system options should be set to Y (Yes) under normal circumstance. The rest of the options can be set according to the situation at hand.
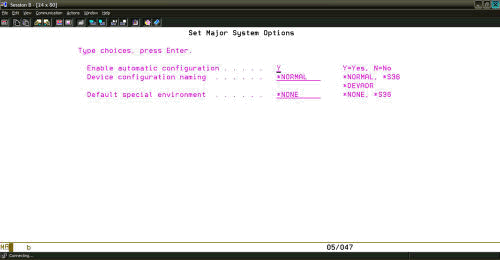
11. The Set Major System Options screen is presented, and the selections shown are for most all situations. There are exceptions to this; however, exceptions are rare.
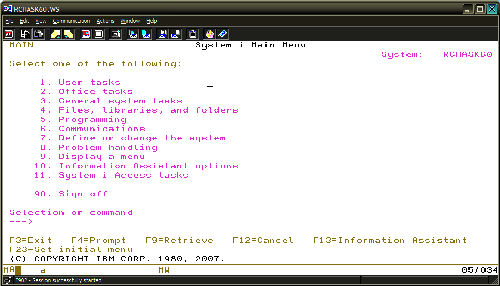
12. Under normal situations you will not be presented additional screens. The IPL will continue, and the OS/400 main menu will be displayed.
4. Once you have selected your installation device, you will need to confirm your choice to install the operating system by pressing Enter.
5. After pressing Enter on the screen above, you will go into the start of an IPL.
6. You will come to the Install the Operating System options screen. For a normal SLIP, you should select option 1 for the defaults. Option 2 would be used for what is called an abbreviated installation. Verify that the system date and time is correct.
7. You will see the six stages of the actual operating system being installed. This replaces all of the IBM-supplied objects and does not affect user data.
8. If you are installing from CD, you will be prompted to load the next volume in the set. If you are installing from tape, you may not be prompted to load additional media.
9. You will be prompted to sign on during the installation. Normally, you would sign on as QSECOFR.
10. The IPL Options screen will be displayed. You should verify the system date, time, and time zone. The Set major system options should be set to Y (Yes) under normal circumstance. The rest of the options can be set according to the situation at hand.
11. The Set Major System Options screen is presented, and the selections shown are for most all situations. There are exceptions to this; however, exceptions are rare.
12. Under normal situations you will not be presented additional screens. The IPL will continue, and the OS/400 main menu will be displayed.
[{"Type":"MASTER","Line of Business":{"code":"LOB57","label":"Power"},"Business Unit":{"code":"BU058","label":"IBM Infrastructure w\/TPS"},"Product":{"code":"SWG60","label":"IBM i"},"Platform":[{"code":"PF012","label":"IBM i"}],"Version":"7.1.0"}]
Historical Number
534393347
Was this topic helpful?
Document Information
Modified date:
11 November 2019
UID
nas8N1012771