Troubleshooting
Problem
This document describes how to configure the BCS storage using CLI when the GUI interface is not available.
Resolving The Problem
Note: Configuring the BladeCenter S storage is not supported by the System i Support Center. This document provides information for you; however, the support staff in System i support are not educated in this process. If further support is needed related to using this document, it would be considered Hardware how to and is done using x Series software support. This support requires a RTS Service Pack for System X contract that is not part of the SWMA contract.
Configuring the BladeCenter S internal disk units can be done two different ways. First of which is using an application called Storage Configuration Manager (SCM). This application only functions under IBM Director or under Windows Server 2003 or 2008. There are no versions available for Windows XP. You could also install SCM on an x86 or i386-based Linux OS. If none of these options are available, you can use the command line interface to set up the storage and assign LUNs to the blades for virtualization to your client partitions. This document describes the CLI method.
The system described in this document is a BCS with two SAS modules and two RAIDed Shared Storage Modules (RSSM) installed. The BCS also has space for up to 12 SAS disk units installed in the front of the chassis. This system is capable of configuring RAID on the internal BCS disk unit using the RSSM modules. If the RSSM modules are not installed, RAID 5 is not capable on the BCS internal disk drives.
1. To begin, IP addresses on the SAS and RSSM modules must be in the same network as the Advanced Management Module (AMM). If you are configuring a new system out of the box, the default IP addresses for all five components will be in the same IP range such as 192.168.70.xxx. If you have configured the AMM to a public IP such as 9.5.30.xx, you will also need to configure the IP addresses for the two SAS and two RSSM modules to be in the same 9.5.30. network.
2. Configuration using the CLI interface is performed by connecting to one of the RSSM modules. Using telnet, you should connect to either of the RSSMs. It does not matter which one is used; the configuration will be duplicated to the other module automatically.
3. Sign on to the module using USERID for the user and PASSW0RD (use zero, not the letter "o") for the password fields. This is the default sign in. It can be changed.
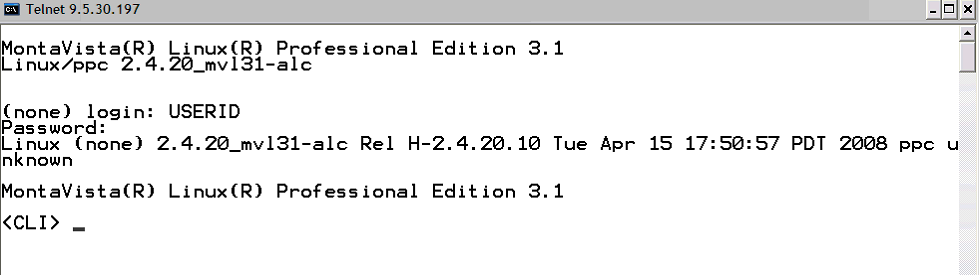
4. Notice the CLI prompt. You should type help to see a list of the available commands. The commands are as follows:
--------------------------------
#Display Commands :
--------------------------------
1. list -help
2. list controller
3. list volume
4. list pool
5. list drive
6. list enclosure
7. list drivelba [-name poolname:volname] | [-number number] -vlba number
8. detail -help
9. detail volume verbose
10. detail volume [-name poolname:volumename| -number number]
11. detail pool [-name poolname | -number number]
12. detail controller -ctlr [0|1]
13. detail enclosure -encl [0|1|2]
14. detail drive [-slot [ENCLOSURE]:[TRAY] | -number [NUMBER] ]
-------------------------------
#Managing Volumes :
-------------------------------
1. create pool -drives <N> <N>[....] -raidtype [ 10 | 5 | 0 | 1 ] -port
[0|1] -name GRPNAME
2. create volume -name poolname:volumename -size <N> [%|MB|GB]
[-seqpostreadcmdsize size -seqreadaheadmargin margin ]
3. host -[add WWN [-name HOSTNAME] | delete WWN | get]
4. hostlun -[get | map -volume poolname:volumeName -permission [R/RW] [-name [HOSTNAME]]| unmap] [-wwn WWN -lun lunnumber]
5. delete volume -name poolname:volumename
6. delete pool -name poolName
7. global spare -[add -slot [ENCLOSURE]:[TRAY]] | get | delete -[slot [EN
CLOSURE]:[TRAY]|number [NUMBER]]
8. assimilate drive -[get | set [-slot <E:T> | -number number] ]
-------------------------------
#Volume Services :
-------------------------------
1. synchronize volume [-name [pool:volume]]
2. delete all
3. view long running tasks
4. add capacity -pool name -drivelist <E:T>
5. initialize -drive <E:T>
6. expand -volume poolname:volumename -add capacityIncrement [MB|GB|%]
7. datascrub -[get | set -auto [on|off]
-----------------------------------
#System Control and Configuration :
-----------------------------------
1. commparams -get
2. swversion
3. post result
4. list features
5. show raid levels
6. validate key [-get | -set <192 bit key>]
7. event log [-show [all|arts|alsal|tlc] ] | [ -save [all|arts|alsal|tlc] ] |
[-setlevel [-tlc <string> | -alsal <string> | -arts <string>] | -getlevel ]
8.locate [ -getobject [drive | pool | volume | ctlr | bbu | enclosure] ] | [[-setobject | -off ]
[ -drive [ slot | all] | -pool poolname | -volume poolname:volumename | -ctlr [0|1] |
-bbu [0|1] | -enclosure [0] | -number objectnumber] ]
9. cache -[get | set [-volumesetting -seqpostreadcmdsize [SIZE] -seqreadaheadmargin [MARGIN]
[-systemdefault] [-volumename pool:volume] | -ctlrsetting -writecachepolicy [on|off] [-suspendmigrates] ]
10. time -[get | set -date mm/dd/yyyy -time hh:mm:ss -[am|pm] ]
11. controller config -[[save | load] filename | get]
12. service mode -getreason
13. shutdown -ctlr [0|1] -state [servicemode | reboot] | -system -state [servicemode | reboot]
14. cliscript -f filename
15. email alert -[get | set [-test] -email [EMAIL] -smtpserver [SERVER] -smtpport [PORT] -smtpsender [SENDER] | -test |-delete [EMAIL] ]
16. configure alert -[get | set [-email | -lightPath]] -on <NUMBER>..<NUMBER>-off <NUMBER> .. <NUMBER>
17. alert [ -get |-create -code genericAlertCode | -savehistory | -[ mask | unmask | ack ] -code AlertCode -id Id -ctlr SlotID ]
18. battery -ctlr [0|1] –get
19. chpasswd -[cli | mgmtInterface] -oldpasswd [OLDPWD] -newpasswd [NEWPWD]
20. mountstate [-getobject [drive |pool |mediatray |enclosure |bbu ]]
------------------------------
#Miscellaneous Commands:
------------------------------
1. exit
2. help
5. To start, you need to know what drives are installed in the BCS. Use the list drive command to see what drives are present:
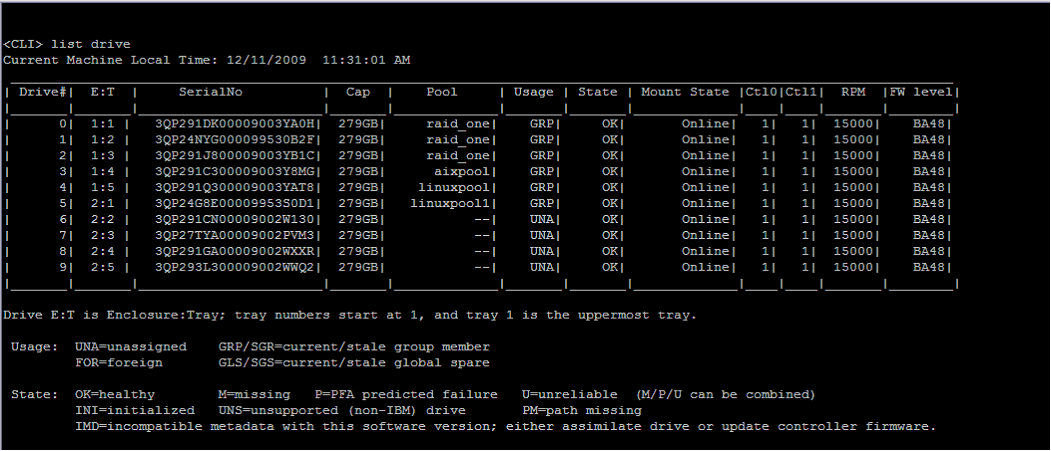
There are two disk drive enclosures in a BCS chassis: drive enclosure 1 and 2. Each enclosure is capable of containing six disk units for a total of 12 drives. This BCS has both enclosures with five disk drives in each. Notice the E:T column. This is the enclosure and tray location code, or otherwise called the disk location. This field will be used in subsequent commands.
6. Looking at the Pool column, you can see that there are a few pools created on this BCS already. The raid_one pool is a disk pool consisting of three disk units in a RAID 5 array. Within this array are LUNs; however, we do not see that on this screen. To create a new array, locate three (minimum) disk units that are not assigned (UNA) to build the new array with. In this example, we can use disks 2:3, 2:4, and 2:5.
7. Use the create pool command to build the new array as shown below:
create pool -drives 2:3 2:4 2:5 -raidtype 5 -port 0 -name test_pool
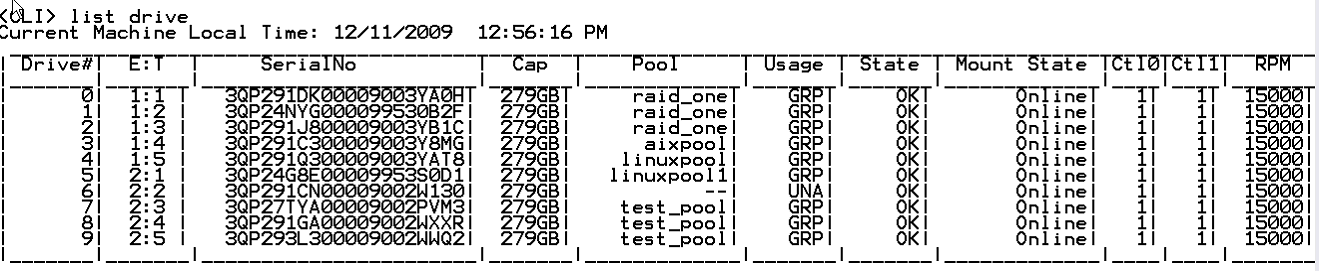 Notice that the test_pool has been created on drives 2:3, 2:4, and 2:5.
8. Next, we will define the volumes (LUNs) to be created in the pool named test_pool.
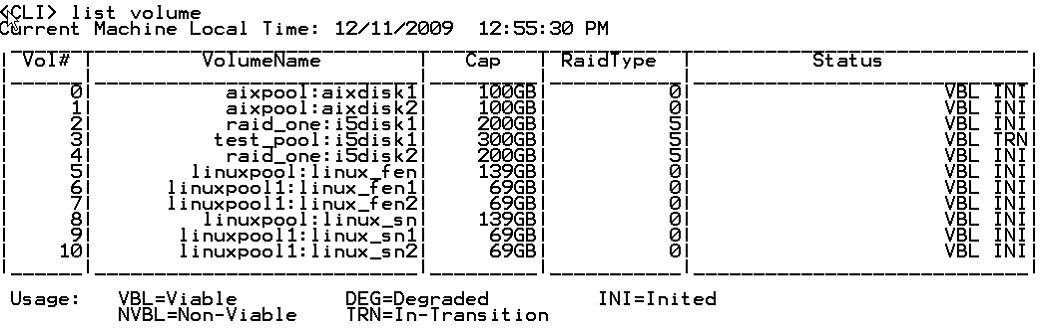
Using the list volume command, you can see what volumes are currently created along with the pool they belong to and the size of the volume. Below is an example of the list volume command:
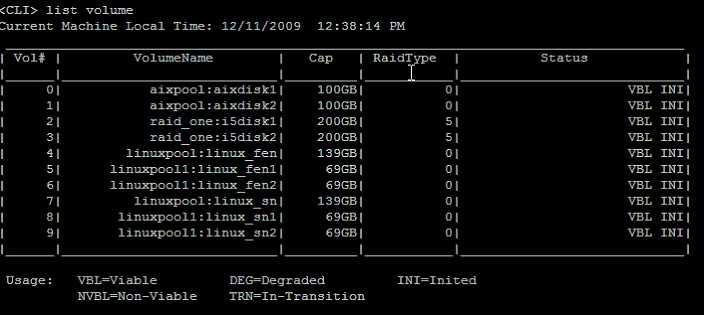
9. The test_pool is not shown here yet because there are no volumes created within this pool. To create volumes, use the create volume command as shown below. The values for read ahead and margin were estimated and may not be correct. This is probably a performance setting of some type for disk caching speeds; however, this will need to be confirmed at a later time.
<CLI> create volume -name test_pool:i5disk1 -size 300 GB -seqpostreadcmdsize 128 -seqreadaheadmargin 0xFFFF
Notes:
1. Sequential Post Read Command Size is the maximum sector count of a single predictive read ahead. A value of 0 disables predictive read for this volume. A value of 1-128 will override the previous setting and represents a command transfer size that is a multiple of 16 Kbytes.
2. Read Ahead Margin is the number of sectors in the read ahead buffer. This parameter is ignored if the Sequential Post Read Command Size is zero. The valid range is 1 to 0x7FFF. A value of (0xFFFF) will cause the default value to be used.
Now we can list the volumes again to see the newly created volume.
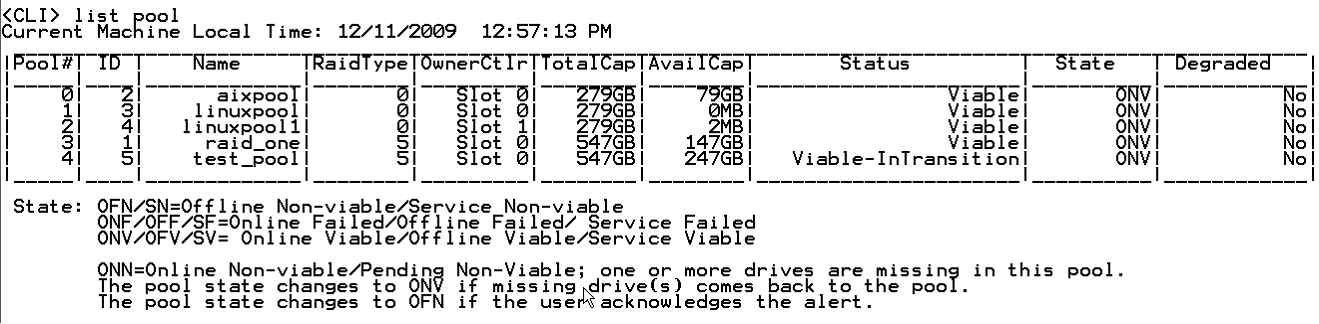
You can also list the pools by using the list pool command as shown below.
10. Now that the volume has been created, we can assign the volume to the blade using the mapping functions. However, we first need to discover the World Wide Port Name (WWPN) of the blade we are planning to assign the volumes to. To find the WWPN, sign on to the SAS module command line using telnet. Then type in the phystat command.
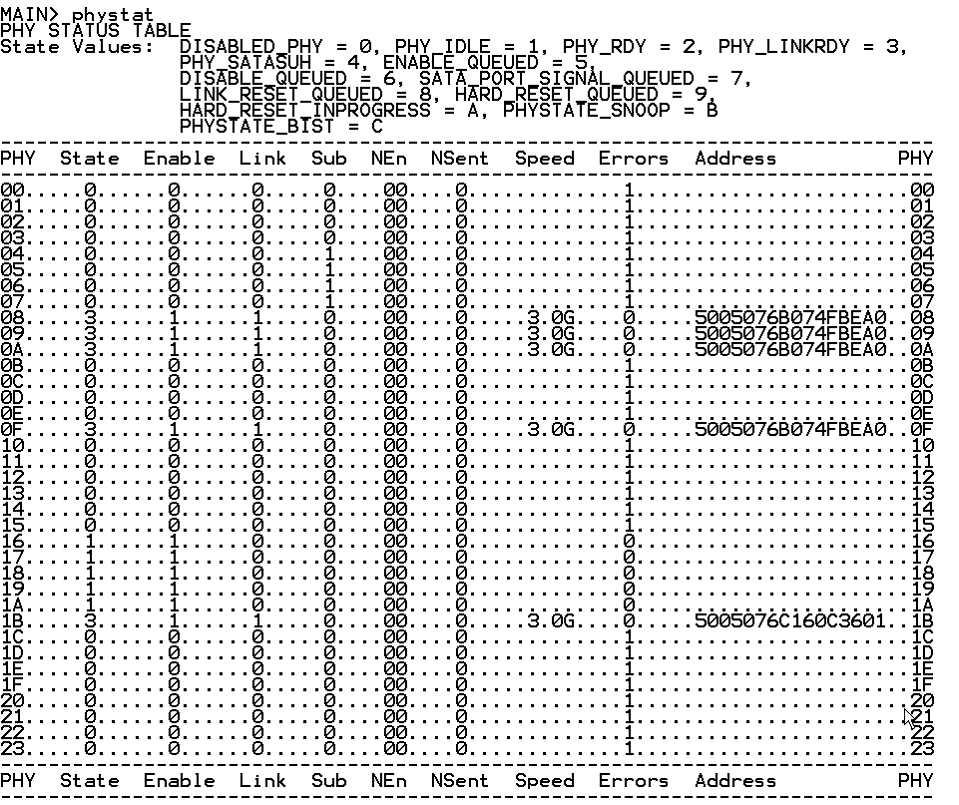
11. To add the new LUNs to blade 2, we need the WWPN of blade 1. In the table, blade 1’s location is hex 1B which equates to 5005076C160C3601. The blade does need to be powered on to see this value in the phystat output.
Internal Blade to PHY Mapping
| Blade Slot | PHY Number (Hex) |
| Blade 1 | 1B |
| Blade 2 | 1A |
| Blade 3 | 19 |
| Blade 4 | 18 |
| Blade 5 | 17 |
| Blade 6 | 16 |
| Blade 7 | 15 |
| Blade 8 | 14 |
| Blade 9 | 0F |
| Blade 10 | 0E |
| Blade 11 | 11 |
| Blade 12 | 10 |
| Blade 13 | 13 |
| Blade 14 | 12 |
12. Now that you know the value for the WWPN, you can use the hostlun command to add the volume to the blade. An example is shown below:
 13. Use the hostlun –get –wwn xxxxxxx command to see the volumes mapped to the blade.
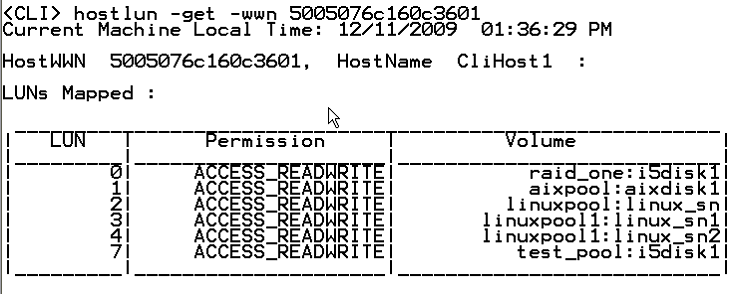
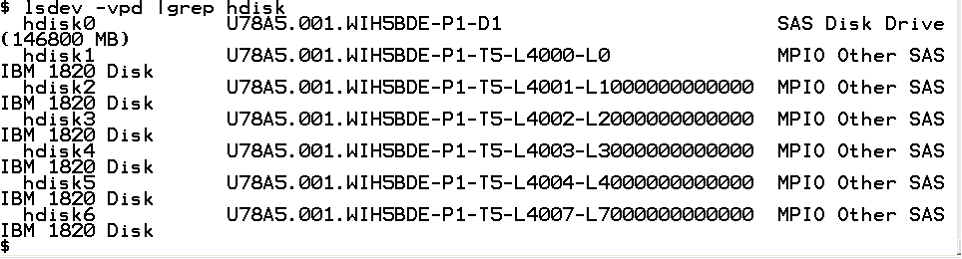
14. After running the cfgdev command in the VIOS partition, you will have access to the new disk unit (LUN) that you have created. An example below shows the new LUN as hdisk6, and you can also see the LUN number in the vpd output (L70000…):
There are many more commands that can be used with the CLI, however, the above steps will at least get you to the point where you can create a RAID array, and then create volumes and assign them to the blade.
Historical Number
551444114
Was this topic helpful?
Document Information
Modified date:
18 December 2019
UID
nas8N1012491