Question & Answer
Question
Answer
-
How Do I Access Digital Certificate Manager?
Check out the video here:
Digital Certificate Manager requires that the HTTP Admin server be running in the QHTTPSVR subsystem. The ADMIN jobs should appear as follows when viewed using WRKACTJOB:-
-
V7R2
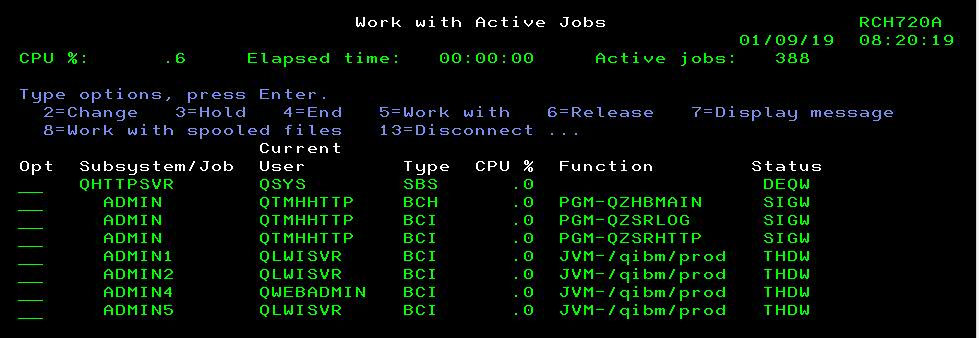
If these jobs are not in the subsystem, you should try starting the server with the following command:
STRTCPSVR SERVER(*HTTP) HTTPSVR(*ADMIN)
If the jobs do not start and look like the previous example, you should refer to the following document to troubleshoot the HTTP Admin server:ERROR 500 (Internal Server Error) When Accessing 'IBM Web Administration for i5/OS' in HTTP ADMIN
If all the HTTP Admin jobs are up and running as they should, Digital Certificate Manager can be accessed using the following URL (replace systemname with either the IBM i system name or IP address):
http://systemname:2001/QIBM/ICSS/Cert/Admin/qycucm1.ndm/main0 -
-
V7R3
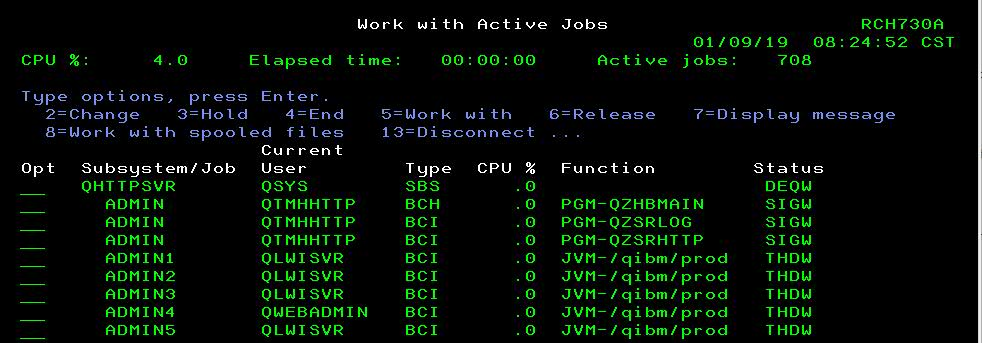
If these jobs are not in the subsystem, you should try starting the server with the following command:
STRTCPSVR SERVER(*HTTP) HTTPSVR(*ADMIN)
If the jobs did not start and look like the previous example, you should refer to the following document to troubleshoot the HTTP Admin server:ERROR 500 (Internal Server Error) When Accessing 'IBM Web Administration for i5/OS' in HTTP ADMIN
If all the HTTP Admin jobs are up and running as they should, Digital Certificate Manager can be accessed using the following URL (replace systemname with either the IBM i system name or IP address):
http://systemname:2001/QIBM/ICSS/Cert/Admin/qycucm1.ndm/main0
-
V7R3
-
V7R2
-
-
How Do I Configure Telnet and the IBM i Host Servers for TLS?
-
I see both 'Local Certificate Authority (CA)' and '*SYSTEM' stores
If you have both the 'Local Certificate (CA)' and '*SYSTEM' stores, you can proceed with creating a self-signed certificate and assign it the following application IDs in DCM:
- Central Server
- Database Server
- Data Queue Server
- Network Print Server
- Remote Command Server
- Signon Server
- IBM i TCP/IP Telnet Server
- i5/OS DDM/DRDA Server - TCP/IP
- Host Servers
- File Servers
- Management Central Server
NOTE: The above applications must be restarted after the TLS certificate is assigned to enable TLS for the server application.
The following document will guide you through the certificate creation and assignment process: -
I see only the 'Local Certificate Authority (CA)'
A) If you see only the 'Local Certificate Authority (CA)' store, you will also need to create the *SYSTEM store where your TLS certificates are stored. To do this, you should refer to the following document:How to create the *SYSTEM store in DCM
B) Once the *SYSTEM store is created, you should verify that the Local Certificate Authority is still valid in the 'Local Certificate Authority (CA)' store. On the left menu, click Select a Certificate Store. On the right side of the screen, select the Local Certificate Authority (CA) radio button and click CONTINUE. Provide the store password and click CONTINUE.
C) On the left menu, click Manage Local CA and then click the View link underneath:
D) Under the 'Additional Information:' section, check the 'Validity Period' and make sure that the certificate authority is still valid and is not going to expire soon. If necessary, select the 'Renew' option under 'Manage Local CA' to renew the certificate. It will pull in the existing information on the original certificate authority certificate. Adjust Validity Period of the CA (up to 7300 days) and click CONTINUE. On the 'Install Renewed Local CA Certificate', click CONTINUE. Lastly, on the 'Select Applications to Trust this Certificate Authority (CA)', click the 'Select All' button and then click CONTINUE at the bottom of the page.
E) Now that the Local CA has been verified and you now have both the 'Local Certificate (CA)' and '*SYSTEM' stores, you can proceed with creating a self-signed certificate and assign it the following application IDs in DCM:
- Central Server
- Database Server
- Data Queue Server
- Network Print Server
- Remote Command Server
- Signon Server
- IBM i TCP/IP Telnet Server
- i5/OS DDM/DRDA Server - TCP/IP
- Host Servers
- File Servers
- Management Central Server
NOTE: The above applications must be restarted after the TLS certificate is assigned to enable TLS for the server application.
You should refer to the following document which will guide you through the certificate creation and assignment process:
-
I see only the '*SYSTEM' store
A) If you see only the *SYSTEM store, you will need to also create a Local Certificate Authority (CA) store using the following document:How to Create the Local Certificate Authority (CA) Store in DCM
B) Now that you have both the 'Local Certificate (CA)' and '*SYSTEM' stores, you can proceed with creating a self-signed certificate and assign it the following application IDs in DCM:
- Central Server
- Database Server
- Data Queue Server
- Network Print Server
- Remote Command Server
- Signon Server
- IBM i TCP/IP Telnet Server
- i5/OS DDM/DRDA Server - TCP/IP
- Host Servers
- File Servers
- Management Central Server
NOTE: The above applications must be restarted after the TLS certificate is assigned to enable TLS for the server application.
You should refer to the following document which will guide you through the certificate creation and assignment process:
-
I see neither 'Local Certificate Authority (CA)' or '*SYSTEM' stores
You should refer to the following document which will guide you through the configuration:
NOTE: Ensure that CHGTELNA has 'Allow Secure Socket Layer' set to *YES. If it is set to *NO, TLS is not permitted. Changing this value requires Telnet to be ended and restarted to take effect.
To configure TLS for Telnet and the IBM i Host servers, you first need to access Digital Certificate Manager by using the following URL (see 'How do I access Digital Certificate Manager' section above for more details):
http://systemname:2001/QIBM/ICSS/Cert/Admin/qycucm1.ndm/main0
Before you can begin the configuration, you first need to check to see what is currently configured in Digital Certificate Manager:
1) On the left menu bar, click the 'Select a Certificate Store'button:
2) On the right side, it will show the different certificate stores that are configured. Based on what you see in this section, you should use one of the sections below:
3) Once you have your TLS certificate created and assigned to the Telnet and Host Server application IDs in DCM, you can then proceed with configuring the PC 5250 client to use TLS using the following document:Configuring Client Access 6.1 and 7.1 to Use Secure Sockets
-
I see both 'Local Certificate Authority (CA)' and '*SYSTEM' stores
-
How do I configure the FTP client for TLS?
To configure the FTP client for TLS, you first need to access Digital Certificate Manager using the following URL (see theHow do I access Digital Certificate Manager section above for more details):
http://systemname:2001/QIBM/ICSS/Cert/Admin/qycucm1.ndm/main0
Before you can begin the configuration, you first need to check to see what is currently configured in Digital Certificate Manager:
1) On the left menu bar, click the Select a Certificate Store button:
2) On the right side, it will show the different certificate stores that are configured. Based on what you see in this section, you should use one of the sections below:-
I do not see the '*SYSTEM' store
A) You will need to create the *SYSTEM store where our TLS certificates are stored. To do this, you will use the following document:How to create the *SYSTEM store in DCM
B) Once the *SYSTEM store is created, you can use the following instructions to import your CA certificate and allow your TLS FTP client to trust it:
-
-
I see the '*SYSTEM' store
Because the *SYSTEM store exists, you can now use the following instructions to import your CA certificate and allow your TLS FTP client to trust it:
-
I see the '*SYSTEM' store
-
I do not see the '*SYSTEM' store
-
How do I configure the FTP server for TLS?
Check out the video on assigning a certificate to the FTP server here:
To configure TLS for FTP, you first need to access Digital Certificate Manager using the following URL (refer to the How do I access Digital Certificate Manager section above for more details):
http://systemname:2001/QIBM/ICSS/Cert/Admin/qycucm1.ndm/main0
Before you can begin the configuration, you first need to check to see what is currently configured in Digital Certificate Manager:
1) On the left menu bar, click the Select a Certificate Store button:
2) On the right side, it will show the different certificate stores that are configured. Based on what you see in this section, you should use one of the sections below:-
I see both 'Local Certificate Authority (CA)' and '*SYSTEM' stores
If there is a TLS certificate already created to assign to FTP, the following document will guide you through the process:
If a TLS certificate has not yet been created, the following document will guide you through the certificate creation and assignment process:
-
-
I see only the 'Local Certificate Authority (CA)' store
A) If you see only the 'Local Certificate Authority (CA)' store, you will also need to create the *SYSTEM store where your TLS certificates are stored. To do this, you should refer to the following document:How to create the *SYSTEM store in DCM
B) Once the *SYSTEM store is created, you should verify that the Local Certificate Authority is still valid in the 'Local Certificate Authority (CA)' store. On the left menu, click Select a Certificate Store. On the right side of the screen,select the 'Local Certificate Authority (CA)' radio button and click CONTINUE. Provide the store password and click CONTINUE.
C) On the left menu, click Manage Local CA and then click the View link underneath:
D) Under the 'Additional Information:' section, check the 'Validity Period' and make sure that the certificate authority is still valid and is not going to expire soon. If necessary, select the 'Renew' option under 'Manage Local CA' to renew the certificate. It will pull in the existing information on the original certificate authority certificate. Adjust Validity Period of the CA (up to 7300 days) and click CONTINUE. On the 'Install Renewed Local CA Certificate', click CONTINUE. Lastly, on the 'Select Applications to Trust this Certificate Authority (CA)', click the 'Select All' button and then click CONTINUE at the bottom of the page.
E) Now that the Local CA has been verified and you now have both the 'Local Certificate (CA)' and '*SYSTEM' stores, you can proceed with creating a self-signed certificate and assign it the FTP server application ID. You should refer to the following document which will guide you through the creation:
-
-
I see the '*SYSTEM' store
If there is a TLS certificate already created to assign to FTP, you should refer to the following document which will guide you through the process:
If a TLS certificate has not yet been created, you should use the following steps:
A) If you see only the *SYSTEM store, you will need to also create a Local Certificate Authority (CA) store using the following document:How to Create the Local Certificate Authority (CA) Store in DCM
B) Now that you have both the 'Local Certificate (CA)' and '*SYSTEM' stores, you can proceed with creating a self-signed certificate and assign it the FTP server application ID in DCM:
You should refer to the following document which will guide you through the certificate creation and assignment process:How to create a basic self-signed certificate in DCM
-
-
I see neither 'Local Certificate Authority (CA)' or '*SYSTEM' stores
A) To configure TLS for the FTP Server, you first need to create the *SYSTEM store where your TLS certificates are kept. To do this, you will use the following document:How to create the *SYSTEM store in DCM
B) Once the *SYSTEM store is created, you then need to create your Local Certificate Authority (CA) store. The following document describes the steps for configuring this:How to Create the Local Certificate Authority (CA) Store in DCM
C) Now that you have both the 'Local Certificate (CA)' and '*SYSTEM' stores, you can proceed with creating a self-signed certificate and assign it the FTP Server application ID in DCM. The following document will guide you through the certificate creation and assignment process:
-
I see neither 'Local Certificate Authority (CA)' or '*SYSTEM' stores
-
I see the '*SYSTEM' store
-
I see only the 'Local Certificate Authority (CA)' store
-
I see both 'Local Certificate Authority (CA)' and '*SYSTEM' stores
-
How do I configure an HTTP server for TLS?
To configure an HTTP server for TLS we first need to access Digital Certificate Manager via the following URL (see 'How do I access Digital Certificate Manager' section above for more details):
http://systemname:2001/QIBM/ICSS/Cert/Admin/qycucm1.ndm/main0
Before you can begin the configuration, you need to check to see what is currently configured in Digital Certificate Manager:
1) On the left menu bar, click the Select a Certificate Store button:
2) On the right side, it will show the different certificate stores that are configured. Based on what you see in this section, you should use one of the sections below:-
I see both 'Local Certificate Authority (CA)' and '*SYSTEM' stores
If you see both the 'Local Certificate Authority (CA)' and '*SYSTEM' store and a TLS certificate exists to assign to HTTP we can skip to step 3 below. If a certificate needs to be created, you can use one of the following documents to create it and then proceed to step 3:How to create a basic self-signed certificate in DCM
How to use DCM to create a certificate issued by Verisign or another Internet Certificate Authority
-
I see only the 'Local Certificate Authority (CA)' store
A) If you see only the 'Local Certificate Authority (CA)' store, you will also need to create the *SYSTEM store where your TLS certificates are stored. To do this we will use the following document:How to create the *SYSTEM store in DCM
B) Once the *SYSTEM store is created, you can now either create a certificate signed by your Local Certificate authority,or you can choose to use one signed by a third-party CA.
If you would like to use a certificate signed by a third-party CA, you can use the following document to guide you through the process:How to use DCM to create a certificate issued by Verisign or another Internet Certificate Authority
If you would like to use a certificate signed by the Local Certificate Authority, you should now perform the following steps:
b1) Verify that the Local Certificate Authority is still valid in the 'Local Certificate Authority (CA)' store. On the left menu, click 'Select a Certificate Store'. On the right side of the screen, select the 'Local Certificate Authority (CA)' radio button and click CONTINUE. Provide the store password and click CONTINUE.
b2) On the left menu, click Manage Local CA,and then click the View link underneath:
b3) Under the 'Additional Information:' section, you should check the 'Validity Period' and make sure that the certificate authority is still valid and is not going to expire soon. If necessary, select the 'Renew' option under 'Manage Local CA' to renew the certificate. It will pull in the existing information on the original certificate authority certificate. Adjust Validity Period of the CA (up to 7300 days) and click CONTINUE. On the 'Install Renewed Local CA Certificate', click CONTINUE. Lastly, on the 'Select Applications to Trust this Certificate Authority (CA)', click the 'Select All' button and then click CONTINUE at the bottom of the page.
b4) Now that the Local CA has been verified and you now have both the 'Local Certificate (CA)' and '*SYSTEM' stores, you can proceed with creating a self-signed certificate. You should refer to the following document which will guide you through the creation:How to create a basic self-signed certificate in DCM
C) Once you have your TLS certificate created and available to assign you can proceed to step 3 below -
I see only the '*SYSTEM' store
If you see the *SYSTEM store and you already have a TLS certificate created proceed to step 3.
If there are no TLS certificates, you should refer to one the following documents (depending on the type of certificate you would like):How to use DCM to create a certificate issued by Verisign or another Internet Certificate Authority
How to create a basic self-signed certificate in DCM
Once a certificate is created and ready to assign to an HTTP server proceed to step 3 -
I see neither 'Local Certificate Authority (CA)' or '*SYSTEM' stores
A) To configure TLS for the HTTP Server, you first need to create the *SYSTEM store where your TLS certificates are kept. To do this, you will use the following document:How to create the *SYSTEM store in DCM
B) Once the *SYSTEM store is created, you can now either create a certificate signed by your Local Certificate authority,or you can choose to use one signed by a third-party CA.
- If you would like to use a certificate signed by a third-party CA, you can use the following document to guide you through the process:How to use DCM to create a certificate issued by Verisign or another Internet Certificate Authority
- If you'd like to use a local TLS certificate you then need to create your Local Certificate Authority (CA) store. The following document describes the steps for configuring this:How to Create the Local Certificate Authority (CA) Store in DCM
We then can proceed with creating a self-signed certificate. The following document will guide you through the certificate creation process:How to create a basic self-signed certificate in DCM
Once the TLS certificate is created and ready to assign to the HTTP server proceed with step 3. - 3) Once we have a TLS certificate created and ready to assign to HTTP we can use the instructions on the following document:
-
I see both 'Local Certificate Authority (CA)' and '*SYSTEM' stores
-
How do I configure the HTTP ADMIN server for TLS?
To configure the HTTP Admin server for TLS we first need to access Digital Certificate Manager via the following URL (see 'How do I access Digital Certificate Manager' section above for more details):
http://systemname:2001/QIBM/ICSS/Cert/Admin/qycucm1.ndm/main0
Before you can begin the configuration, you need to check to see what is currently configured in Digital Certificate Manager:
1) On the left menu bar, click the Select a Certificate Store button:
2) On the right side, it will show the different certificate stores that are configured. Based on what you see in this section, you should use one of the sections below:-
I see both 'Local Certificate Authority (CA)' and '*SYSTEM' stores
A) First we will need to verify that the Local Certificate Authority is still valid in the 'Local Certificate Authority (CA)' store. On the left menu, click 'Select a Certificate Store'. On the right side of the screen, select the 'Local Certificate Authority (CA)' radio button and click CONTINUE. Provide the store password and click CONTINUE.
B) On the left menu, click Manage Local CA,and then click the View link underneath:
C) Under the 'Additional Information:' section, you should check the 'Validity Period' and make sure that the certificate authority is still valid and is not going to expire soon. If necessary, select the 'Renew' option under 'Manage Local CA' to renew the certificate. It will pull in the existing information on the original certificate authority certificate. Adjust Validity Period of the CA (up to 7300 days) and click CONTINUE. On the 'Install Renewed Local CA Certificate', click CONTINUE. Lastly, on the 'Select Applications to Trust this Certificate Authority (CA)', click the 'Select All' button and then click CONTINUE at the bottom of the page.
D) Now that the Local CA has been verified and you have both the 'Local Certificate (CA)' and '*SYSTEM' stores, you can proceed with Step 3 -
I see only the 'Local Certificate Authority (CA)' store
A) If you see only the 'Local Certificate Authority (CA)' store, you will also need to create the *SYSTEM store where your TLS certificates are stored. To do this we will use the following document:How to create the *SYSTEM store in DCM
B) Once the *SYSTEM store is created we will need to verify that the Local Certificate Authority is still valid in the 'Local Certificate Authority (CA)' store. On the left menu, click 'Select a Certificate Store'. On the right side of the screen, select the 'Local Certificate Authority (CA)' radio button and click CONTINUE. Provide the store password and click CONTINUE.
C) On the left menu, click Manage Local CA,and then click the View link underneath:
D) Under the 'Additional Information:' section, you should check the 'Validity Period' and make sure that the certificate authority is still valid and is not going to expire soon. If necessary, select the 'Renew' option under 'Manage Local CA' to renew the certificate. It will pull in the existing information on the original certificate authority certificate. Adjust Validity Period of the CA (up to 7300 days) and click CONTINUE. On the 'Install Renewed Local CA Certificate', click CONTINUE. Lastly, on the 'Select Applications to Trust this Certificate Authority (CA)', click the 'Select All' button and then click CONTINUE at the bottom of the page.
E) Now that the Local CA has been verified and you now have both the 'Local Certificate (CA)' and '*SYSTEM' stores, you can proceed with Step 3 -
I see only the '*SYSTEM' store
If you see the *SYSTEM store we will need to create the Local Certificate Authority (CA) store using the instructions on the following documentHow to Create the Local Certificate Authority (CA) Store in DCM
Once the Local Certificate Authority (CA) store is created proceed to Step 3 -
I see neither 'Local Certificate Authority (CA)' or '*SYSTEM' stores
A) To configure TLS for the HTTP Admin Server, you first need to create the *SYSTEM store where your TLS certificates are kept. To do this, you will use the following document:How to create the *SYSTEM store in DCM
B) We then need to create the Local Certificate Authority (CA) store. The following document describes the steps for configuring this:How to Create the Local Certificate Authority (CA) Store in DCM
We then can proceed with Step 3 - 3) The following document describes how to enable TLS for the HTTP Admin server:
How to Enable Secure Sockets Layer (TLS) for IBM Web Administration Server (HTTP Admin)
-
I see both 'Local Certificate Authority (CA)' and '*SYSTEM' stores
-
How do I create a TLS server certificate issued by a third-party (Verisign,Thawte,etc)?
To create a TLS server certificate issued by a third-party (Verisign,Thawte,etc) we first need to access Digital Certificate Manager via the following URL (see 'How do I access Digital Certificate Manager' section above for more details):
http://systemname:2001/QIBM/ICSS/Cert/Admin/qycucm1.ndm/main0
Before you can begin the configuration, you need to check to see what is currently configured in Digital Certificate Manager:
1) On the left menu bar, click the Select a Certificate Store button:
2) On the right side, it will show the different certificate stores that are configured. Based on what you see in this section, you should use one of the sections below:-
I see the '*SYSTEM' store
If we see the *SYSTEM store we can proceed to Step 3 -
I do not see the '*SYSTEM' store
If we do not see the *SYSTEM store we will need to create it using the instructions in the following document:How to create the *SYSTEM store in DCM
Once the *SYSTEM store exists we can proceed with Step 3 - 3) The following document will guide you through the TLS certificate creation process:
How to use DCM to create a certificate issued by VeriSign or another Internet Certificate Authority
-
I see the '*SYSTEM' store
-
How do I create a TLS server certificate issued by a local Certificate Authority?
Check out the video here:
The following document describes how to create a TLS certificate issued by the Local Certificate Authority:
-
How do I extract Certificate Authority certificates from a third-party TLS certificate?
The following document describes how to extract Certificate Authority certificates from a third-party TLS certificate: -
How do I import a Certificate Authority certificate?
To import a Certificate Authority Certificate we first need to access Digital Certificate Manager via the following URL (see 'How do I access Digital Certificate Manager' section above for more details):
http://systemname:2001/QIBM/ICSS/Cert/Admin/qycucm1.ndm/main0
Before you can begin the configuration, you need to check to see what is currently configured in Digital Certificate Manager:
1) On the left menu bar, click the Select a Certificate Store button:
2) On the right side, it will show the different certificate stores that are configured. Based on what you see in this section, you should use one of the sections below:-
I see the '*SYSTEM' store
If we see the *SYSTEM store we can proceed to Step 3 -
I do not see the '*SYSTEM' store
If we do not see the *SYSTEM store we will need to create it using the instructions in the following document:How to create the *SYSTEM store in DCM
Once the *SYSTEM store exists we can proceed with Step 3 - 3) The following document will guide you through importing a CA certificate into Digital Certificate Manager:
How to Import a CA Certificate into Digital Certificate Manager
Often times during the import process we will see the error message 'Issuer Not in the Certificate Store'. If this occurs the following document guides through how to resolve this:When Certificate Import Fails,Issuer Not in the Store
On occasion we will be sent a P7B chained certificate from a third-party. The following document describes how to break the necessary pieces out of this file and import them into Digital Certificate Manager:
-
I see the '*SYSTEM' store
-
How do I import a third-party PKCS#12 TLS Certificate (files with .p12 or .pfx extension)?
To import a third-party PKCS#12 TLS certificate we first need to access Digital Certificate Manager via the following URL (see 'How do I access Digital Certificate Manager' section above for more details):
http://systemname:2001/QIBM/ICSS/Cert/Admin/qycucm1.ndm/main0
Before you can begin the configuration, you need to check to see what is currently configured in Digital Certificate Manager:
1) On the left menu bar, click the Select a Certificate Store button:
2) On the right side, it will show the different certificate stores that are configured. Based on what you see in this section, you should use one of the sections below:-
I see the '*SYSTEM' store
If we see the *SYSTEM store we can proceed to Step 3 -
I do not see the '*SYSTEM' store
If we do not see the *SYSTEM store we will need to create it using the instructions in the following document:How to create the *SYSTEM store in DCM
Once the *SYSTEM store exists we can proceed with Step 3 - 3) The following document will guide you through the import process for the PKCS#12 certificate:
-
I see the '*SYSTEM' store
-
How do I renew a third-party TLS certificate?
The following document will guide you through how to renew a third-party TLS Certificate:Renewing a third-party TLS Certificate in Digital Certificate Manager (DCM)
-
How do I renew a local TLS server certificate?
A) First we will need to verify that the Local Certificate Authority is still valid in the 'Local Certificate Authority (CA)' store. On the left menu, click 'Select a Certificate Store'. On the right side of the screen, select the 'Local Certificate Authority (CA)' radio button and click CONTINUE. Provide the store password and click CONTINUE.
B) On the left menu, click Manage Local CA,and then click the View link underneath:
C) Under the 'Additional Information:' section, you should check the 'Validity Period' and make sure that the Certificate Authority is still valid and is not going to expire soon.
If the CA is expired or will expire soon, select the 'Renew' option under 'Manage Local CA' to renew the certificate. It will pull in the existing information on the original certificate authority certificate. Adjust Validity Period of the CA (up to 7300 days) and click CONTINUE. On the 'Install Renewed Local CA Certificate', click CONTINUE. Lastly, on the 'Select Applications to Trust this Certificate Authority (CA)', click the 'Select All' button and then click CONTINUE at the bottom of the page.
D) If a renewal of the Local CA was necessary we will need to use the following document to create a new Local Server certificate (a renewal is not possible since the CA is new):How to create a basic self-signed certificate in DCM
If the Local CA was still valid and no renewal was necessary the following document will lead you through the Local Server certificate renewal process:How to Renew a Local Server Certificate in Digital Certificate Manager
-
How do I renew a Local Certificate Authority certificate?
The following document describes the process for renewing a Local Certificate Authority certificate:How to Renew a Local Certificate Authority (CA) in Digital Certificate Manager (DCM)
-
How do I create a *SYSTEM certificate store?
The following document describes how to create the *SYSTEM store in DCM:How to create the *SYSTEM store in DCM
Alternately,this YouTube video demonstrates how to access DCM and create the *SYSTEM certificate store:
-
How do I create a Local Certificate Authority certificate store?
The following document describes how to create the Local Certificate Authority (CA) store in DCM:How to Create the Local Certificate Authority (CA) Store in DCM
- How do I backup/migrate/replicate my Digital Certificate Management (DCM) environment?
Related Information
Historical Number
673816594
Was this topic helpful?
Document Information
Modified date:
08 September 2022
UID
nas8N1010356