Troubleshooting
Problem
This document includes instructions on setting up Access Client Solutions (ACS) LAN console on the initial installation of a server using the default console IP address. It assumes a stand-alone (non-HMC/SDMC managed) POWER6 or Later server; however, it can be used with a POWER5 server substituting port T5 in place of T1.
Resolving The Problem
This document includes instructions on setting up Access Client Solutions (ACS) on the initial installation of a server using the default console IP address.
The procedure described in this document requires the following minimum release and PTF levels:
IBM i 6.1.1:
o MF55540
o MF55547
These are included in RS-J and later.
Note: With 610 and security restrictions on the IBM i your Java on the PC needs to be running at Java 7 and ACS must be at v1.1.7.3 or older.
IBM i 7.1.0:
o MF54263
o MF55485
o MF55538
These are included in TR5 (RS-F) and later. However, due to security restrictions TR10 or later includes latest Security updates and should be utilized with ACS 1.1.8.0 and later and Java 8 and later.
**NOTE** Older versions have the code in the base but we do recommend being at the latest TR.
-
 Prepare the ACS Workstation
-
 Server Power On
 1. Powering on the server
Note: If the AC cords are connected but the control panel is blank, you may need to remove the power supply shipping brackets. These are the orange brackets located near the power supplies to keep the connectors from damage during shipment. Remove the AC cords, remove the brackets, reseat the power supplies and reconnect the AC cords. The panel should then show it has power.
a. Set the for a manual IPL.- 1. Locate the Server's control panel. Look for the little blue tab on the front of the box; push it to the side, and pull out slowly.
2. Press the Up arrow until you see 02, and press Enter.
3. Press Enter again, and you will see a < move to the N.
4. Press the up arrow and your N will change to an M.
5. Press Enter.
6. Press Enter again. This will bring you back to just 02.
b. Once you have the server set to a manual IPL, push the white power button to power on the server.
c. Continue to the next section to set the console configuration on the system using the control panel. - 1. Locate the Server's control panel. Look for the little blue tab on the front of the box; push it to the side, and pull out slowly.
-
 Set Default IP Address and Console Adapter Location
Note: Read this section completely before performing the steps. When performing the control panel functions, there is a time limit involved. If you take too long between the steps, you may need to start over again or cycle through the different codes more than once.
The system control panel is used to set the console options, including the console type and location of the adapter for the system console. Each sequence of 65-21-11 (enter on each step) will cycle through the different functions shown in the chart below. To "set" one of the functions, you should use a control panel function 21, press Enter, and then use control panel function 11 and Enter to verify the setting. When a function is successfully set, the code ends with letter "C". Successive 65+21+11 sequences must be done within 60 seconds or a time-out occurs. SRC A6XX500D = time-out setting console bit, start over.
Example: You have scrolled through the options using 65<enter>-21<enter>-11<enter> and the control panel now displays A603500A. This is the option for LAN console. To set this option, you should use control panel function 21 and press Enter. Then use the down button to go to function 11 and press Enter. You would see A603500C as a confirmation that the LAN console option was selected.
During the IPL, the system will show C6004031 (searching for console) for 20-30 minutes. Then A6005008 is displayed, meaning no available console. You can either wait for the A6005008 or you may also set the console configuration while the C6004031 is displayed.1. Set manual mode.
If the system is Normal mode (function 01 shows 01 B N), you should perform Steps a-e below. Otherwise, if the system is in Manual mode (01 B M), continue to Step 2.
Place the system in manual mode.
a) Use the up or down arrow buttons on the control panel to go to function 02.
b) Press the Enter button - the cursor should move to the Mode selection (A,B,D).
c) Press the Enter button - the cursor should move to the keylock position (N).
d) Press the Up button to change the selection to M.
e) Press Enter until the display reads 02.
Note: You can check if the upper functions are already available by pressing the down arrow button once. If it did not go to 70 or 69, you need to do Steps 2 and 3. Otherwise, proceed to Step 4.2. Enable control panel functions.
Use the Up button to get to function 25, then press the Enter button. You should see a 00 return code.
Use the Up button to get to function 26, then press the Enter button. You should see a 00 return code.
Note: If you see a FF return code, go back to function 25 and press Enter, then return to function 26 and press Enter.3. Read the current setting.
Issue one 65+21+11 sequence to read the current setting.
A600 500A = No console defined
A601 500A = Twinax console
A602 500A = Direct cable console
A603 500A = LAN console
A604 500A = HMC console
If the SRC = A603500A, skip to Step 5.
For all others, continue to the next step.4. Set console type to LAN.
Issue 65+21+11 sequences until it returns A603500B (lan console).
Use 21+11 to save the setting. A603500C indicates success.5. Set the console adapter location.
Refer to the "console adapter location" you noted earlier in the preparation section. If it is the internal adapter,
use Step 5a. If the adapter location is in a PCI I/O slot location, use Step 5b.
5a. Select console adapter location - Internal HEA port T1.
a) Use 65+21+11 sequences until it returns A6E1500B (clear).
Use 21+11 to save the setting. A6E1500C indicates success.
Console SettingFunction E1Enable embedded port (OPSCONSOLE ENBINTLAN)
5b. Select the console adapter location - external PCI card.
a) Use the 65-21+11 options sequences until it returns A6E2500B (Enable add-on adapter).
Use 21+11 to save the setting. A6E2500C indicates success.
b) Use the 65-21+11 options sequences until it returns A6D1500B (disable the internal embedded port).
Use 21+11 to save the setting. A6D1500C indicates success.
c) Use the 65-21+11 options sequences until it returns A6Bn500B (enable the LAN Adapter in location Cn) where n= the location code of the "Console adapter location".
Use 21+11 to save the setting. A6Bn500C indicates success.
Console SettingFunction E2Enable add-on adapter (OPSCONSOLE ENBEXTLAN) D1Disable embedded port (OPSCONSOLE DISINTLAN) BnEnable LAN adapter in slot Cn (OPSCONSOLE ENBLSLOT n)
Note: This requires that the embedded (internal) LAN flag be off and the external flag be on or you will not see this series.6. Clear adapter address.
Use 65+21+11 sequences until it returns A6C3500B (clear).
Use 21+11 to save the setting. A6C3500C indicates success.7. Set adapter address.
Use 65+21+11 sequences until it returns A6C4500B (clear).
Use 21+11 to save the setting. A6C4500C indicates success.8. Restart
Wait approximately 3 minutes for the edit mode to timeout.
Issue 65+21+11 and verify it returns A603500A (if it does not, issue a 66 and wait approximately 3 minutes).
Use 21+11 to restart. A603500C indicates success.9. The default address should respond to pings in within 3 minutes.
-
 Configure ACS
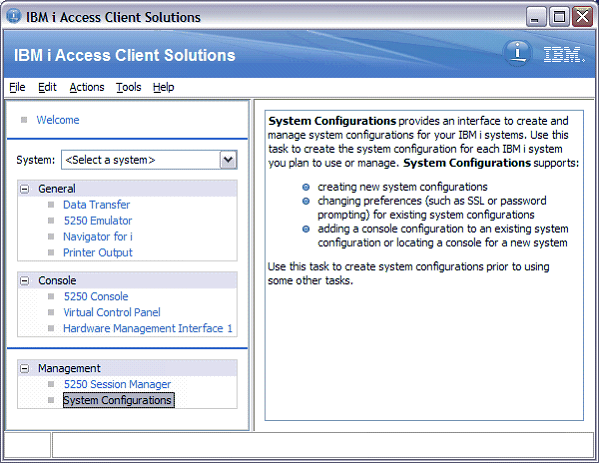
 1. Start ACS 2. Select Management > System Configurations:
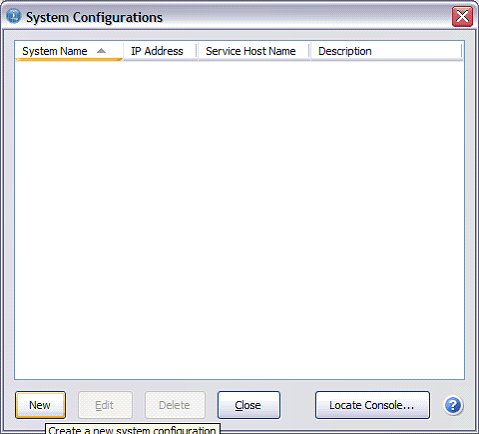
3. Click New to create a new system configuration:
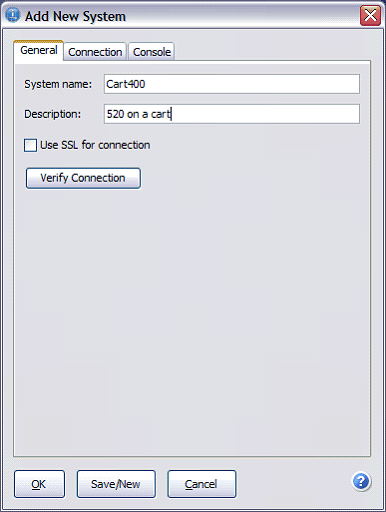
4. Enter a name for the configuration, and then click the Console tab.
Tip: For System name, use the host name or IP address of the TCP interface you plan to configure as the default interface for Telnet and other IBM i OS functions:
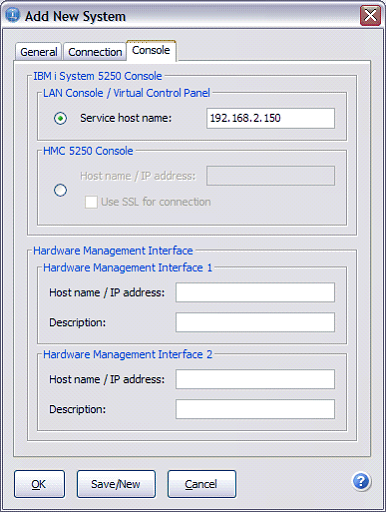
5. Select Service host name, and then type the default IP of 192.168.2.150. Click OK:
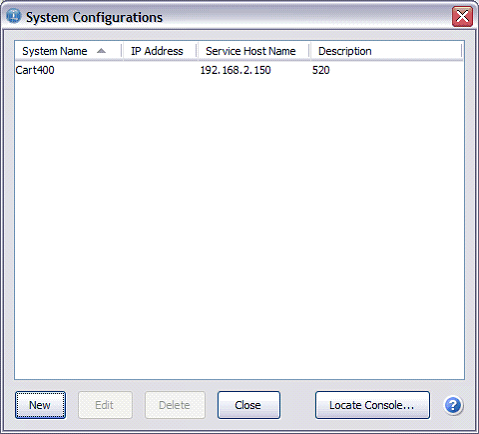
6. On the System Configurations panel, click Close:
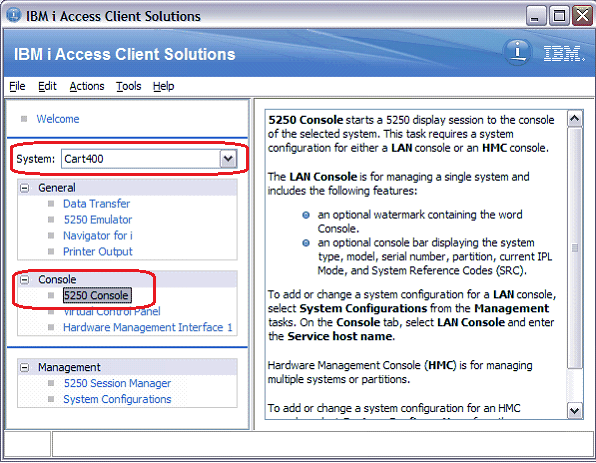
7. Under System, select the name you created in Step 4. Click Console > 5250 Console:
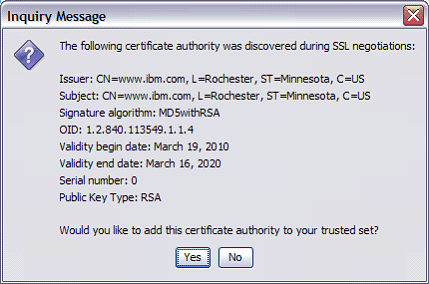
8. If prompted to trust the certificate, click Yes:
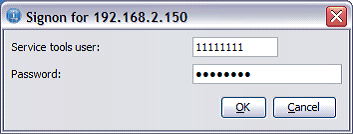
9. Log into service tools using the default ID of 8 1's, password 8 1's:
.10. Wait for the initial screen to paint. This may take a few minutes on a D-mode IPL:
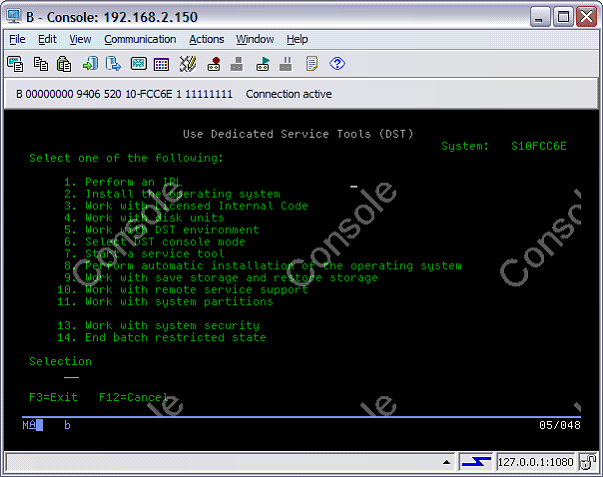
11. (Optional) access remote control panel:
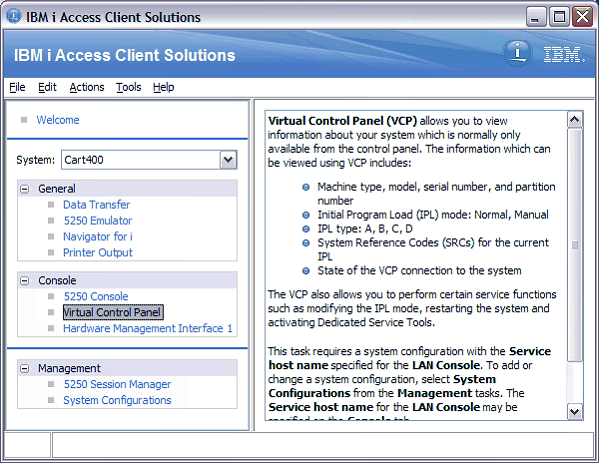
12. This completes the connection configuration.
-
 Completion Steps
IPL and configure the system
Before you IPL, change the service tool LAN adapter (STLA or console LAN adapter) IP address to be a static address.- You can use the 192.168.2.150 if you would like to leave it direct connected as a point 2 point connection.
- Obtain a new static IPaddress for console that is different than the IP address you plan to use for IBM i OS TCP interfaces.
- Do not place an IBM i Ethernet line description on the console resource. Leave the console Ethernet port dedicated to console only.
- If another Ethernet card is available, configure TCP on another card to provide better availability in the case of a hardware failure.
- Configure TCP and verify 5250 telnet is working prior to changing the STLA IP address so that an alternative method to access the system is available.
1. Change the LAN adapter address.a Access SST or DST
SST: 8. Work with service tools user IDs and Devices
DST: 5. Work with DST environment
2. System devicesb SST: 4. Configure service tools LAN adapter
DST: 7. Configure service tools LAN adapterc Enter the new TCP configuration data:
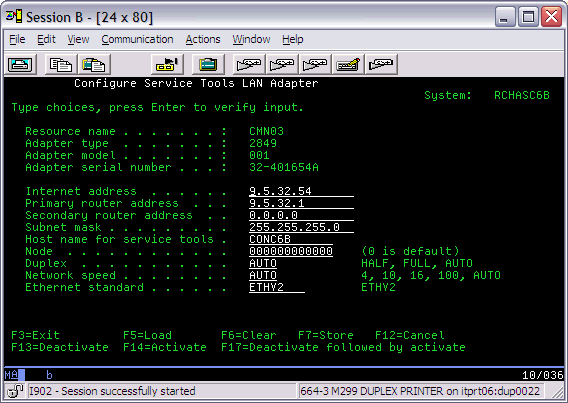
d Press F7 (Store) to save your changes. e Press F17 (F17=Deactivate followed by activate) to apply the changes.
Note: When you press F17, the console connection will drop. The server will restart the console LAN adapter using the new configuration. It should be active within a few minutes (in other words, respond to ping or a console connection).2. Update your TCP/IP settings on the PC
a On the ACS main panel select Management > System Configurations
b Select the system configuration created early, then click Edit
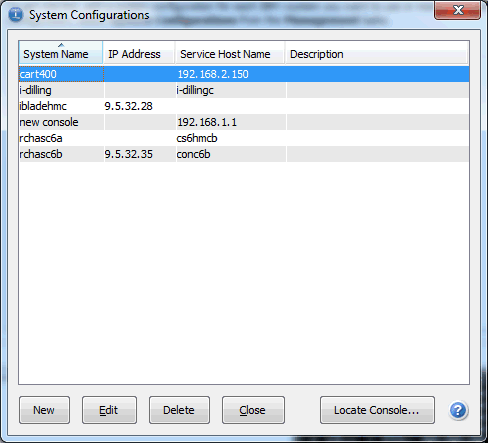
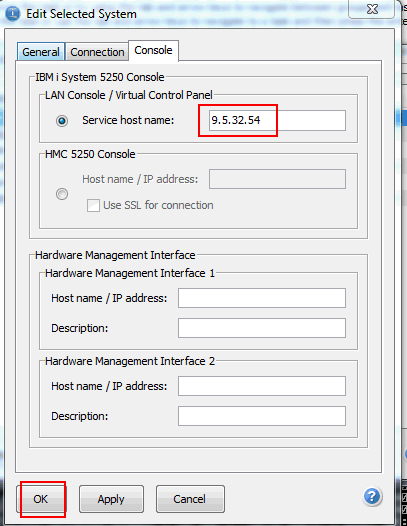
c Click the Console tab. Under Service host name, enter the new IP address (or host name). Click OK.
Tip: On the General tab, edit the system name to match the host name or ip address of the TCP interface you wish to use for telnet and other IBM i OS functions.
-
 Console Setting Reference Information
Below is a table of all the various Console Settings that can be selected using the 65-21 process on the control panel:Console SettingFunction 00No console defined 01Twinax console 02Direct-attached Operations Console 03LAN Operations Console 04Hardware Management Console (HMC) A1Shows current ip address in HEX mode when looking at additional words - convert HEX to DEC to see IP address C3Clearing the resource and configuration for the Operations Console LAN adapter C4Set adapter IP address to 192.168.2.150 - Note: C3 option must be used prior to C4 becoming available A3Deactivating and activating the Operations Console LAN adapter DDDumping Operations Console-related flight recorders to vlogs E1Enable embedded port (OPSCONSOLE ENBINTLAN) E2Enable add-on adapter (OPSCONSOLE ENBEXTLAN) D1Disable embedded port (OPSCONSOLE DISINTLAN) D2Disable add-on adapter (OPSCONSOLE DISEXTLAN) BnEnable LAN adapter in slot Cn (OPSCONSOLE ENBLSLOT n)
Note: This requires that the embedded (internal) LAN flag be off and the external flag be on or you will not see this series.FnEnable asynchronous adapter in slot Cn (OPSCONSOLE ENBSLOT n)
Historical Number
675002182
Was this topic helpful?
Document Information
Modified date:
18 December 2019
UID
nas8N1010341