Troubleshooting
Problem
This document provides information about doing a manual IPL.
Resolving The Problem
This document provides information about doing a manual IPL.
To do a manual IPL, you should do the following:
- If the system is up and running, put it in Manual mode using the front panel controls. For immediately help on the Front Panel Functionality panel, click here: http://www-01.ibm.com/support/docview.wss?uid=nas8N1010051 .
- From the IBM OS/400 command line, type the following:
PWRDWNSYS *IMMED Restart (*Yes)
Press the Enter key. The system shuts down and perform a manual IPL .
- If the system is powered off, put it in Manual mode. Use the front panel, and press the Power Switch/Button.
- Change system value QIPLTYPE to 1. On the OS/400 command line, type the following:
PWRDWNSYS *IMMED Restart (*YES)
Press the Enter key.
Note: Never use front panel function 03 to start an IPL. It can, in rare circumstances, cause errors to occur during the IPL and may also result in not all the standard manual IPL screens being shown. In all cases, ensure the power to the console is active.
When Should I Do a Manual IPL?
The overall reason for doing a manual IPL is to allow more control over that process. For example, the IPL can be paused and data examined or altered, system values can be checked or altered, DASD can be re-configured, PTFs can be applied, and so on.
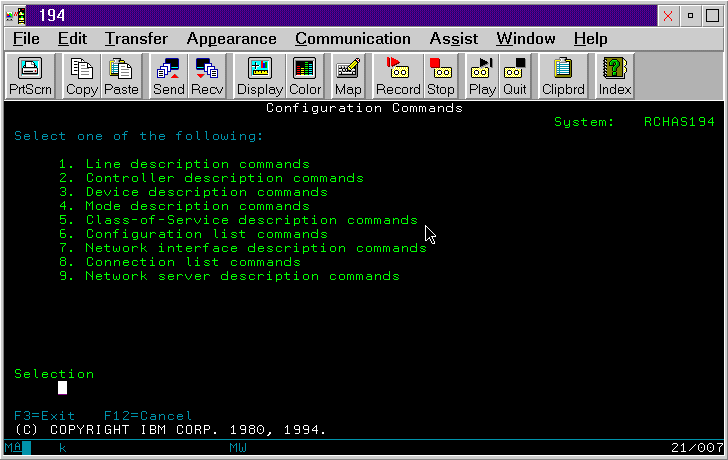
Outline of a Manual IPL
The following is an outline of a manual IPL and the kind of operations that can be performed at each of the screens.
As the IPL progresses, it goes through the SRCC1xxxxxx and SRCC3xxxxxx codes first. These are the lowest levels of either VLIC/HLIC on a CISC system or SLIC on a RISC where the various elements of the system hardware; for example, IOPs and so on are being initialized. The system eventually moves to SRCC6xxxxxx and starts to initialize the system as a system. During this process, the front panel displays 01 B, and the console displays Screen 1 if it is a CISC system or screen 2 if a RISC.
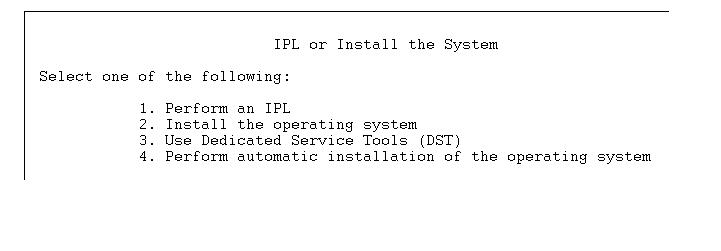
Screen 1
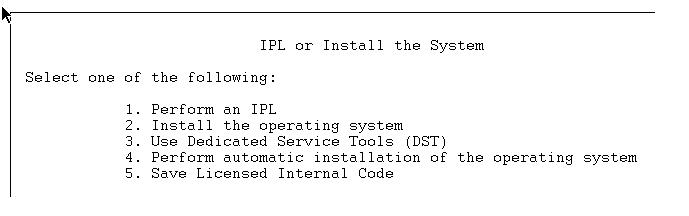
Screen 2
- Perform an IPL
This option does the VLIC recovery phases and passes control to the operating system. The operating system is loaded.
- Install the Operating System
This option is used to perform a manual installation of the operating system from tape. This option is the same as the Perform an IPL option except that the operating system is loaded from the load-source tape/CD device. The current operating system (if any) is replaced. This option is used for installing a new release of the currently installed operating system or for installing the operating system after a failure. This must be run from the primary console and is outlined in the Basic Backup and Recovery Guide in pre-R410 and in the Backup and Recovery Guide for R410.
- Dedicated Service Tools
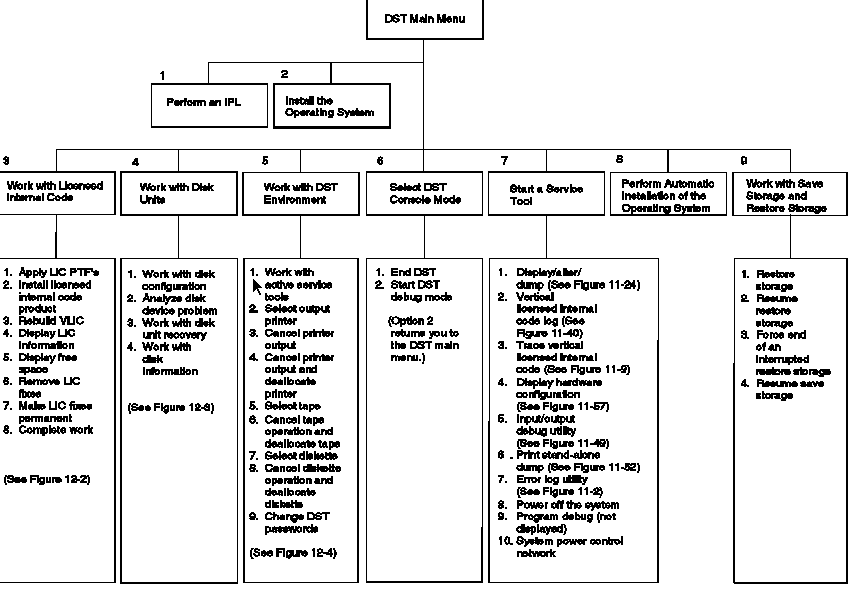
Option 3 takes you to the Dedicated Service Tools (DST). Main passwords for CISC systems are 22222222 for most normal operations or QSECOFR if you wish to reset passwords, both for DST and the operating system. For RISC systems (see Screen 3 below), you are asked for a user ID. Use 22222222. Then, either of the above passwords complete the SignOn to DST. The DST main menu is shown in Screen 3 . The (LIC) Diagnostic Aids Vol. 1 has a lot of additional information on DST (main menu shown below). However, the kind of operations we undertake here are on the lines of DASD reconfiguration using Option 4 on the DST menu, applying PTFs using Option 3, changing Passwords with Option 5, set system up for a Step- Mode IPL using Option 6, and get into Service Tools using Option 7.
Screen 3

Screen 4 is of the main DST menu flow.
Screen 4
Automatic Installation of the Operating System
This option is used only when an auto installation has failed before completion, but after the Licensed Internal Code has been installed.
Save Licensed Internal Code
Available only on RISC systems and is self-explanatory.
Once it has exited the service tools, the system starts to run the rest of the LIC portion of the IPL. If not configuring disks, a Manual IPL is normally taking place because of a system outage or problem. If that is the case, this could well be an Abnormal IPL and, therefore, will spend more time in stages of the IPL than it would otherwise do so. SRCC6004260 is very popular as its Storage Management Directory Recovery. This is where we recover Temp storage. High CPU activity is a sign all is well and the IPL is progressing. SRCC6004204 and SRCC6004205 may also be seen as we resynchronize Mirroring. When the system has reached the SRCC900xxxx region of the IPL, we have reached the operating system portion. The next screen is shown. This is a sign-on screen as shown in Screen 5 below. Sign on as appropriate.
Screen 5
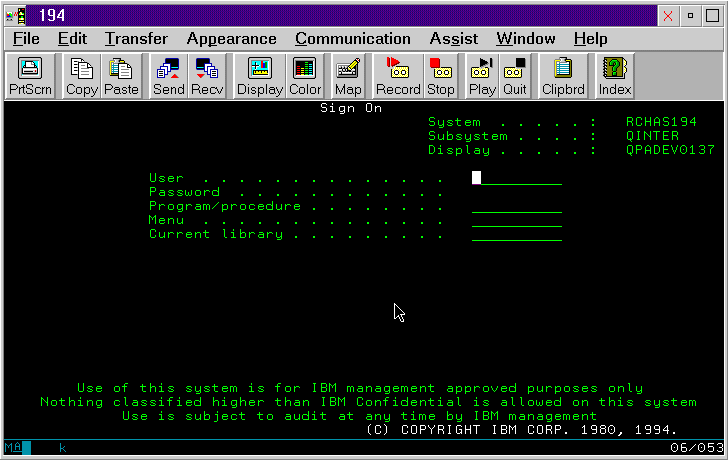
On both CISC and RISC systems, this screen should appear at SRCC9002960 on the front panel. We have run into problems in the past where users were not aware this screen was going to be displayed and assumed their system was stuck in an IPL because their console had gone to screen saver mode and they could not see anything requiring a response. The system continues the IPL once you have signed on and eventually shows the following screen
Screen 6
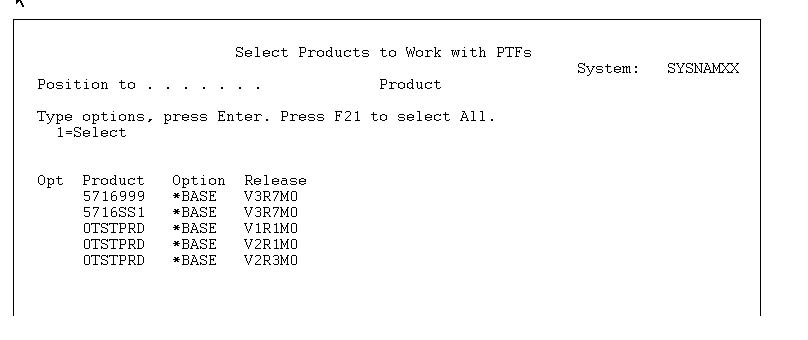
On the Select Products to Work with PTFs screen, select the product for which you want to apply a PTF and continue with the attended IPL. If you do not want to apply a PTF, press F3 (Exit) on the Select Products to Work with PTFs display and continue with the IPL. This screen allows you to perform PTF work on the various Licensed Program Products (LPPs) including OS/400. On a CISC system, it appears when SRCC9002960 is still displayed. For a RISC system, it appears when SRCC9002967 is still displayed.
The next screen is called IPL Options and is shown below in Screen 7.
Screen 7
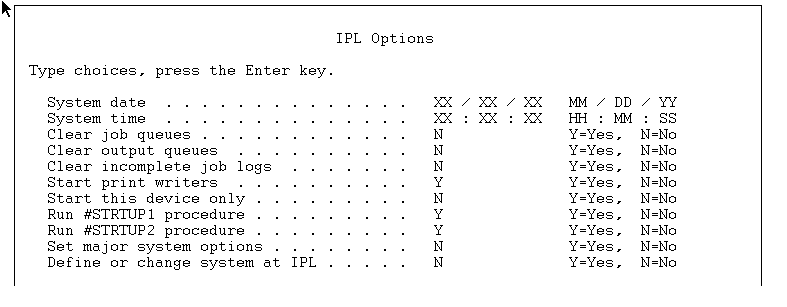
The IPL Options screen is extremely useful from an OS/400 debug perspective. It provides significant control over major parts of the system before they become active. The main options are as follows:
Lines 1 and 2 allow the setting of the system time and date and should be checked as a matter of course. There have been occasions in the past when these settings were wrong and led to a lot of problems later on when scheduled activities did not occur when they should have.
Lines 3, 4, 5, and 6 are very useful in freeing up permanent storage when a system is in dire need of it. Be careful of using the Clear Output Queues (CLROUTQ) command without advising the customer. This will mean the loss of all of their spooled files.
Lines 8 and 9 allow you to change if the Start-up routines run on this IPL. This does not affect the next IPL.
Line 10 allows the changing of major system options. Change this to Y for yes, and press the Enter key shows the following screen.
Screen 8
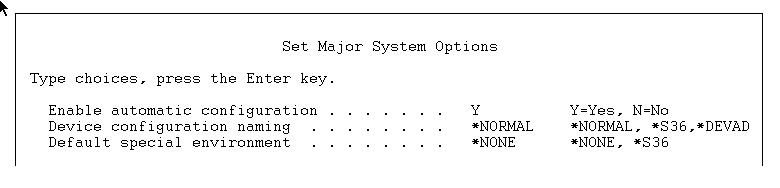
These sub-options allow control over how the system handles configuration devices, and so on.
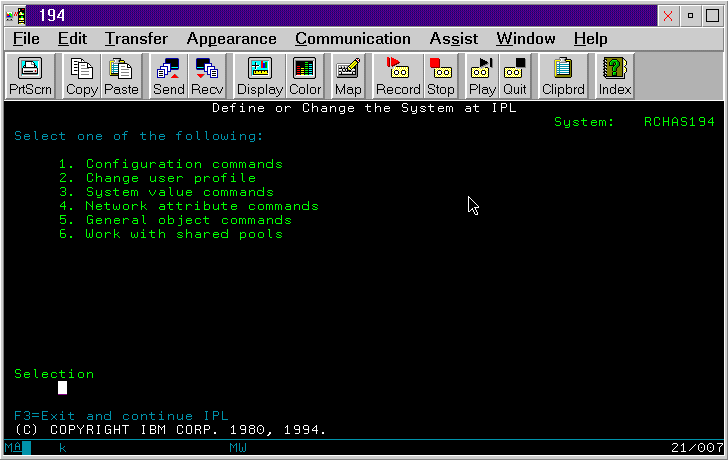
Line 11 is a menu of great beauty in the control it gives you. This is the menu you will get if you select Y for this option.
Screen 9
Option 1 on the Define menu shows this screen
Screen 10
As can be seen, this menu allows you to display and change many of the communications variables on the system to avoid any problems they may be causing.
Option 2 on the Define menu allows changes to any User Profile if you have signed on with sufficient authority
Option 3 on the Define menu allows you to make any changes to System Values. For example, changing QIPLTYPE to 2 as required by some debug techniques for SRCA9002000 problems.
Option 4 on the Define menu allows you to work with your network attributes like the system name, and so on.
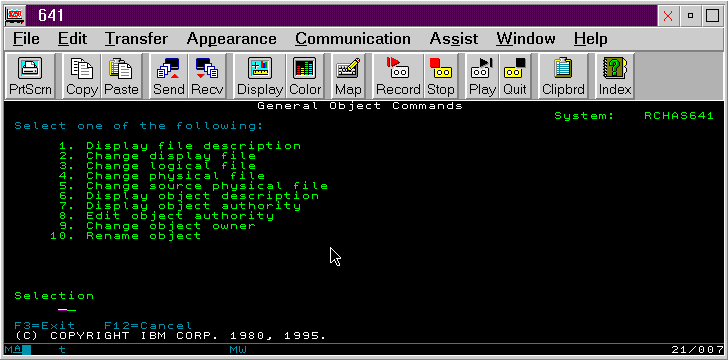
Option 5 on the Define menu allows you to work with various object commands as show below in Screen 11.
Screen 11
Option 6 on the Define menu allows you to make changes to storage pools and provides an alternative to turning on the QPFRADJ system value to make changes to pools during an IPL.
Whatever options are chosen during this phase (or none, as the case may be) all you need to do to have the IPL continue is to press the Enter key on the IPL Options screen or exit from whatever options you may have taken. The system continues its IPL through the rest of the operating system portion. One stage of this is to check the database in use table. If there are any Access Paths that must be rebuilt, the system compiles a list and displays them on a screen of the type shown in Screen 12 below.
Screen 12
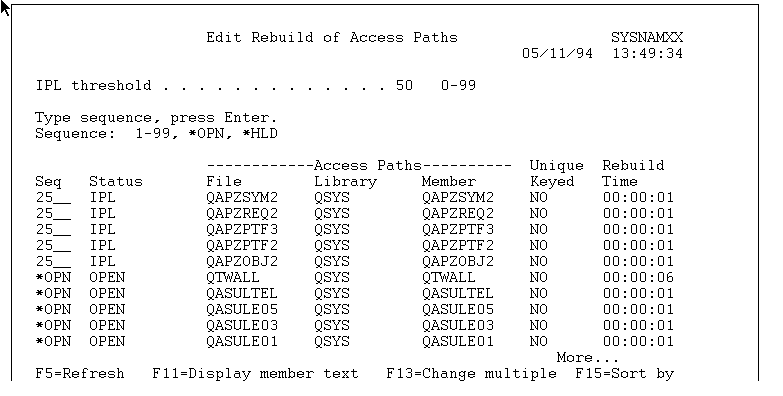
This screen allows you control over the access path rebuild during the IPL. The system is dedicated at this time so the process will be much faster than leaving it until the system is fully up and running. At that point, the rebuild (although very high priority) must contend with other system activities and could affect overall system performance. The IPL threshold is a value from 1 through 99 that can be set (default is 50), which indicates that access paths with a sequence less than or equal to the number specified will be rebuilt at IPL time. If the IPL threshold changes, all access paths with a status of IPL and AFTIPL are changed to reflect the new status of the IPL threshold. In many cases, having this screen display during an IPL after a system outage is the main reason for doing a manual IPL because of the control it gives you over the Access path issue. Customers will have the following choices of action at this point.
| o | Check Access path status and leave as they are by pressing the Enter key to continue. |
| o | Rebuild all Access paths by changing the SEQ value to less than the threshold shown at the top of the screen. |
| o | Rebuild any critical access paths during this phase of the IPL, and leave all others to be dealt with when the system is back up by either letting the *OPN or AFTIPL settings in SEQ take effect or use EDTRBDAP to change their rebuild. |
Screen 13
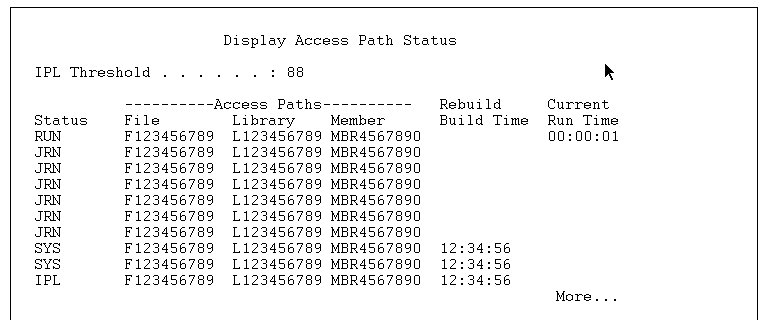
If you press F3 (Exit and continue IPL), the access paths are rebuilt while the IPL continues. If you press F12 (Cancel), you return to the Edit Rebuild of Access Paths display. Every 5 seconds, the display is updated with the current run time. After all the access paths have been rebuilt (access paths with a sequence less than or equal to the IPL threshold), the IPL continues.
Very similar to the Access paths screen is the EDIT Check Pending Constraints display which are displayed if there are any restraints detected that need to be verified. A constraint is an attribute that places a restriction or limitation on a physical file. Screens 14 and 15 are displayed if you detect any and decide to rebuild them during the IPL.
Screen 14
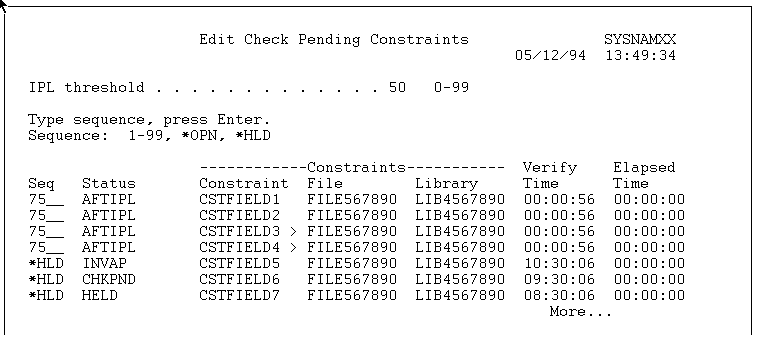
Screen 15
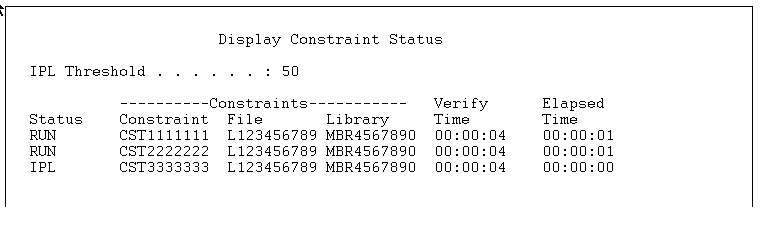
The Constraints screen is not often encountered during a manual IPL.
If this IPL is taking place after a system crash, you may start to receive messages on the console as we near completion. Make a note of these; however, on the whole, bypass. When the system displays a Main Menu, the IPL has completed. Your last step is to go back to the front panel and ensure that the system is put back to the Normal mode if necessary.
[{"Type":"MASTER","Line of Business":{"code":"LOB57","label":"Power"},"Business Unit":{"code":"BU058","label":"IBM Infrastructure w\/TPS"},"Product":{"code":"SWG60","label":"IBM i"},"Platform":[{"code":"PF012","label":"IBM i"}],"Version":"6.1.0"}]
Historical Number
9473331
Was this topic helpful?
Document Information
Modified date:
18 December 2019
UID
nas8N1010050